
Domotz Agent Installation on Virtual Box (VM)
This section contains a few tips and tricks on how to get started with the Domotz Agent on your Virtual Box.
Installing the Domotz Agent
Step 0 – Download the VM Image:
1.Download the VirtualBox image from here:
- US Mirror: domotzpro-ubuntu-24.04.2-x64-4.9.2-7.4.2-b001-204-virtualbox_2025.zip
- EU Mirror: domotzpro-ubuntu-24.04.2-x64-4.9.2-7.4.2-b001-204-virtualbox_2025.zip
2. Unzip it in a location of your choice.
Step 1. Import Appliance:
After the download has finished, open Oracle VM VirtualBox Manager (which you need to have previously installed on your system), and from the File menu select Import Appliance:
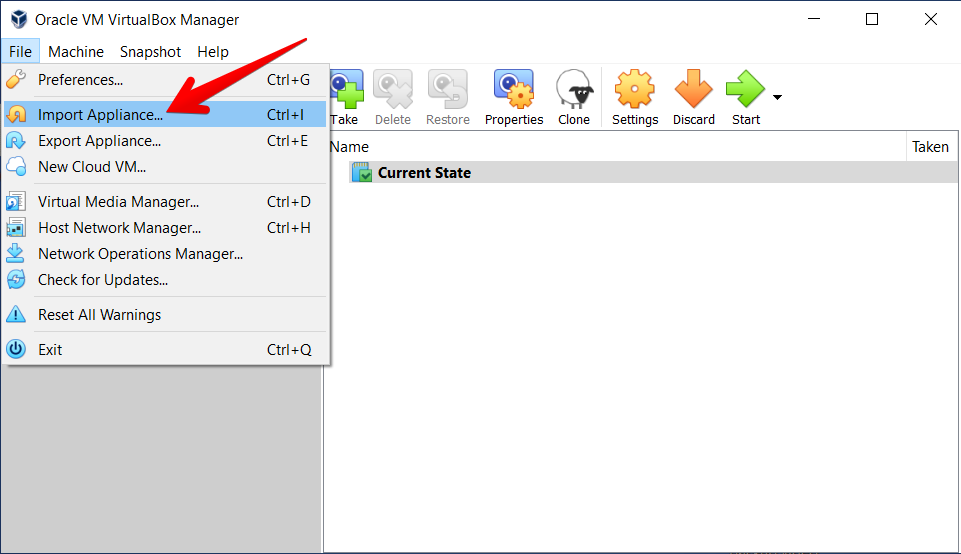
How to Import an Appliance in Oracle VM VirtualBox Manager
1. Open Oracle VM VirtualBox Manager.
2. Navigate to the menu bar at the top, and click on "File."
3. From the drop-down menu, select "Import Appliance..."
4. This option allows you to import virtual machines saved as an appliance. Use it when you need to add a pre-configured virtual machine to your environment.
Search for the downloaded file:
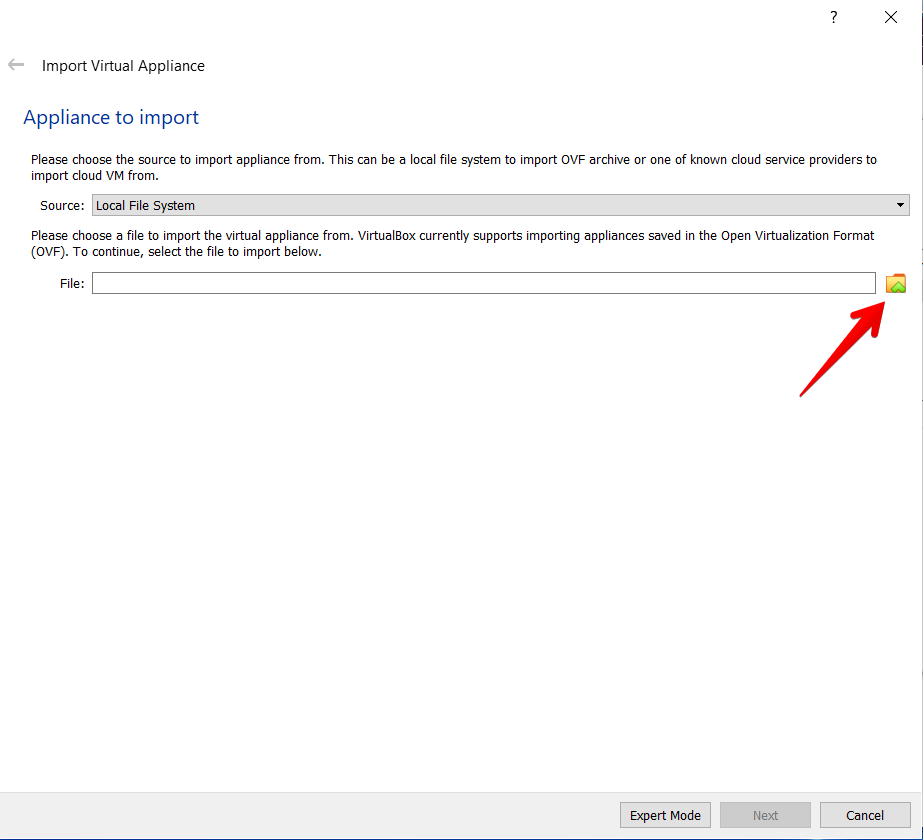
Importing a Virtual Appliance in VirtualBox
1. Open the "Import Virtual Appliance" window in VirtualBox.
2. Under the "Appliance to import" section, select the source for importing the appliance by choosing "Local File System" from the "Source" drop-down menu.
3. To import a virtual appliance, click the folder icon next to the "File" input field to browse and select a file saved in the Open Virtualization Format (OVF).
4. After selecting the file, click "Next" to proceed or "Cancel" to exit the process. You can also switch to "Expert Mode" for more options.
Select the downloaded .ova file:
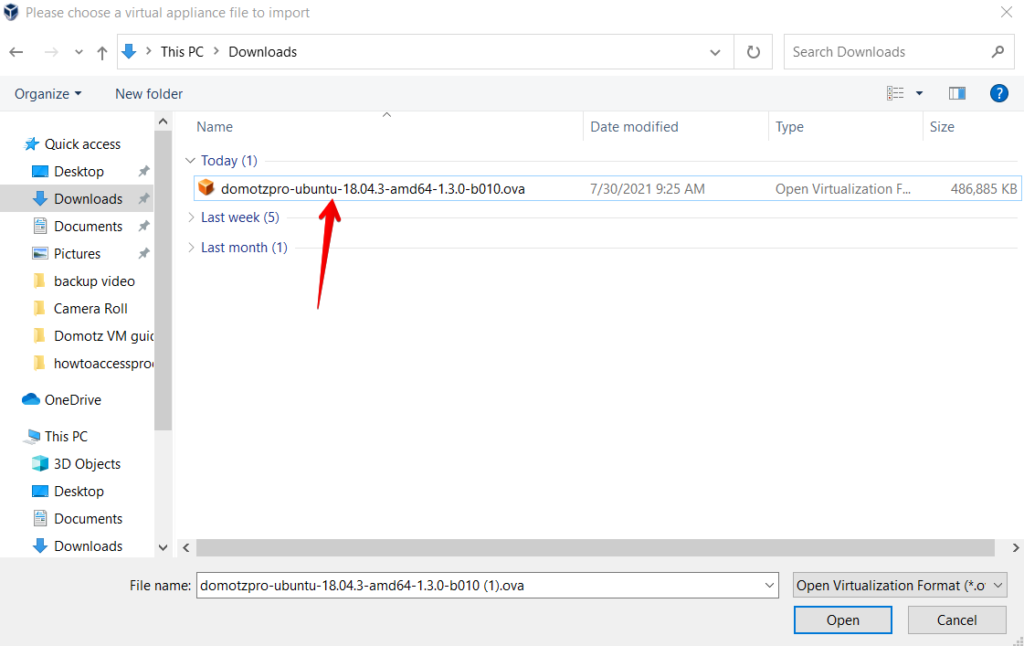
Importing a Virtual Appliance File
1. Navigate to the "Downloads" folder in the file explorer sidebar.
2. Locate and select the file named "domotzpro-ubuntu-18.04.3-amd64-1.3.0-b010.ova" from the list. It's in the section labeled "Today."
3. Verify the file type is "Open Virtualization Format" and check the size is 486,885 KB.
4. Click the "Open" button at the bottom right to import the selected virtual appliance file.
and import the Domotz Agent Virtual box image and click Next:
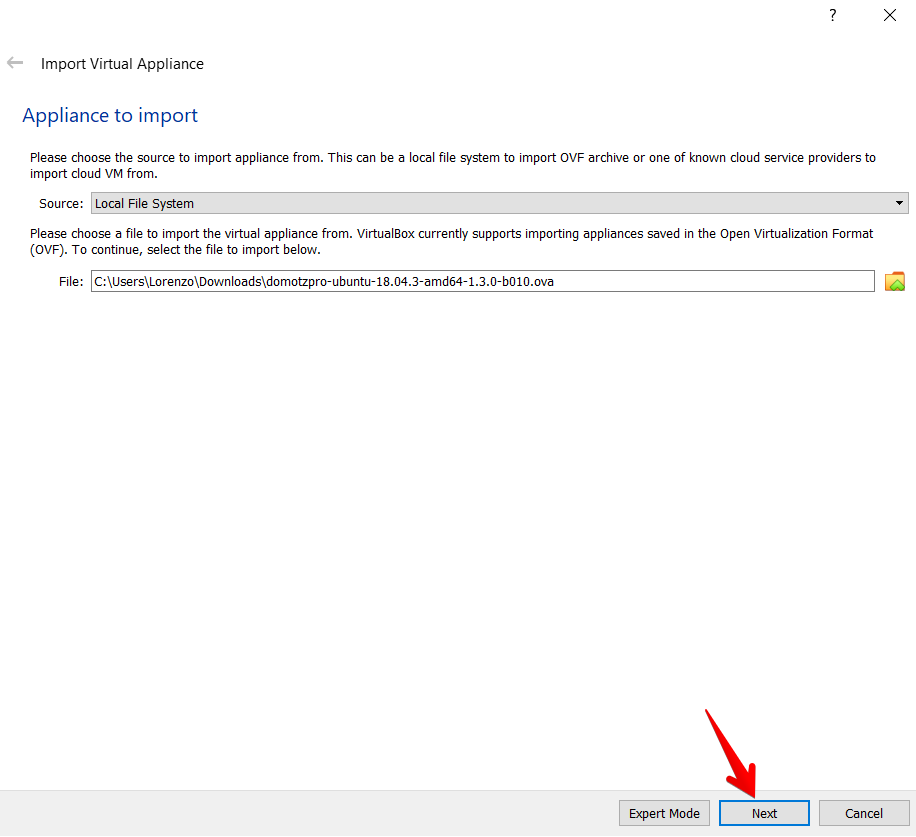
Importing a Virtual Appliance in VirtualBox
1. Choose the source to import the appliance from by selecting "Local File System" in the Source dropdown menu.
2. Specify the file to import by typing or selecting the path to the desired .ova file in the File field. In this example, the file path is "C:\Users\Lorenzo\Downloads\domotzpro-ubuntu-18.04.3-amd64-1.3.0-b010.ova".
3. Click the "Next" button to proceed with importing the virtual appliance.
Step 2 – Edit the VM settings:
When the import process is finished, please edit the VM settings:
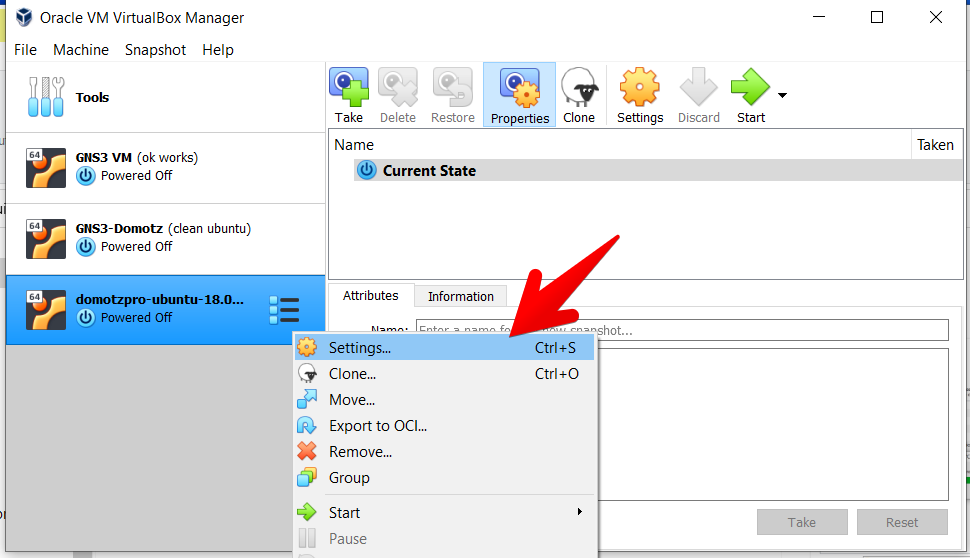
Accessing the Settings menu in Oracle VM VirtualBox Manager.
1. In the Oracle VM VirtualBox Manager, locate the list of virtual machines on the left panel.
2. Select the virtual machine named "domotzpro-ubuntu-18.0" which is shown as Powered Off.
3. Right-click on the selected virtual machine to open a context menu.
4. In the context menu, choose the "Settings" option to access the configuration settings for the selected virtual machine.
Select the Network settings:
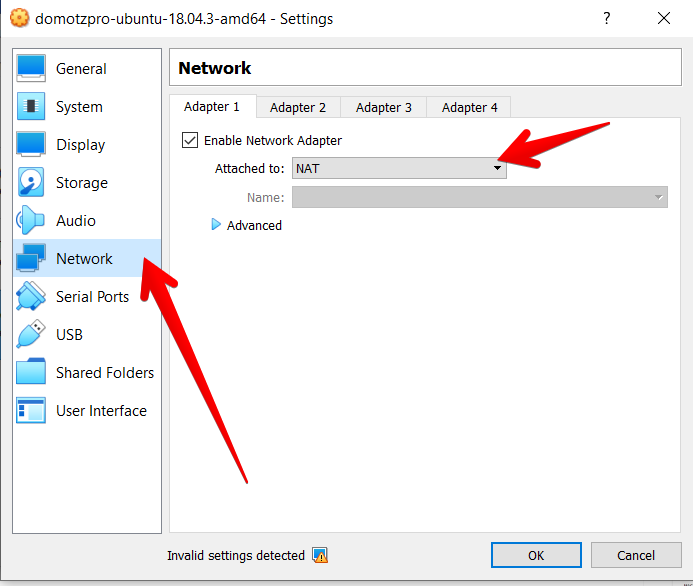
Virtual Machine Network Adapter Settings
1. In the virtual machine settings window, select "Network" from the left-hand menu.
2. Ensure "Enable Network Adapter" is checked.
3. Use the "Attached to" dropdown menu to select the network type; in this case, "NAT" is selected.
4. Click "OK" to save the changes.
Change the NAT network to Bridge and click OK:
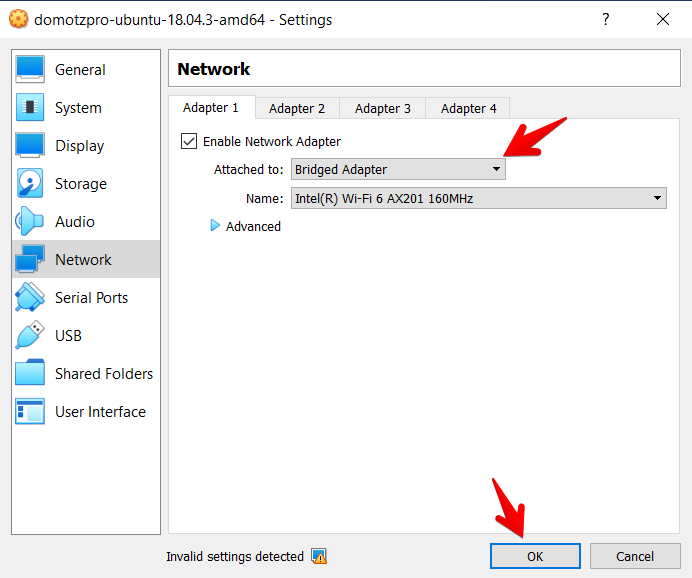
Network Adapter Configuration in Virtual Machine Settings
1. Open the settings window of your virtual machine and select the "Network" tab from the left-hand menu.
2. Ensure the "Enable Network Adapter" checkbox is selected.
3. In the "Attached to" dropdown, choose "Bridged Adapter" to allow the virtual machine to share the host's network connection.
4. Confirm the network adapter's name under "Name," which is shown as "Intel(R) Wi-Fi 6 AX201 160MHz."
5. Click "OK" at the bottom to apply the changes.
In case you want to monitor Windows TAP L2VPN configured interfaces, please jump to the NAT setup paragraph.
Now you can start the VM:
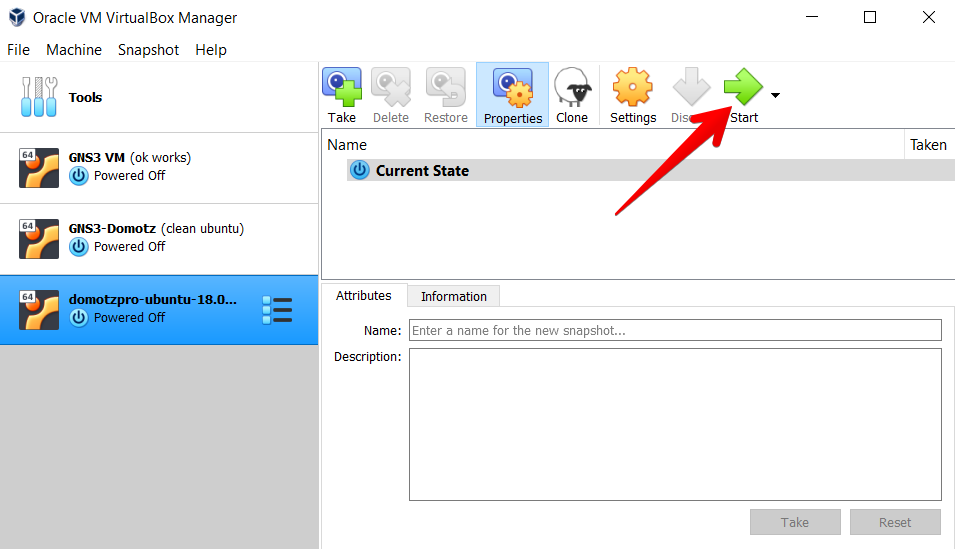
Starting a Virtual Machine in Oracle VM VirtualBox Manager
1. Open Oracle VM VirtualBox Manager.
2. In the left panel, select the virtual machine you wish to start. Ensure it is "Powered Off."
3. At the top of the window, click the "Start" button, indicated by a green arrow, to power on the selected virtual machine.
4. Monitor the "Current State" label to confirm the machine's status changes from "Powered Off" to "Running."
This process initiates the virtual machine, allowing access to the VM's system and resources.
Step 3 – Setting up the IP address:
After the VM has started login as
username: domotz
password: domotz
and issue the ifconfig command in order to see the IP address of your Domotz Agent:
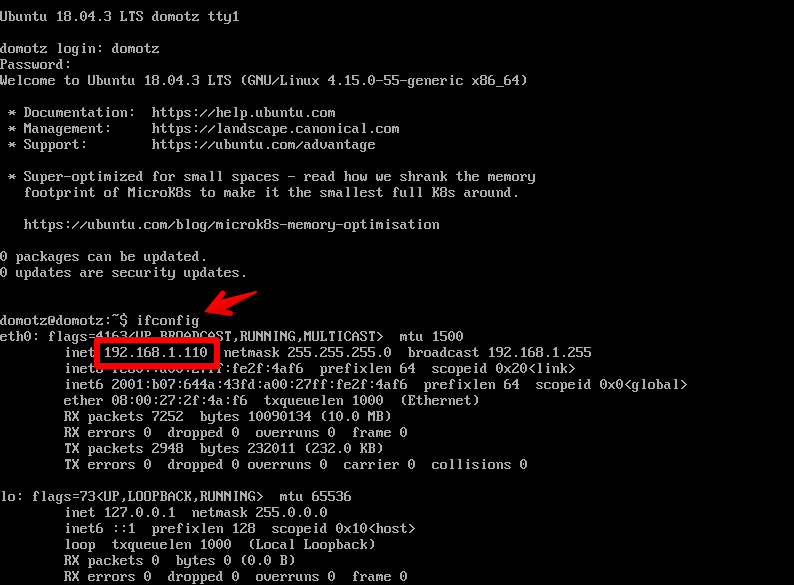
Viewing IP Address in Ubuntu Terminal
1. Open the terminal on your Ubuntu system and log in.
2. Enter the command `ifconfig` to display network configuration details.
3. Look for the section labeled `eth0`, which contains network interface information.
4. Identify your device's IP address within `eth0` by noting the `inet` line, specifically the IP address `192.168.1.110`. This is the local IP address assigned to the device.
Now you can connect to the Domotz Agent using your browser using the IP you got with the ifconfig command followed by the 3000 port.
In this case, we will use the address http://192.168.1.110:3000/
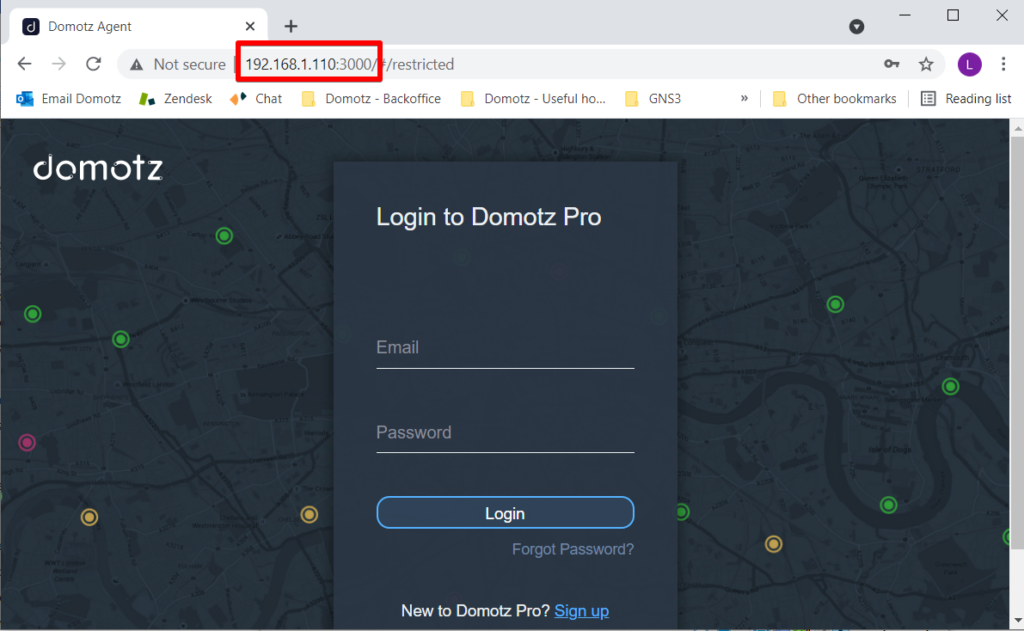
Login to Domotz Pro.
1. Open a web browser and enter the URL: `192.168.1.110:3000/restricted`.
2. You will be directed to the Domotz Pro login page.
3. Enter your email in the "Email" field.
4. Enter your password in the "Password" field.
5. Click the "Login" button to access your account.
6. If you are new to Domotz Pro, click "Sign up" to create a new account.
NAT setup: Configuration for Windows TAP L2VPN
In case you have windows based TAP Layer2 VPNs you should use the NAT network in order to have Domotz scan your connected VPNs.
Step 1:
To do this go to the Network settings of your virtual machine and please select Attached to NAT (1), then Advanced (2), then click on the Port Forwarding (3) button:
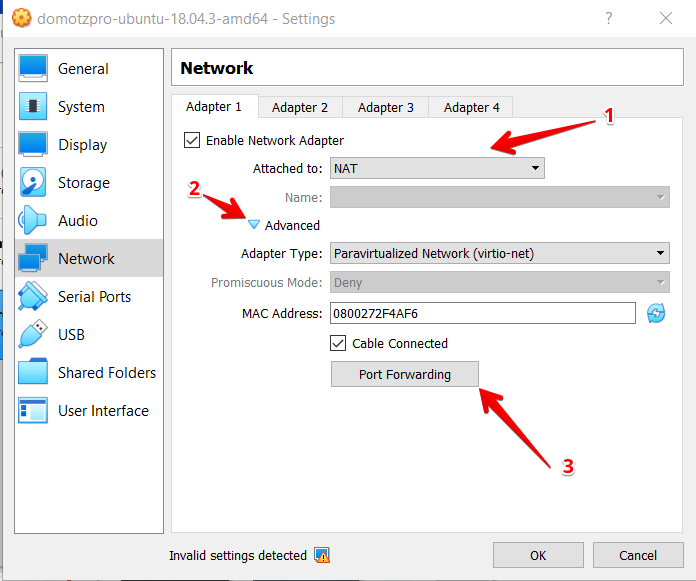
Network Configuration for Virtual Machine
1. In the Network settings, ensure the "Enable Network Adapter" checkbox is selected. Choose "NAT" from the "Attached to" dropdown menu.
2. Click on "Advanced" to reveal additional settings.
3. Select the "Port Forwarding" button to configure port forwarding rules.
Complete the configuration by clicking "OK" to save settings or "Cancel" to discard changes.
Then insert these values by clicking on the + button at your right:
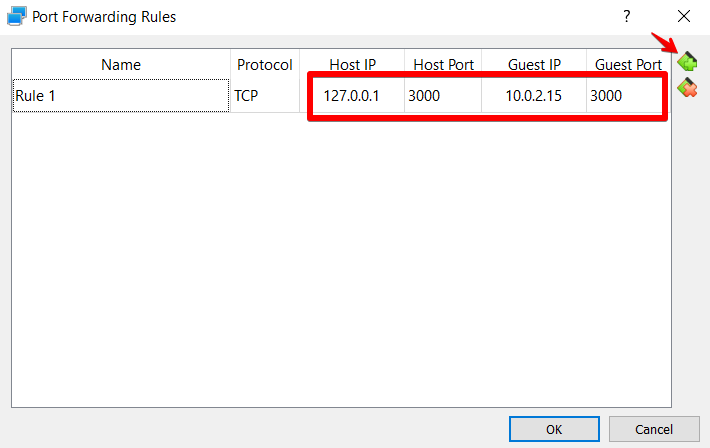
Port Forwarding Rules Configuration
1. Locate the "Port Forwarding Rules" window, which lists existing rules.
2. Identify the rule under the "Name" column, labeled as "Rule 1."
3. Ensure the protocol is set to "TCP."
4. Check the "Host IP" field for the address "127.0.0.1."
5. Confirm the "Host Port" is set to "3000."
6. Verify the "Guest IP" is "10.0.2.15."
7. Ensure the "Guest Port" matches "3000."
8. Use the green add and red delete buttons on the right to modify rules as needed.
9. Click “OK” to save changes or “Cancel” to exit without saving.
Step 2:
Start the VM and you will be able to access the Domotz Agent at http://127.0.0.1:3000
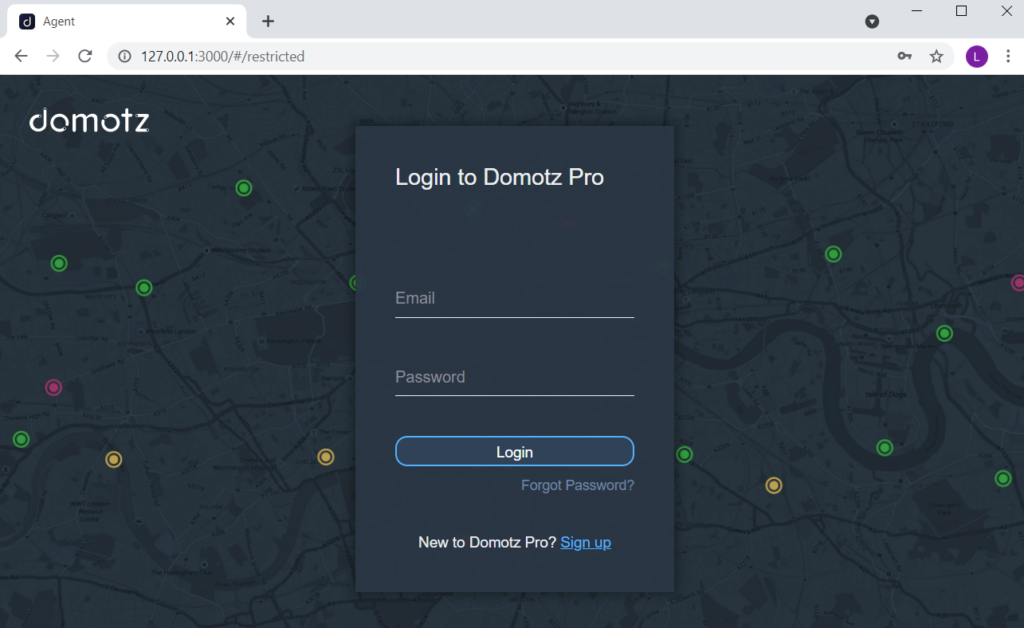
Domotz Pro Login Screen
1. Enter your email address in the "Email" field.
2. Enter your password in the "Password" field.
3. Click the "Login" button to access your account.
4. Use the "Forgot Password?" link if you need to reset your password.
5. If you are new to Domotz Pro, click "Sign up" to create an account.