
The RBAC feature in Domotz lets you control what each User can do and which resources they can reach. Each User gets only the access they need for their job, which improves security and makes it easier to manage Users across different teams or clients. Access is defined with Access Sets, which can be read-only, admin-level or fully custom.
Enabling RBAC
How to Enable Access Management (RBAC)
If your account uses the Team Management system and is eligible, the account owner will see a banner on the Team page in the Domotz portal with an option to enable RBAC. Before enabling it, read the sections below on unsupported accounts and what happens during migration.

Team Management Section Overview
1. The section introduces the ability to manage team members using Domotz Pro, providing controlled access to Collectors, Sites, or Networks.
2. A new feature, Granular Role-Based Access Control, is highlighted as available for use.
3. Users can assign permissions by Group and Access Sets.
4. Two options are provided: "Learn more" to get additional information, and "Enable functionality" to activate the feature.
Unsupported Account Types and Functions
The following aren’t supported for Access Management (RBAC). Contact support@domotz.com for more information and assistance.
Company Structure Accounts: Accounts that use the company structure to manage collector access and migration between accounts/teams aren’t supported by RBAC at this time. If you’d like to use RBAC to more tightly control User permissions, contact us and we can discuss the transition with you.
Collector Collaboration and Collaborated Collectors: You can’t enable RBAC yourself if your account has collaborated collectors with other Users, or has access to collaborated collectors.
- RBAC replaces the need for collaboration. It lets you give external Users access to your Domotz account and tightly control their permissions.
- If RBAC is enabled for these accounts, Users lose the ability to manage collector collaboration and lose access to any collaborated collectors.
- We can help you move from collaboration to adding these Users directly to your account with RBAC, with the right permission levels.
What Happens When You Enable RBAC
When the account owner enables RBAC from the Team Management menu, a pop-up explains the process. Once they confirm, RBAC is enabled and Users are migrated as follows to preserve your current access:
- Account Owner: Added to the Administrators Group and given the Administrator Access Sets, with full access to all features and settings, including subscription and Access Management (RBAC). This Group’s permissions can’t be changed, but you can add other Users to it to give them full access.
- Team Members: Added to a Team Members Group and given the Team Member Access Sets. These mirror their current permissions, so they exclude Access Management (RBAC) and Billing.
- Field Operators: Migrated as Users only, with no Groups or Access Sets. Save their collector assignments before you enable RBAC. You’ll need to create and assign Groups and Access Sets afterwards to restore their access.
The Access Management (RBAC) menu then replaces the Team Management menu. At first, only the Account Owner can see it. From there, you can review existing Users and their assignments, review the default Groups and Access Sets, and create your own.
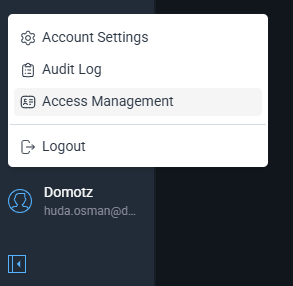
User Account Menu Options
1. Select "Account Settings" to modify your personal settings.
2. Choose "Audit Log" to view the record of activity.
3. Click "Access Management" to manage user permissions.
4. Use "Logout" to sign out of your account.
5. The user profile section at the bottom displays the username, "Domotz," and the email, partially shown as "huda.osman@d...".
How RBAC Works
RBAC has three components:
- Users: Individual people who access the Domotz platform. Users can be assigned to Groups, directly to Access Sets, or both.
- Groups: Collections of Users (e.g., Field Technicians, Network Admins). Access Sets assigned to a Group apply to every User in it, so you can manage many Users at once.
- Access Sets: Sets of permissions that define what Users can do and which resources they can do it on. Access Sets can be assigned to Groups or directly to Users.
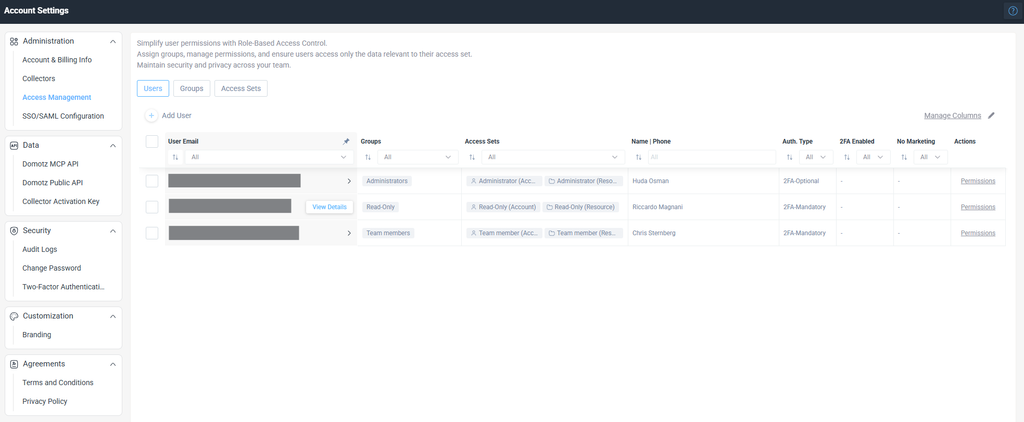
Account Settings - Role-Based Access Control
1. Navigate to the "Account Settings" panel on the left sidebar. Here, you can manage various settings under categories like Administration, Data, Security, Customization, and Agreements.
2. Under "Administration," select "Access Management" to manage user permissions.
3. At the top, there are two tabs: "Users" and "Access Sets." Ensure the "Users" tab is selected to view and manage individual user permissions.
4. You can add new users by clicking the "+ Add User" button.
5. Below, there's a table listing user details, including User Email, Groups, Access Sets, Name, and Phone. Use filters above each column to sort or search specific entries.
6. For each user row, view or modify permissions using the "Permissions" link in the "Actions" column.
Types of Access Sets
There are two types of Access Sets, which work together:
- Account Access Sets define what Users can do across your Domotz account. They don’t target specific collectors, devices or dashboards. Permissions include:
- Organization, tag and custom filter management
- Billing and Branding management
- Alert settings for managing alert profiles and contact channels
- Integration settings for managing integrations and drivers
- Device Profile access to view, manage and apply profiles to devices
- Resource Access Sets define which collectors, devices and dashboards Users can access, and what they can do with them. Permissions include:
- Collector access to all or only selected collectors and their devices
- Collector Configuration to manage collector settings, VPN connections and device deletion. When restricted, all collector settings are read-only.
- Device Management. When restricted, devices are read-only.
- Dashboard access to view or manage all or selected dashboards
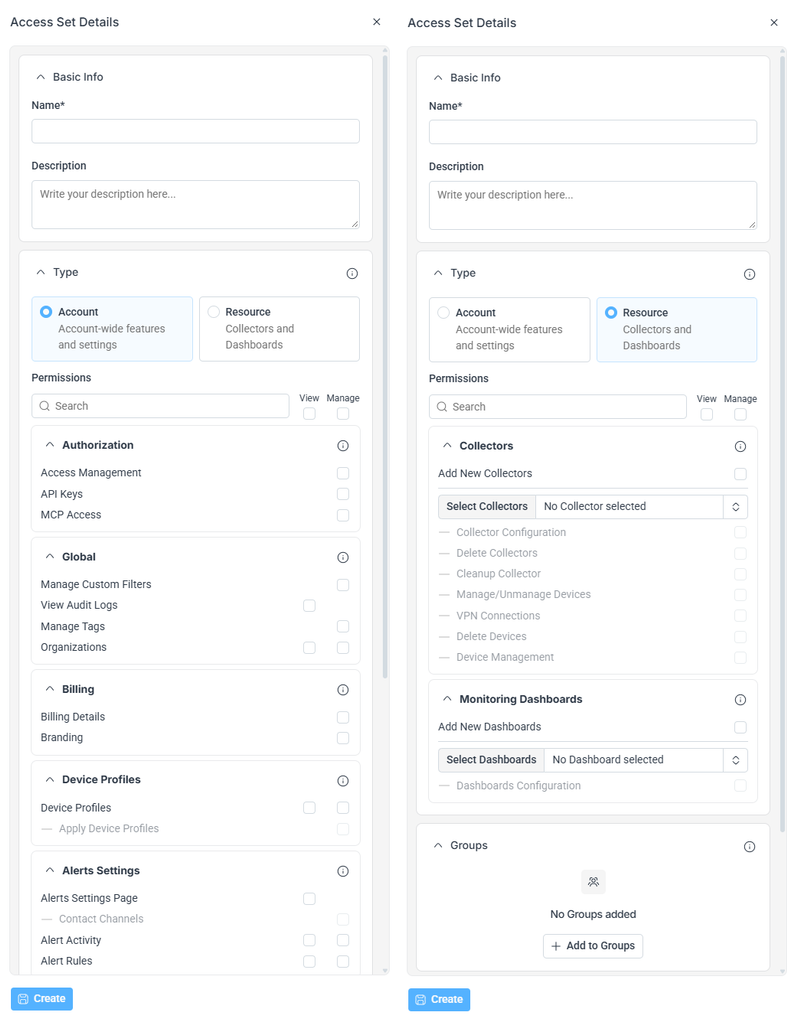
Setting Up Access Set Details in a Software Interface
1. Enter Basic Information:
- Fill in the "Name" field.
- Optionally, add a description in the "Description" field.
2. Select Access Type:
- Choose between "Account" for account-wide features and settings, or "Resource" for collectors and dashboards.
3. Adjust Permissions:
- Use the search bar to find specific permissions.
- Under "Account," enable permissions such as Authorization (Access Management, API Keys, MCP Access), Global (Manage Custom Filters, View Audit Logs, etc.), Billing, Device Profiles, and Alerts Settings.
- Under "Resource," configure Collectors by adding and selecting collectors. Configure Monitoring Dashboards by selecting suitable dashboards.
4. Manage Groups:
- If needed, add the access set to groups by selecting "+ Add to Groups."
5. Finalize Configuration:
- Once all selections and entries are made, click the "Create" button to save the access set details.
How Permissions Are Combined
- Access Sets stack. A User gets the permissions of every Access Set assigned to them, directly or through their Groups. You can assign more than one Access Set of each type to the same User or Group.
- The highest level of access wins. If the same permission is set differently in more than one Access Set, the User gets the higher level. For example, if one Access Set denies Collector Configuration and another grants it, the User can manage Collector Configuration.
- Account permissions only apply to resources the User can access. If an account permission involves collectors, devices or dashboards, it only applies to the resources in that User’s Resource Access Sets. For example, a User who can set alert profiles can only do so for Collectors they can access.
- Each Resource Access Set applies the same permissions to every resource in it. To give different permissions for different resources, create separate Resource Access Sets.
User Settings
- Permissions Overview: Use Actions > Permissions on a User to see every permission they’ve been granted.
- No Marketing Communications: Use this for Users who shouldn’t receive marketing emails or product updates from Domotz, such as your customers. This doesn’t affect their access or permissions in the account.
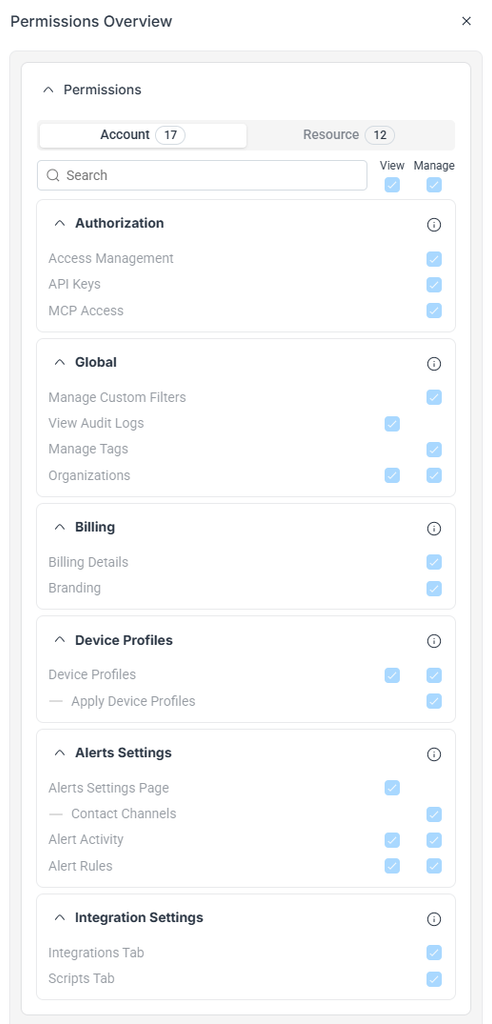
Permissions Overview Interface
1. At the top, choose between "Account" with 17 permissions and "Resource" with 12 permissions.
2. Use the search bar below to find specific permissions.
3. The "View" and "Manage" checkboxes allow setting specific access levels.
Authorization Section:
- Access Management: Enable both view and manage permissions.
- API Keys and MCP Access: Both can be viewed and managed.
Global Section:
- Manage Custom Filters, View Audit Logs, Manage Tags, and Organizations: Enable both view and manage permissions.
Billing Section:
- Billing Details and Branding: Both view and manage permissions are enabled.
Device Profiles Section:
- Device Profiles: Enable both viewing and managing.
- Apply Device Profiles: Only view permission is enabled.
Alerts Settings Section:
- Alerts Settings Page: Enable both view and manage permissions.
- Contact Channels: Only view permission is enabled.
- Alert Activity and Alert Rules: Both are viewable and manageable.
Integration Settings Section:
- Integrations Tab and Scripts Tab: Enable both viewing and managing permissions.
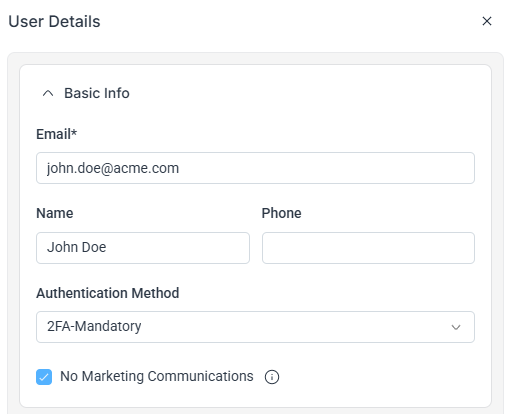
User Details Configuration Form
1. Enter the user's email address in the "Email" field.
2. Fill in the user's name in the "Name" field.
3. Optionally, add the user's phone number in the "Phone" field.
4. Select the authentication method from the "Authentication Method" dropdown; here, it shows "2FA-Mandatory."
5. Check the box labeled "No Marketing Communications" to opt the user out of marketing emails.
Default Groups and Access Sets
When RBAC is enabled, a set of default Groups is created. Each one has its own Account Access Set and Resource Access Set. You can use them as examples, edit them, or create your own.
- Administrators: Full Global, Account, Collector and Device permissions. The Administrator Access Sets are the only Access Sets that can’t be edited or deleted, and their link to this Group can’t be changed. You can add more Users to this Group, or assign the Administrator Access Sets to other Groups.
- Team Members: All Administrator permissions except Access Management (RBAC), API Keys, Billing and Branding.
- Read-Only: View-only access to all Collectors, Devices and Dashboards. No Global or Account level permissions.
- Billing: Billing Management only. All other permissions are restricted.
- Manager: Read/Write access to all Collectors, Devices and Dashboards. No other management permissions.
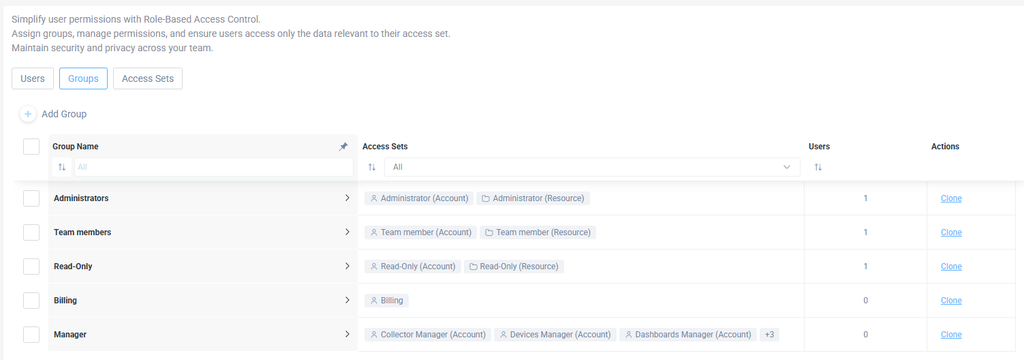
Manage user permissions with role-based access control settings.
1. Navigate to the "Groups" tab to manage different user groups.
2. Use the "Add Group" button to create a new group, entering a unique group name.
3. In the "Group Name" column, view existing groups such as Administrators, Team members, Read-Only, Billing, and Manager.
4. The "Access Sets" column displays associated permissions, like Administrator (Account), Team member (Account), etc., which define user permissions.
5. Check the "Users" column to see how many users are assigned to each group.
6. Use the "Actions" column to clone existing groups for quick duplication of settings.
Recommended Approach: Access Set Stacking
Instead of creating a unique Access Set for every combination of access and permissions:
- Create a standard Account Access Set (e.g., Tech-Permissions).
- Create Resource Access Sets for different collectors, devices and dashboards (e.g., Region-A-Access, Region-B-Access).
- Assign the Account Access Set and the right Resource Access Set(s) to each Group.
This way, permission changes only require updating the Account Access Set, access changes only require updating the Resource Access Set, and Users get the updates automatically.
How to Set It Up
1. Create Account Access Sets
Define the permissions Users need for their typical work.
Example: Tech-Permissions, with permissions such as Alert Settings and Profiles.
- Go to Access Management > Access Sets.
- Click Add Access Set and choose Account.
- Select the appropriate permissions.
- Save the Access Set.
2. Create Resource Access Sets
Define which collectors, devices and dashboards Users need, and what they can do with them.
Example: Region-A Collectors, with permissions for Region A collectors only.
- Go to Access Management > Access Sets.
- Click Add Access Set and choose Resource.
- Select the collectors, and their permissions.
- Save the Access Set.
3. Create Groups
Group Users by function or team, and stack the Access Sets they need.
Example: Region A Techs, with the Tech-Permissions and Region-A Collectors Access Sets assigned.
- Go to Access Management > Groups.
- Click Add Group.
- Assign the Account Access Set and the Resource Access Set.
- Optionally, add Users. You can also do this later from each User.
- Save the Group.
4. Assign Users
Users get all the Access Sets assigned to their Groups, plus any assigned to them directly.
- Go to Access Management > Users.
- Add or edit a User.
- Assign the User to the right Group(s), and optionally assign Access Sets to them directly.
Managing Changes
Updating permissions: When you edit an Account Access Set, every Group and User that has it gets the change right away. For example, if Tech-Permissions gains a new “Delete Alerts” permission, every Group using it inherits it immediately.
Giving access to a new collector: Either add the collector to an existing Resource Access Set, or assign a Resource Access Set that includes it (existing or new) to the User’s Group or directly to the User.
Example Scenario: Scaling Admin Access Across Two Regions
| Step | Action | Description |
|---|---|---|
| 1 | Create Tech-Permissions Account Access Set | Defines tech-level permissions. |
| 2 | Create Region-A Collectors and Region-B Collectors Resource Access Sets | Restrict permissions for collectors to each region. |
| 3 | Create Region A Techs Group | Assign the Tech-Permissions + Region-A Collectors Access Sets. |
| 4 | Create Region B Techs Group | Assign the Tech-Permissions + Region-B Collectors Access Sets. |
| 5 | Assign Users | Users inherit permissions and region access automatically. |
| 6 | Change Permissions | Edit Tech-Permissions once to update both Groups instantly. |
Best Practices
- Standardize Account Access Sets: Fewer Account Access Sets means easier management.
- Use Clear Naming Conventions: For example, Region-A and Tech-Permissions.
- Audit Access Sets Periodically: Check for redundant or unused Access Sets.