
Overview
This guide outlines how to create an Azure App Registration and assign the appropriate IAM permissions so that Domotz custom drivers can authenticate and collect data from Azure services such as:
- Virtual Machines
- Virtual Machine Scale Sets
- Storage Accounts
- Metrics via Azure Monitor
Prerequisites
- Access to the Azure Portal with appropriate privileges
- Subscription Owner or User Access Administrator role
- Domotz agent or environment ready to store ‘Tenant ID’, ‘Client ID’, and ‘Client Secret’
- Optional: Familiarity with Azure AD App Registrations and IAM\
Step-by-Step Instructions
1. Create an App Registration
- Navigate to Microsoft Entra ID → App registrations
- Click “Add App Registration”
- Set the following:
- Name: e.g. ‘domotz-automation’
- Supported account type: ‘Accounts in this organizational directory only (Single tenant)’ (required)
- Redirect URI: leave blank or use `https://localhost` (optional)
- Click Register.
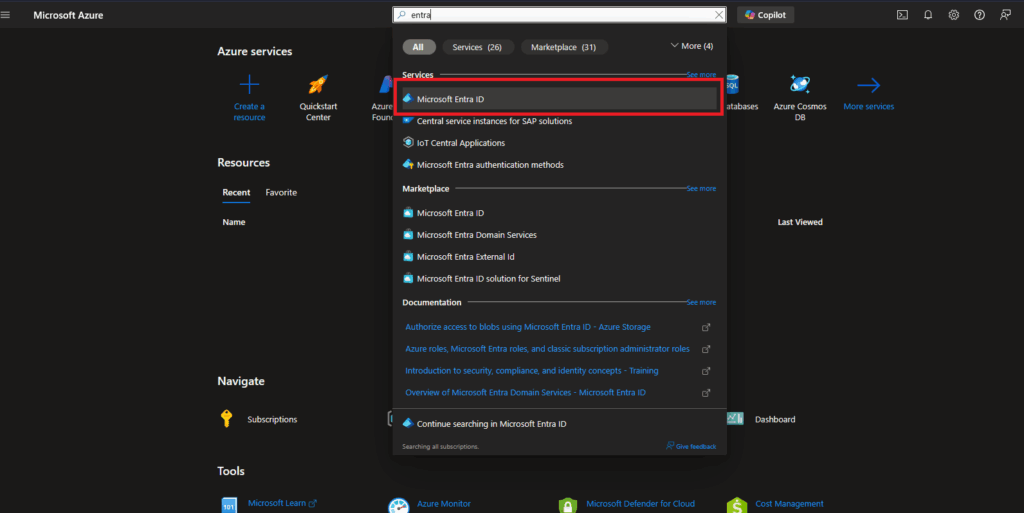
Accessing Microsoft Entra ID in Azure Portal.
1. Open the Microsoft Azure portal.
2. Locate the search bar at the top of the portal.
3. Enter "Entra" in the search field.
4. From the search results, select "Microsoft Entra ID" under the Services section to access Entra ID features and settings.
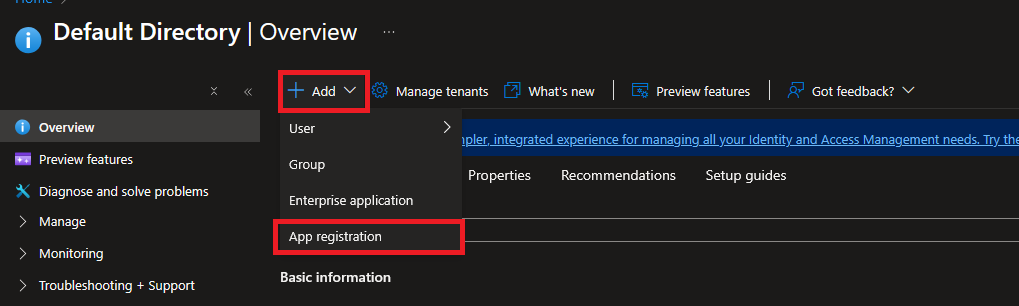
Registering a new application in the Default Directory.
1. Navigate to the "Default Directory" and ensure you are in the "Overview" section on the left sidebar.
2. Click on the "Add" button located near the top of the interface.
3. From the dropdown menu, select "App registration" to proceed with registering a new application.
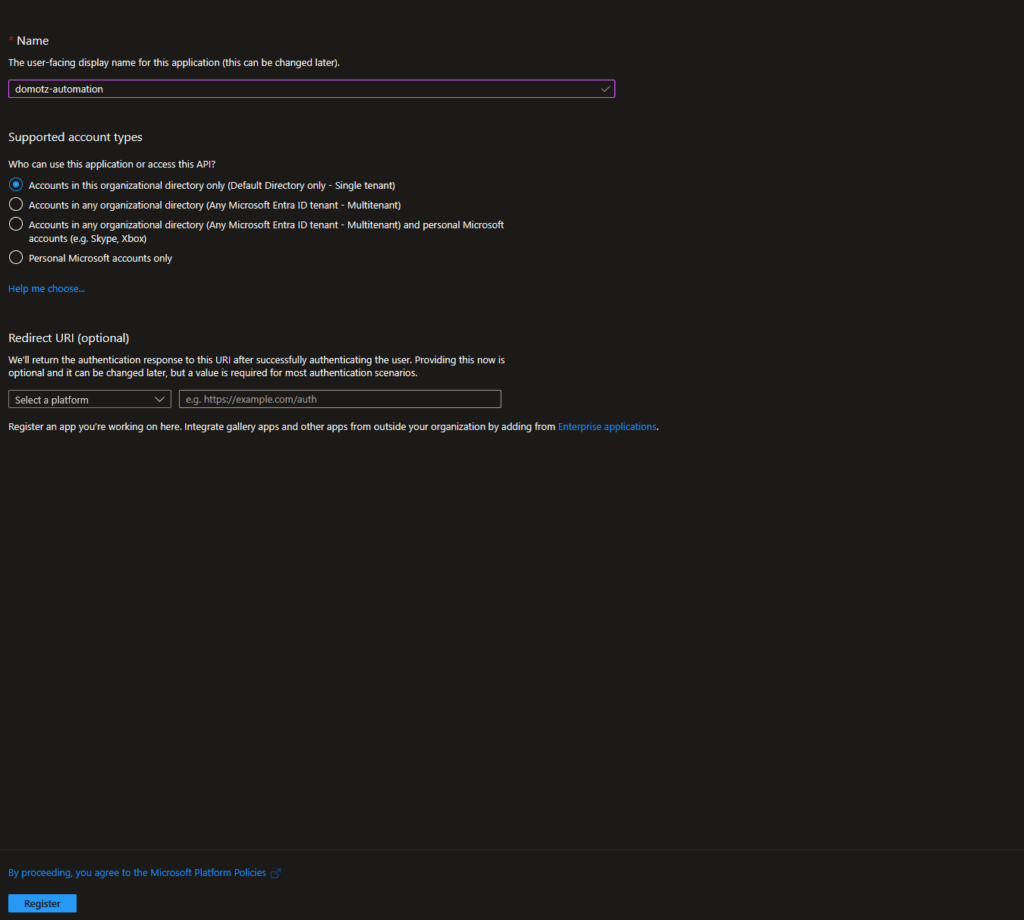
Setting Up an Application in Microsoft Platform
1. Enter a user-facing display name in the "Name" field. This example uses "domotz-automation." This name can be changed later if needed.
2. Choose the supported account types for accessing the application or API. Options include:
- Single tenant access with accounts in this organizational directory only.
- Multitenant access with accounts from any organizational directory or Microsoft personal accounts.
- Personal Microsoft accounts only.
3. For the optional Redirect URI, select a platform from the dropdown and enter a valid URI. This is used to return authentication responses and can be added or changed later.
4. To proceed with registration, click the "Register" button at the bottom.
Ensure you agree to the Microsoft Platform Policies by clicking "Register."
2. Create a Client Secret
- Inside the App, navigate to Certificates & secrets
- Under “Client secrets” click New client secret
- Enter a description and set expiration
- Click Add
- Copy the Value immediately and store it securely — it will not be shown again.
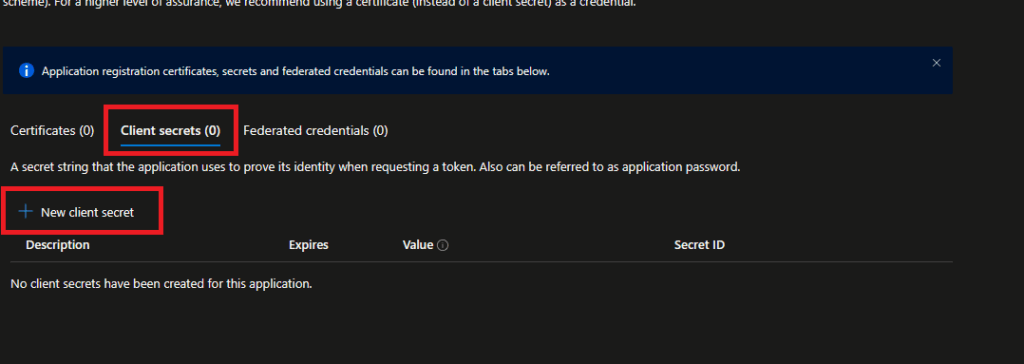
Accessing and Creating a New Client Secret
1. In the Application registration section, navigate to the tabs labeled "Certificates," "Client secrets," and "Federated credentials." Select the "Client secrets" tab to view related options.
2. Locate the "New client secret" option to begin creating a new client secret. This option allows you to generate a secret string that the application will use to authenticate its identity when requesting a token.
3. The page displays columns for Description, Expires, Value, and Secret ID. Currently, it states that no client secrets have been created for this application. Use the "New client secret" option to add entries here.
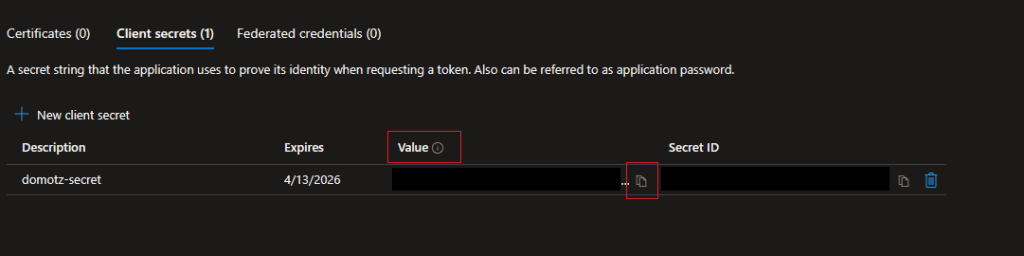
Managing Client Secrets in an Application.
1. Navigate to the "Client secrets" tab to view existing secrets.
2. To create a new secret, click "+ New client secret."
3. The table displays existing client secrets with columns: "Description," "Expires," "Value," and "Secret ID."
4. The "Value" column shows the secret value, used by the application to request a token.
5. The "Description" is the name of the secret, e.g., "domotz-secret."
6. The "Expires" column indicates the expiration date, such as "4/13/2026."
7. To copy the secret ID, use the button next to the "Secret ID" field.
3. Note Key Identifiers
- Tenant ID: Found under Microsoft Entra ID → App Registrations → All Applications
- Client ID: Found on the App Registration Overview page
- Client Secret: Copied in the previous step
You’ll need these values in Domotz driver parameters.
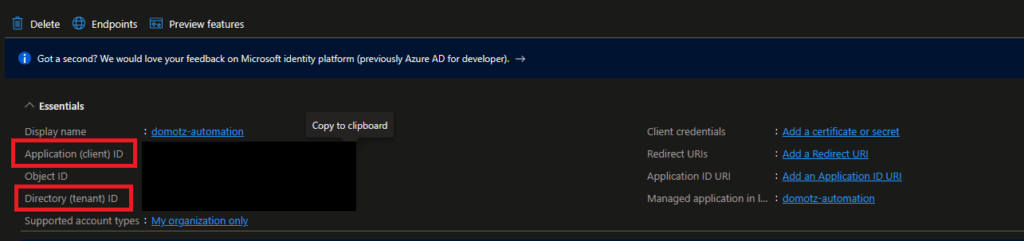
Viewing Application and Directory IDs in Microsoft Identity Platform
1. Under the "Essentials" section, locate the "Application (client) ID" and "Directory (tenant) ID" fields on the left side. These IDs are important for application configuration and authentication.
2. To the right, find options to manage client credentials and URIs: "Add a certificate or secret" for credentials, "Add a Redirect URI" and "Add an Application ID URI" for URIs.
3. For further management, a link to the "Managed application in local directory" is available as a clickable link. Use these functions to configure and manage your application settings.
4. Assign IAM Roles to the App
- Navigate to Subscriptions → Select your subscription
- Go to Access control (IAM) → Add role assignment
- Select Reader role → Next
- Assign to → User, group, or service principal
- Find your registered App (e.g. ‘domotz-automation’) and assign the role.
- Optional (if metrics are restricted): Add Monitoring Reader role the same way.
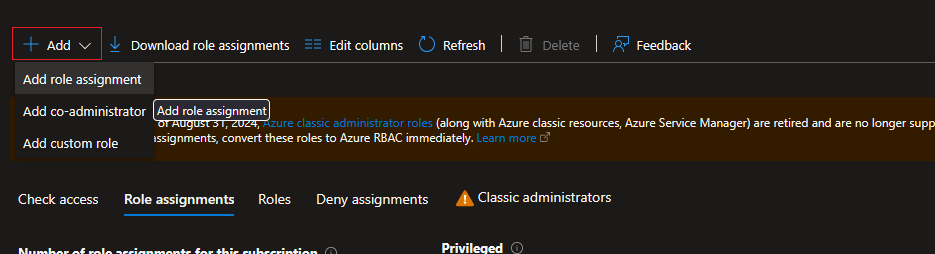
Adding a Role Assignment in Azure.
1. Navigate to the "Role assignments" tab in the Azure portal.
2. Click on the "+ Add" button located at the top left.
3. From the dropdown menu, select "Add role assignment."
4. Follow the prompts to complete the role assignment process.
Ensure you review any warnings or information related to role changes and their impact, which may be displayed above the tab section.
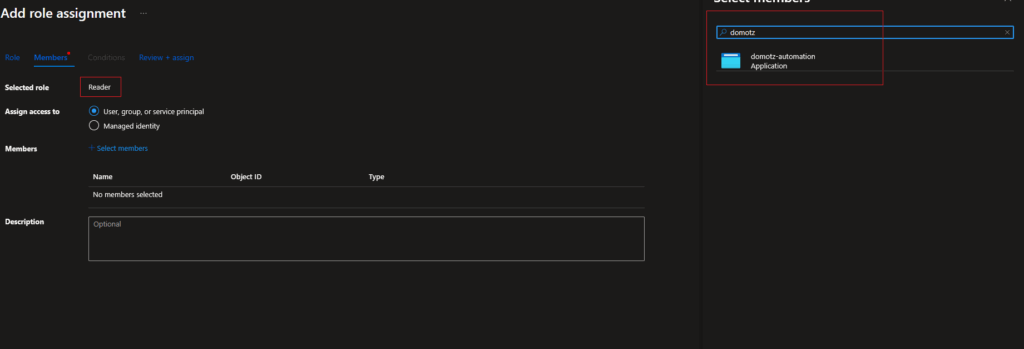
Add a Role Assignment in a Software Interface
1. Under "Selected role," ensure the "Reader" role is chosen.
2. In the "Assign access to" section, select either "User, group, or service principal" or "Managed identity" based on your needs.
3. In the "Members" section, click on "+ Select members" to open the member selection pane on the right.
4. In the search box, type the member's name or ID. For example, type "domotz" to find matching entries.
5. Select the appropriate member (e.g., "domotz-automation" marked as an application).
6. Optionally, add a description in the "Description" field.
7. Review your selections and proceed to assign the role.
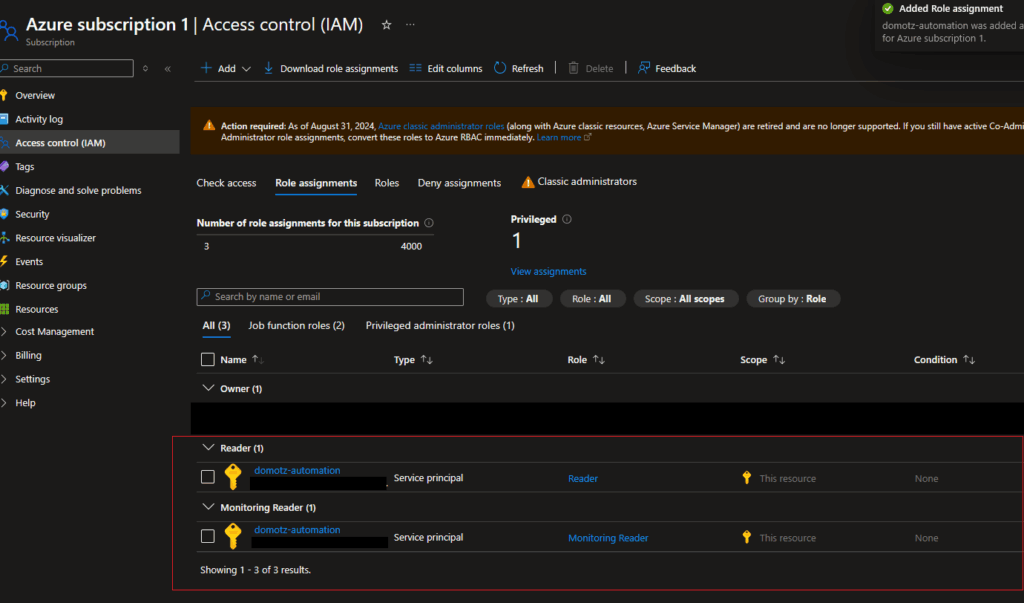
Azure Subscription Role Assignments Overview
1. Navigate to the "Access control (IAM)" section under "Azure subscription 1".
2. Select the "Role assignments" tab to view current role assignments.
3. The top section displays a total of 3 role assignments, with 1 being privileged.
4. Use filters such as "Role", "Scope", and "Group by" to refine the display of assignments.
5. Below, view specific assignments for "domotz-automation", listed as a "Service principal" with two roles: "Reader" and "Monitoring Reader", both scoped to "This resource" with no conditions applied.