
This Domotz KB page explains how to configure your Azure account so that Domotz can integrate with Microsoft Teams and retrieve information about rooms, devices (e.g., screens where Teams is configured) etc. allowing these details to be available within Domotz as well.
In Azure
Open the Azure Portal and navigate to “App registrations”, click on “New registration”:

Azure App Registrations: Creating a New Registration
1. Navigate to the Microsoft Azure portal.
2. Select "App registrations" from the homepage.
3. Click on the "New registration" button to initiate the process of registering a new application.
4. Use the additional options like "Endpoints," "Troubleshoot," "Refresh," "Download," and "Preview features" for further management and customization of app settings.
5. Provide feedback by selecting "Got feedback?" if necessary.
Name your application and click “Register”:
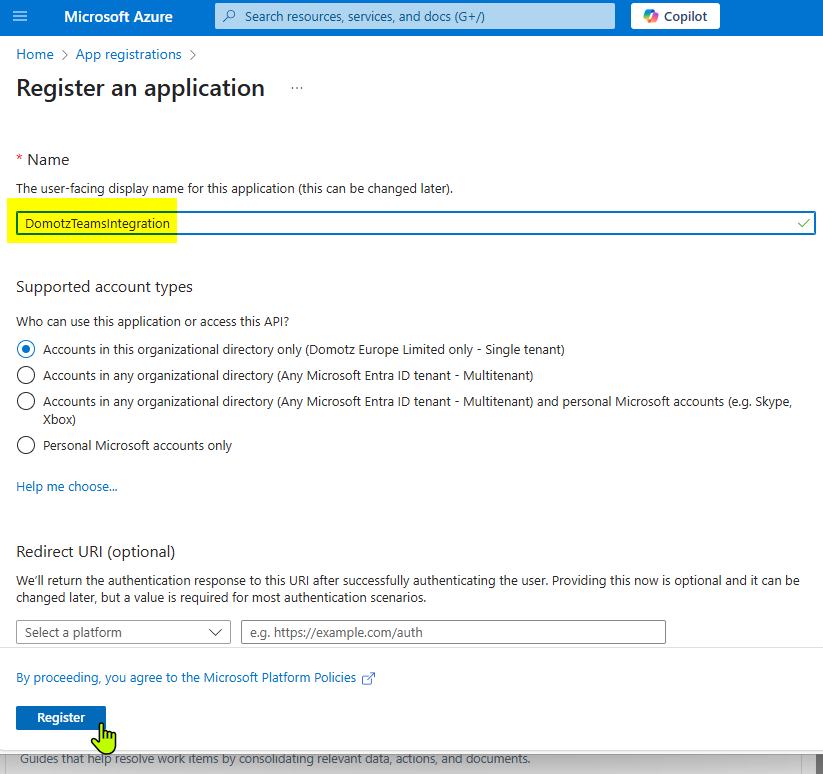
Registering an Application in Microsoft Azure
1. Enter a name for the application in the "Name" field. For example, "DomotzTeamsIntegration."
2. Choose a supported account type:
- "Accounts in this organizational directory only"
- "Accounts in any organizational directory"
- "Accounts in any organizational directory and personal Microsoft accounts"
- "Personal Microsoft accounts only"
3. Optionally, provide a Redirect URI by selecting a platform and entering a URI.
4. Click the "Register" button to complete the application registration.
Once created you’ll land on the “Overview” section of the new application, note down the ‘Application (client) Id’ and the “Directory (tenant) ID” which you’ll need later.
Save them on a notepad as your “ClientID” and “TenantID”. This value will be asked during the Domotz custom driver setup.
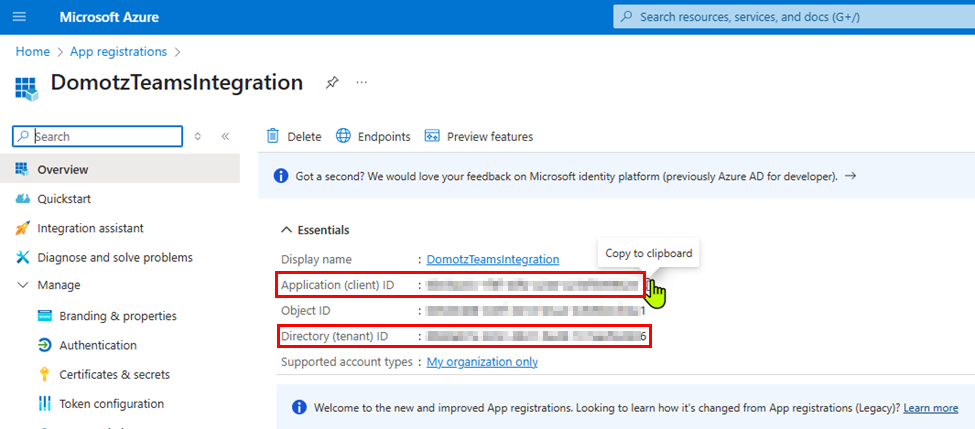
Microsoft Azure app registration overview for DomotzTeamsIntegration.
1. Navigate to the Overview section of the DomotzTeamsIntegration app registration.
2. In the Essentials section, note the Display Name and various IDs:
- Application (client) ID: This is your app's unique identifier.
- Directory (tenant) ID: This ID represents your Azure Active Directory tenant.
3. Use the “Copy to clipboard” icon next to each ID if you need to copy them for use elsewhere.
On the left menu navigate to “Manage -> Certificates and secrets”, on the central pane click on “New client secret”
Enter a description for the new secret, set the expiration days and click on “Add”:
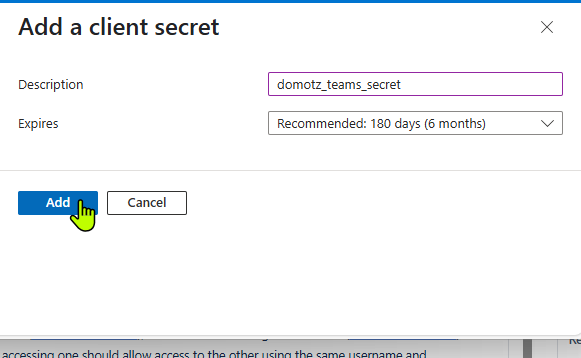
Add a client secret in a software interface.
1. Enter the description for the client secret in the "Description" field. In the example, it is labeled "domotz_teams_secret."
2. Choose an expiration period from the "Expires" dropdown menu. The recommended option is 180 days (6 months).
3. Click the "Add" button to finalize and save the client secret. Alternatively, select "Cancel" to discard the changes.
Once the new secret is created, make sure to record it immediately – this is the only time it will be visible. It won’t be shown again.
Save it on a notepad as your “ClientSecret”. This value will be asked during the Domotz custom driver setup.
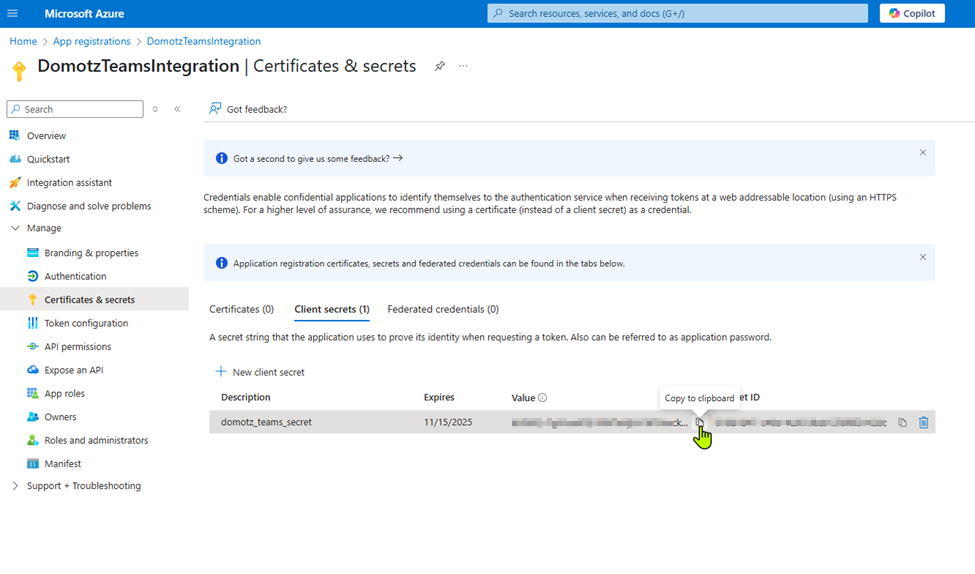
Managing Client Secrets in Azure App Registration
1. Navigate to the Azure portal under "App registrations" and select "DomotzTeamsIntegration."
2. In the left pane, click on "Certificates & secrets."
3. Under the "Client secrets" tab, find a list of existing secrets. The secret is identified by its description, "domotz_teams_secret."
4. Note the expiration date listed, which is 11/15/2025 for this secret.
5. To copy the secret's value, click on the option to copy it to the clipboard.
6. If you need a new client secret, use the "New client secret" option.
Navigate to “Manage -> API permissions” and click on “Add permissions”.
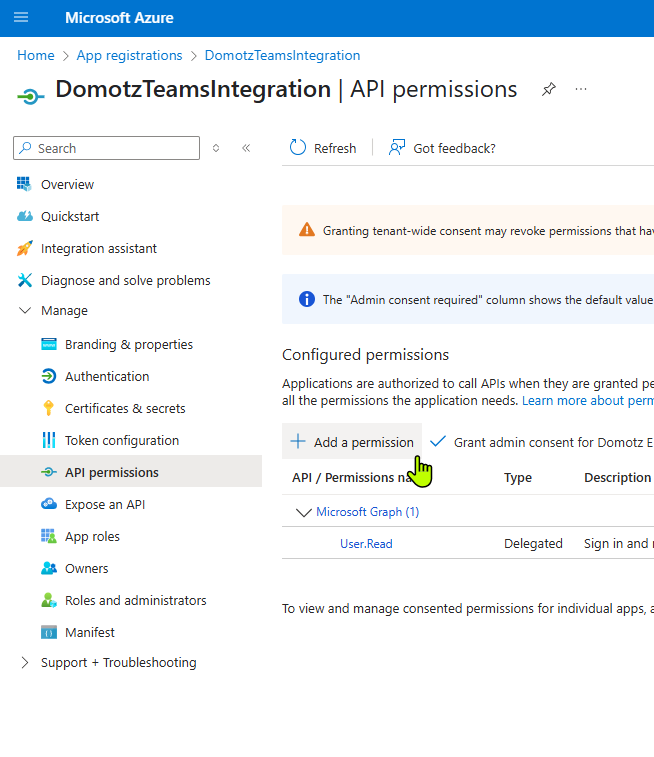
Azure API Permissions Configuration
1. Navigate to the "API permissions" section under the "Manage" menu on the left side.
2. Under "Configured permissions," click on "Add a permission" to authorize applications to call APIs.
3. Below, see the list of configured permissions. For example, the "Microsoft Graph" API has "User.Read" permission with a type of "Delegated."
4. Use the "Grant admin consent" option for tenant-wide API permissions if necessary.
In the new pane click on “Microsoft Graph”
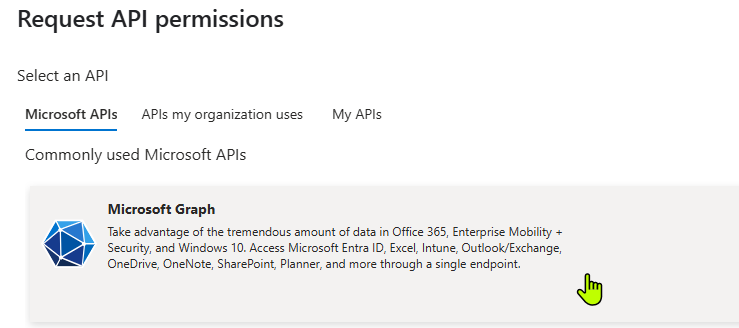
Request API Permissions Interface
1. In the "Select an API" section, choose the "Microsoft APIs" tab.
2. Under "Commonly used Microsoft APIs," locate "Microsoft Graph."
3. Information about Microsoft Graph indicates it provides data from Office 365, Enterprise Mobility + Security, and Windows 10, and allows access to various Microsoft services like Excel, Intune, and OneDrive.
4. Use this option to connect to a wide range of Microsoft services through a single endpoint.
In the next pane select “Application permissions”
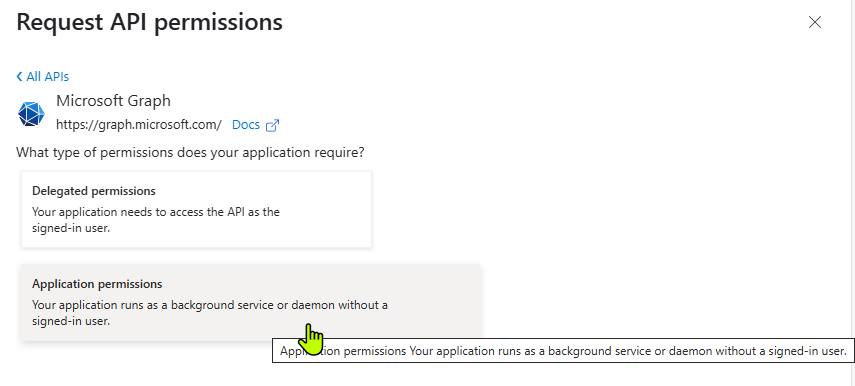
Requesting API Permissions in Microsoft Graph
1. Navigate to the "Request API permissions" section.
2. Select the Microsoft Graph API option.
3. Choose the type of permissions your application requires:
- Delegated permissions: Use this if your application needs to access the API as the signed-in user.
- Application permissions: Use this when your application operates as a background service or daemon, without a signed-in user.
4. Select the appropriate option based on your application's needs.
Search and add the following permissions:
- Calendars.Read
- Calendars.ReadBasic.All
- CallRecords.Read.All
- DeviceManagementManagedDevices.Read.All
- Directory.Read.All
- OnlineMeetingArtifact.Read.All
- OnlineMeetingRecording.Read.All
- OnlineMeetings.Read.All
- Place.Read.All
- Presence.Read.All
- Reports.Read.All
- TeamworkDevice.Read.All
- User.Read.All
Once done click on “Grant admin consent for [name of your tenant]
You should now have green checkmarks for each assigned permission
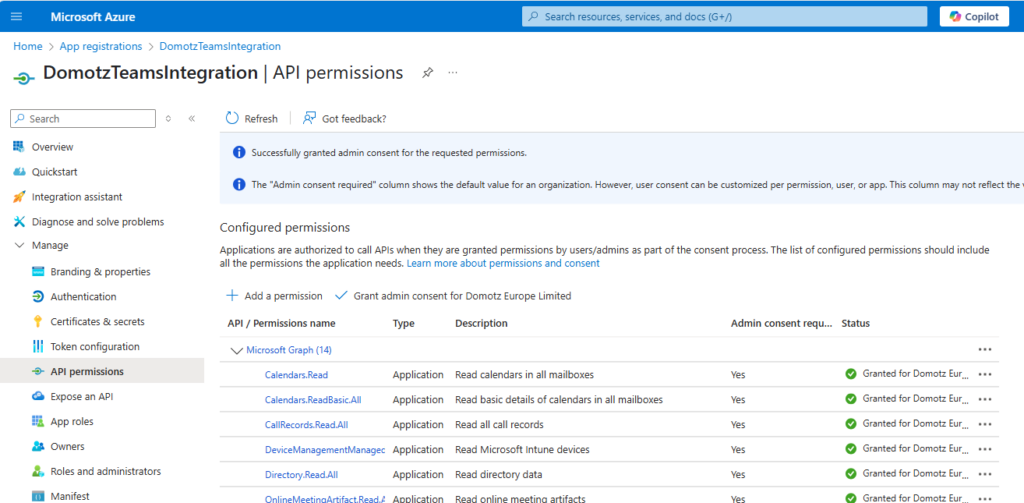
Configuring API Permissions in Microsoft Azure
1. Navigate to the "API permissions" section under "DomotzTeamsIntegration" within the Microsoft Azure portal.
2. Find the "Configured permissions" list, which shows all current permissions for the application. Each entry includes the API name, permission type, and status.
3. Note the confirmation at the top that admin consent has been successfully granted for the displayed permissions.
4. To add a new permission, select "Add a permission."
5. If required, grant admin consent by clicking the "Grant admin consent for Domotz Europe Limited" option.
6. Observe the status column to check if permissions have been granted, indicated by a green check mark and the text "Granted for Domotz Europe Limited."
Use these steps to manage your application's permissions effectively.
Now that the Azure-side configuration has been completed, you can proceed with the Domotz-side setup.
In Domotz
From the Domotz webapp, go to “Integration” and then to “Automation & Drivers”.
Click on the “View all XYZ Pre-Configured Scripts” button on the right hand side of the page as shown in the picture below.
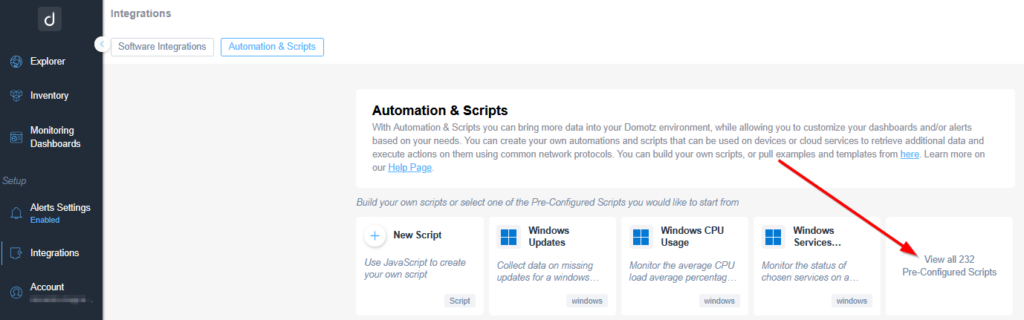
Automation & Scripts Integration Overview
1. Navigate to the "Integrations" section in the sidebar on the left, under "Setup."
2. Click on the "Automation & Scripts" tab at the top to access script options.
3. You can create a new script by selecting "New Script," which allows you to use JavaScript for customization.
4. Explore pre-configured scripts like "Windows Updates," "Windows CPU Usage," and "Windows Services" for monitoring and automation.
5. To view all available pre-configured scripts, select "View all 232 Pre-Configured Scripts" on the right.
Search for Microsoft Teams custom driver:
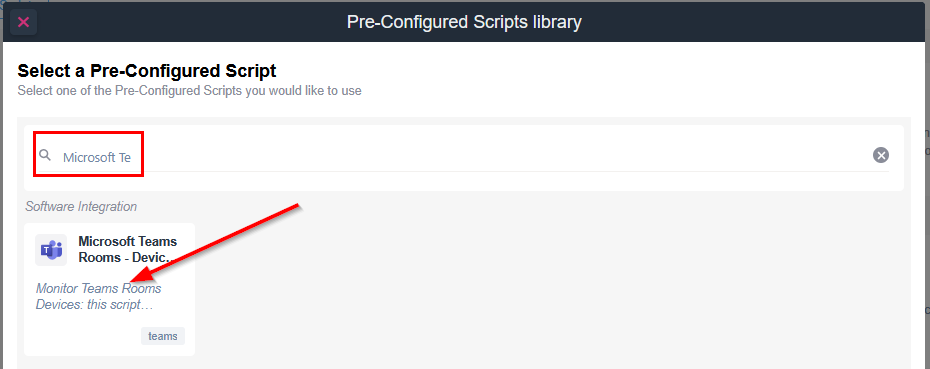
Pre-Configured Scripts Library Interface
1. At the top, there is a search input field labeled with a magnifying glass icon. Enter the script name you want to find, such as "Microsoft Te."
2. Below the search field, available scripts are displayed in a list format. Each script entry includes a title, description, and associated tags.
3. An example script titled "Microsoft Teams Rooms - Devices" is visible, with a brief description about monitoring Teams Rooms devices. Use this option to monitor devices efficiently.
4. To select a script, click on the corresponding script entry from the list.
And select the driver you want to use.
Click the “Use the Driver” button in the bottom of the modal:
Select the device you want to attach the driver to and press the button +:
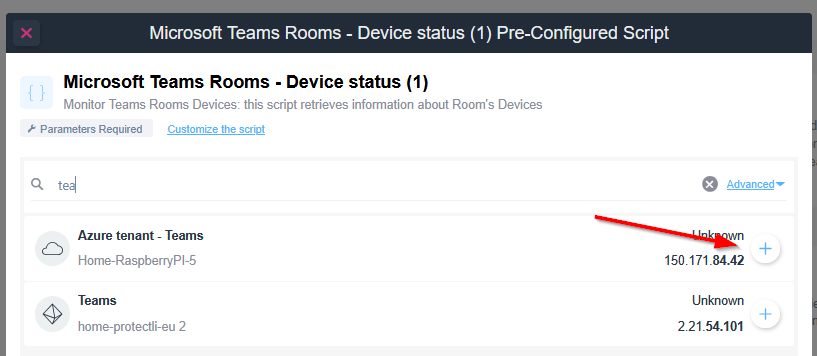
Checking Microsoft Teams Rooms Device Status
1. The title indicates this is a pre-configured script for checking the device status of Microsoft Teams Rooms.
2. At the top, options are available to "Customize the script" and note that "Parameters Required" is mentioned.
3. A search field contains the partial word "tea" to filter results.
4. Two devices are listed:
- "Azure tenant - Teams" with the device name "Home-RaspberryPI-5" and an IP address "150.171.84.42". The status is displayed as "Unknown".
- "Teams" with the device name "home-protectli-eu 2" and an IP address "2.21.54.101". This also shows an "Unknown" status.
5. Each device entry has a plus icon on the right for additional actions.
The following modal appears:
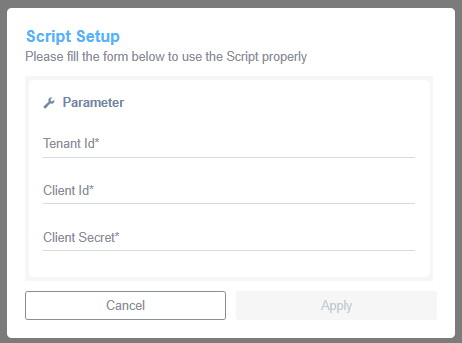
Script Setup Form
1. Fill out the "Tenant Id" field with the appropriate identifier for your tenant.
2. Enter the "Client Id" in the designated field.
3. Provide the "Client Secret" in the last section to complete the setup.
After entering all required information, choose "Apply" to proceed or "Cancel" to abort the setup.
Copy and paste the values saved before during the Azure configuration process and click Apply.
If the Azure app where correctly configured then the appropriate table should appear on the device:
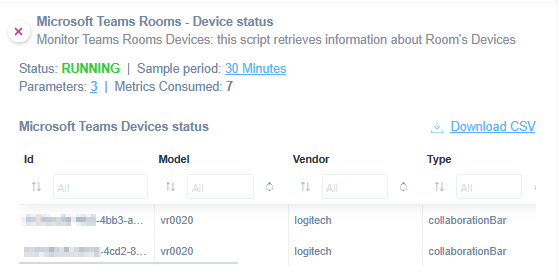
Microsoft Teams Rooms Device Status Overview
1. The script retrieves information about Teams Rooms devices, indicating that its status is "RUNNING."
2. The sample period for data collection is set to "30 Minutes."
3. It involves "3" parameters and has consumed "7" metrics.
4. A table titled "Microsoft Teams Devices status" displays device data.
5. The table includes columns: Id, Model, Vendor, and Type. Apply filters using the dropdowns above each column.
6. The "Download CSV" option allows exporting the data.
7. Visible rows show device information, such as specific Ids, the model "vr0020," the vendor "logitech," and the type "collaborationBar."