
This Domotz KB page explains how to configure your Zoom account so that Domotz can integrate with IT and retrieve information about rooms, devices, etc. allowing these details to be available within Domotz as well.
In Zoom
Login to zoom admin console. Navigate to Advanced -> App marketplace
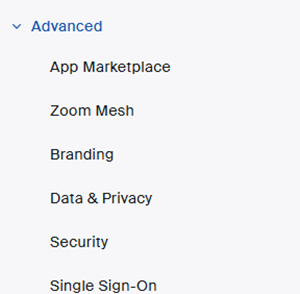
Advanced settings menu options in a software interface.
1. Select "Advanced" to expand the menu list.
2. Choose "App Marketplace" to manage or integrate third-party applications.
3. Click on "Zoom Mesh" for network settings or configurations.
4. Select "Branding" to customize the appearance and branding of the interface.
5. Choose "Data & Privacy" to adjust privacy settings and data management preferences.
6. Click "Security" to configure security options and protocols.
7. Select "Single Sign-On" to manage SSO settings and user access.
On the top right, click on Develop -> Build app

Navigating the Zoom App Marketplace to Build an App
1. Go to the Zoom App Marketplace homepage.
2. Click on the "Develop" button located at the top right corner of the page.
3. Select "Build app" from the dropdown menu to start developing an app.
4. Explore the categories listed on the left side to find relevant resources, such as Analytics, Broadcasting & Streaming, and CRM.
Use these steps to access app development options and necessary documentation.
A new window opens, select “Server to Server OAuthApp” and click on create

Selecting an App Type in Zoom
1. Choose the type of app you want to create from three options: General App, Server to Server OAuth App, or Webhook Only App.
2. The General App option allows integration with Zoom APIs using OAuth 2.0 for accessing user data or linking with third-party services.
3. The Server to Server OAuth App, which is currently selected, enables server-to-server interaction with Zoom APIs.
4. The Webhook Only App allows the creation of apps that receive event-based notifications for Zoom account events.
5. After selecting an app type, click the "Create" button to proceed or "Cancel" to exit.
Name your application and click create
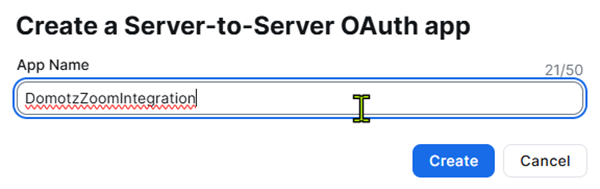
Creating a Server-to-Server OAuth App
1. Enter the app name in the "App Name" text field. In the example, the name entered is "DomotzZoomIntegration." The app name should be between 1 and 50 characters.
2. Once the app name is entered, you have two options:
- Click the "Create" button to proceed with creating the app.
- Click the "Cancel" button to discard the changes and exit.
You can find the data you’ll need to call the app in the “App credentials” section
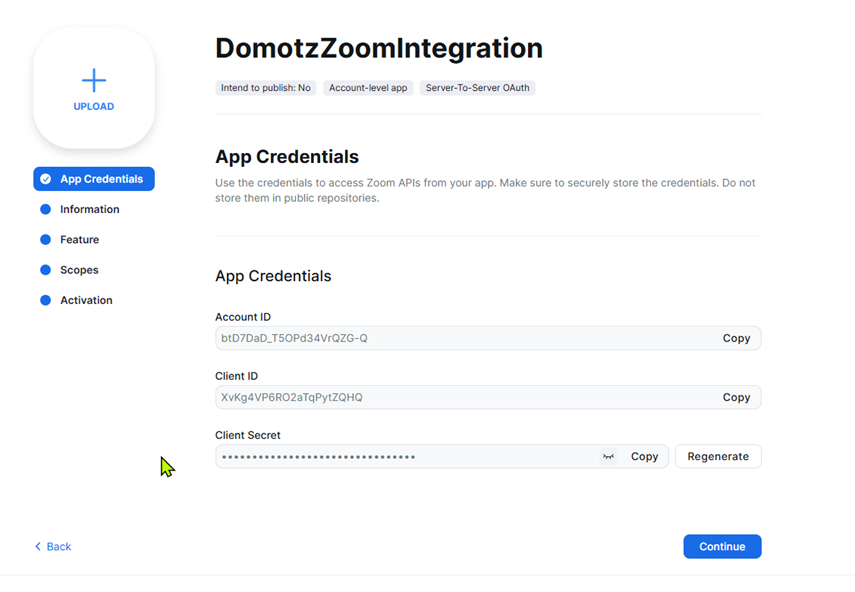
Domotz Zoom Integration: App Credentials Configuration
1. On the left sidebar, select "App Credentials" to access the necessary credentials for your application.
2. Review the section labeled "App Credentials" to find the following details:
- "Account ID": Displays your account identifier. Use the "Copy" button to copy this value.
- "Client ID": Displays your unique client identifier. Use the "Copy" button to copy this value.
- "Client Secret": Displays a secure code for authentication, hidden by default. Use "Copy" or click "Regenerate" to get a new secret if needed.
3. Ensure credentials are stored securely and not in public repositories.
4. Click "Continue" to proceed with the integration process.
Before activating the application you have to provide:
1. Developer contact name
2. Developer contact email
3. Company name
4. Scopes
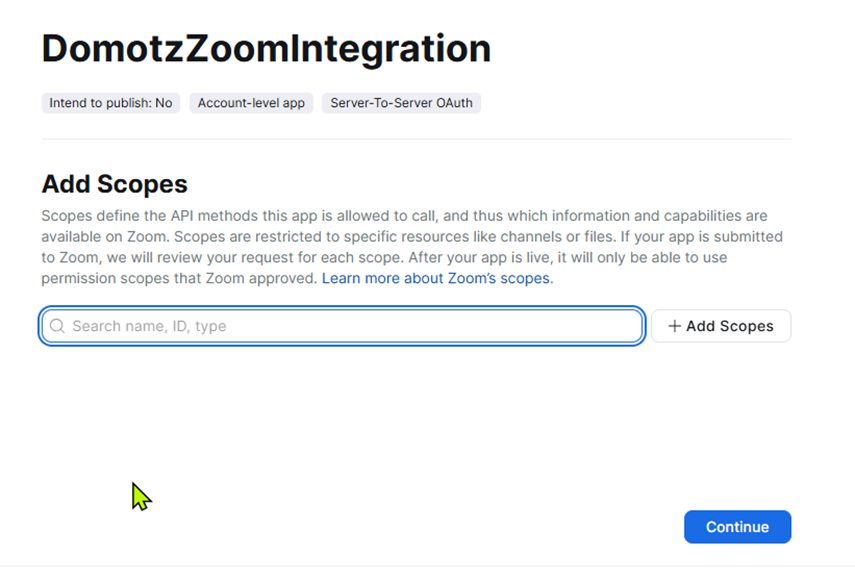
Adding Scopes for Domotz Zoom Integration
1. The integration name, "DomotzZoomIntegration," is shown at the top.
2. Three status indicators are listed: "Intend to publish: No," "Account-level app," and "Server-To-Server OAuth."
3. The "Add Scopes" section explains that scopes define API methods the app can call on Zoom. Scopes are resource-specific such as channels or files.
4. A search bar is available to enter the name, ID, or type of scope you wish to add.
5. Click the "+ Add Scopes" button to add the selected scopes.
6. A "Continue" button is located at the bottom for proceeding to the next step.
The integration driver require the scopes below
Scopes
Dashboard
View all users’ meetings information on Dashboard
dashboard:read:list_meeting_participants_qos:admin – View meeting participants’ quality of service
dashboard:read:meeting_participant_qos:admin – View a meeting participant’s quality of service
View all users’ webinar information on Dashboard
dashboard:read:list_webinar_participants_qos:admin – View webinar participants’ quality of service
dashboard:read:webinar_participant_qos:admin – View a webinar participant’s quality of service
View all users’ Zoom Room usage statistics and information
dashboard:read:zoomroom:admin – View a Zoom Room metrics
Devices
Manage device
device:read:list_zdm_devices:admin – list devices
Meeting
View all user meetings
meeting:read:list_meetings:admin – View a user’s meetings
meeting:read:list_past_participants:admin – View a past meeting’s participants
Room
View all users’ Zoom Rooms information
zoom_rooms:read:list_rooms:admin – View Zoom Rooms
zoom_rooms:read:list_devices:admin – View Zoom Room devices
zoom_rooms:read:sensor_data:admin – View a Zoom Room’s sensor data
zoom_rooms:read:room:admin – View a Zoom Room
zoom_rooms:read:list_calendar_services:admin – View Zoom Room calendar services
zoom_rooms:read:room_settings:admin – View a Zoom Room’s settings
zoom_rooms:read:room_control:admin – View a Zoom Room’s control
zoom_rooms:read:virtual_controller:admin – View a virtual controller
zoom_rooms:read:list_device_profiles:admin – View Zoom Room device profiles
zoom_rooms:read:location:admin – View a Zoom Room location hierarchy’s location
zoom_rooms:read:list_locations:admin – View Zoom Room location hierarchy’s locations
Visitor Management
View visitor management information
visitor_management:read:list_invitations:admin – List visitor invitations
Webinar
View all user Webinars
webinar:read:list_past_participants:admin – View a past webinar’s participants
Workspace
View workspace reservation information for the account
workspace:read:usage:admin – View workspaces usage
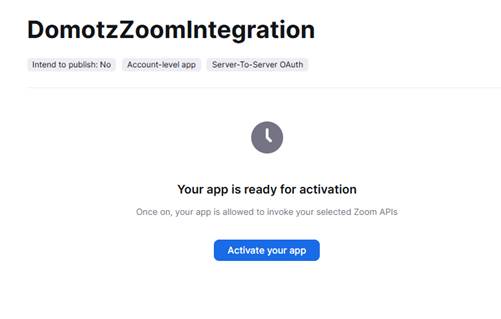
Integration App Activation Screen for Domotz and Zoom
1. Title: "Domotz Zoom Integration"
2. Status indicators: "Intend to publish" is set to "No", and it is an "Account-level app" using "Server-To-Server OAuth."
3. Message: "Your app is ready for activation."
4. Instruction: Click the "Activate your app" button to allow the app to invoke your selected Zoom APIs.