
Device Profiles in Domotz make it easy to apply and replicate configuration settings—such as SNMP templates, credentials, and other parameters—across multiple devices in just a few clicks. This feature streamlines onboarding processes, both for new networks and, if you are an MSP, for new customers, by eliminating repetitive manual setup and ensuring consistent configurations throughout your monitored infrastructure.
1. What is a Device Profile?
A profile acts as a reusable collection of device-level modules, each representing a specific area of configuration—such as credentials, monitoring settings, or alert definitions. Once created, profiles can be manually applied to one or more devices, ensuring that the same configuration logic is replicated quickly and accurately.
Why Managed Device Profiles Are Useful
- Efficiency: Reduce the time and effort needed to configure devices individually.
- Scalability: Easily apply and maintain configurations across large environments.
- Control: Simplify ongoing management by editing a single profile that can be reapplied to multiple devices.
What Are Modules?
Each profile contains modules which are sections representing specific types of device-level settings that can be configured through Domotz. Modules make it easier to understand and manage what settings a profile controls, and provide a similar UI as seen on the Device Details page for configuration of these settings.
Modules can also be enabled or disabled within a profile. Only enabled modules are configured and applied to devices when the profile is used. This allows you to create profiles that include multiple modules but selectively activate only those relevant for specific device configurations.
The following modules are currently available:
- Info: Configure key device properties such as Type, Important flag, Location, and Zone.
- Credentials: Define SNMP credentials for SNMP v1, v2, and v3 communication.
- Alerts: Select from any existing Alert Rules in your account to set alerts for any device metric (NOTE: Currently in beta. Contact Domotz support for more info.)
- SNMP: Choose from preconfigured SNMP sensors or add custom OID sensors to monitor device-specific variables.
- TCP: Configure TCP sensors to monitor network services and port availability.
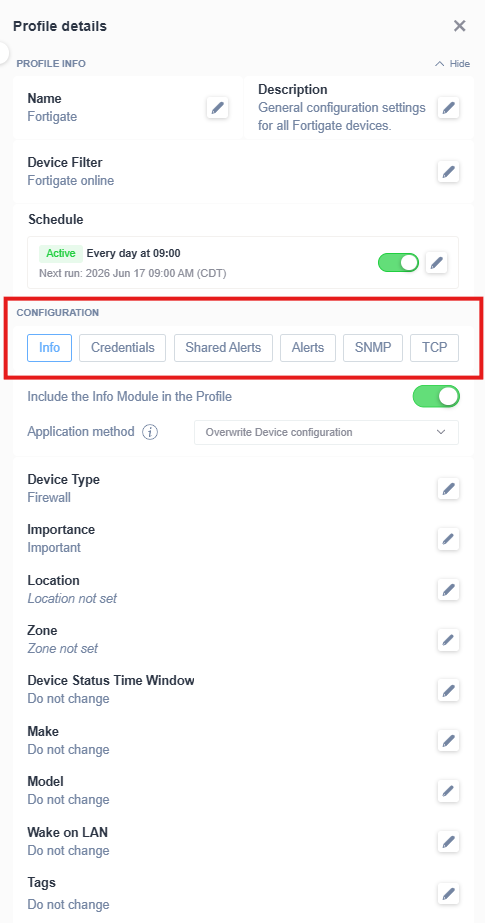
Profile Configuration Settings for Fortigate Devices
1. The profile name is "Fortigate" with a description of general configuration settings for all Fortigate devices.
2. Device Filter is set to "Fortigate online."
3. The Schedule is active, occurring every day at 09:00, with the next run on June 17, 2026, at 09:00 (CDT).
4. Under Configuration, there are six tabs: Info, Credentials, Shared Alerts, Alerts, SNMP, and TCP.
5. The "Include the Info Module in the Profile" toggle is enabled.
6. The Application method is set to "Overwrite Device configuration."
7. Device Information:
- Device Type: Firewall
- Importance: Important
- Location and Zone: Not set
- Device Status Time Window: Do not change
- Make, Model, Wake on LAN, and Tags: Do not change
8. Each field can be edited individually.
Applying Profiles
Profiles can be applied to devices either manually, by selecting target devices or a saved filter, or automatically through a recurring Schedule attached to the profile’s saved Device Filter. When applied, each module’s settings are configured on the target devices.
For manual applications, there is no persistent link between a profile and the devices it’s applied to: changes made to the profile afterward are not automatically propagated, and require a manual reapplication to update previously configured devices.
For profiles with an active Schedule, Domotz automatically reapplies the profile to every device matching the saved filter at each scheduled run, including devices that newly match the filter.
For certain modules—Shared Alerts, SNMP, and TCP—Domotz provides two application modes:
- Overwrite mode: Completely replaces any existing device-level configurations for that module with the settings defined in the profile. This ensures full alignment with the profile but discards previously configured settings for that module on the device.
- Additive mode: Adds the new configuration elements defined in the profile to the device without overwriting existing settings. This is useful when extending a device’s configuration while preserving current monitoring or alert rules.
Users can choose the preferred mode when applying a profile, depending on whether the goal is to standardize all devices under one configuration or augment existing device setups.
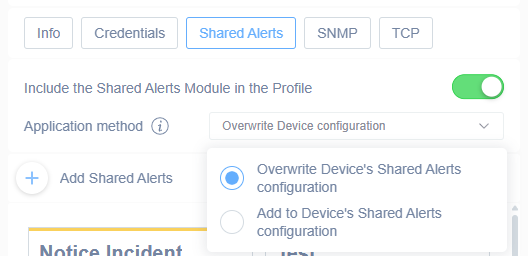
Configuring Shared Alerts in a Profile
1. Navigate to the "Shared Alerts" tab within the software interface.
2. Ensure the "Include the Shared Alerts Module in the Profile" toggle is set to on (green) to activate the module.
3. Select the desired application method by clicking the dropdown menu. Choose between “Overwrite Device configuration” or “Add to Device's Shared Alerts configuration” to specify how the shared alerts should be applied.
4. Click on "+ Add Shared Alerts" to add new alerts to the profile as needed.
Filters and Intended Associations
Filters can be used to locate or group devices based on properties such as vendor, type, or location. Filters can also be saved as default filters within a profile to identify the set of devices that the profile is intended for. While this does not create a hard link between the profile and those devices, it helps maintain consistency by ensuring that the same device filter is used each time the profile is reapplied.
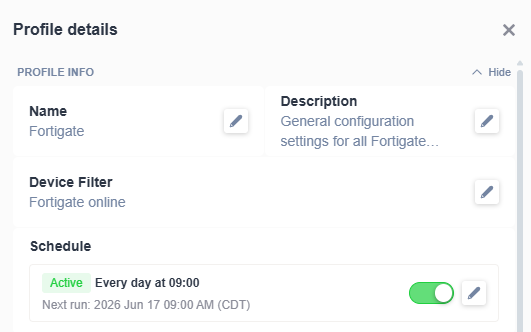
Profile Details Configuration:
1. **Name**: Displays the profile name as "Fortigate." Click the adjacent pencil icon to edit.
2. **Description**: Shows a brief description "General configuration settings for all Fortigate..." This can be edited by selecting the nearby pencil icon.
3. **Device Filter**: Indicates "Fortigate online." Use the pencil icon to modify this setting.
4. **Schedule**: Shows the schedule status as "Active" with the time set to "Every day at 09:00." The next scheduled run will occur on "2026 Jun 17 09:00 AM (CDT)." There is a toggle switch available to activate or deactivate the schedule.
Optionally, once a default filter is set, a recurring Schedule can be enabled on the profile, checking on a defined interval as short as every 15 minutes, to automatically apply it to every device matching the filter, including devices that newly start matching it. This is the recommended approach when you want the profile to stay applied to a group of devices without relying on manual reapplication.
2. Prerequisites
Before creating or applying Managed Device Profiles, ensure that your account and environment meet the following requirements:
Account and Permissions
Domotz supports two permissions systems that control access to Managed Device Profiles: Team Management (ACL) and Access Management (RBAC).
Team Management (ACL)
- Account Owner and Team Member roles have full access to create, edit, and apply Managed Device Profiles.
- The Field Operator role does not have access to create, edit, or apply profiles.
Access Management (RBAC)
- When your account uses RBAC, access to profiles is governed by specific permissions.
- RBAC includes distinct permissions for Profiles Management:
- View Profiles: Allows users to view profile details and configurations.
- Manage Profiles: Allows creation, editing, and deletion of profiles.
- Apply Profiles: Allows users to apply existing profiles to devices.
- Administrators can assign these permissions individually or in combination based on organizational needs.
Device Discovery and Availability
- Devices must already be discovered and visible in your Domotz environment.
- For device-based plans, devices must be in a Managed state in order to apply profile settings. Profiles cannot be used to configure Unmanaged devices.
Recommended Preparation
- Test with a single device: When creating a new profile, apply it first to one device to validate settings before bulk application.
- Plan module enablement: Only enable modules that are relevant to your configuration objectives. Disabled modules will not affect devices when the profile is applied.
Environmental Considerations
- Ensure SNMP and TCP services are enabled and reachable on the target devices if using those modules.
- Be aware of potential conflicts when using Overwrite mode, as existing configurations for SNMP or TCP sensors may be permanently replaced.
3. Creating or Editing a Managed Device Profile
You can create a new Managed Device Profile or edit an existing one to update its configuration. The process for creating and editing profiles is the same: you define or modify the profile name, description, enabled modules, and associated settings.
Steps to Create or Edit a Profile
Navigate to the Profiles Section In your Domotz account, go to Profiles from the left-hand menu. Click on ‘Add Profile’, and give it a name to reflect the purpose of the profile (for example, Standard Switch Profile or SNMP Monitoring Configuration).: Creating a New Device Profile 1. In the navigation pane, select the "Profiles" icon.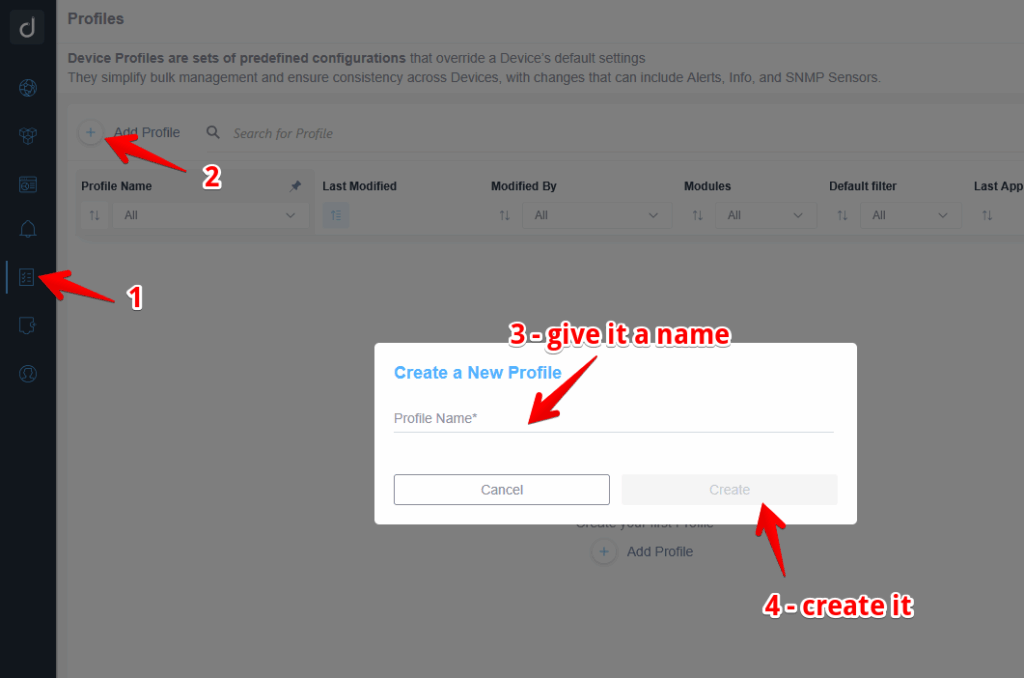
2. Click on "Add Profile" located at the top of the Profiles section.
3. In the "Create a New Profile" dialog box, enter a name for the profile in the "Profile Name" field.
4. Click "Create" to finalize and save the new profile.
The created Device Profile page will show on the right side of your screen:
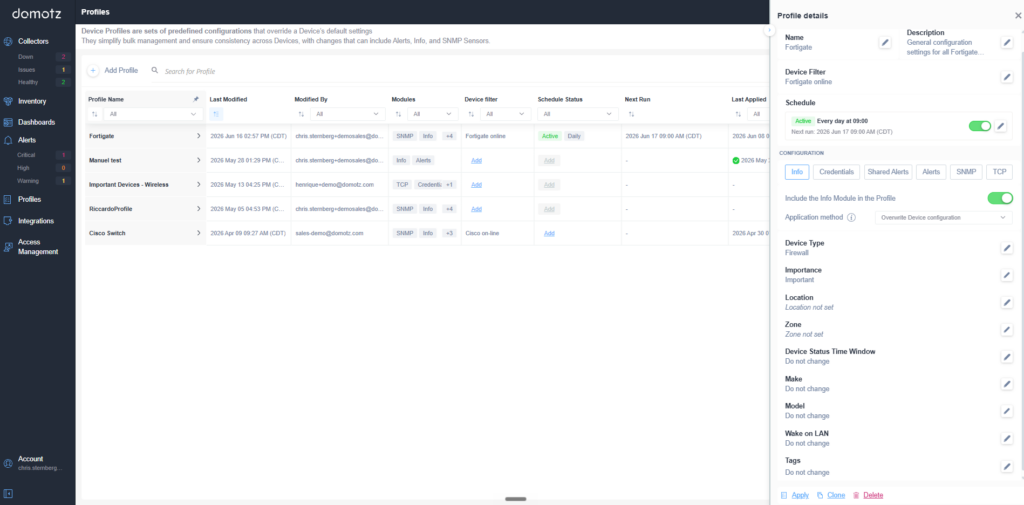
Managing Device Profiles in Domotz
1. Navigate to the "Profiles" section to view a list of device profiles, each showing columns for Profile Name, Last Modified date, Modified By, Modules, Device Filter, Schedule Status, Next Run, and Last Applied.
2. To create a new profile, click "Add Profile" and use the search function to find existing profiles.
3. Select a profile to view detailed settings in the "Profile Details" pane on the right.
4. Under "Profile Details," edit the profile's name and description by clicking the pencil icons.
5. Adjust the "Device Filter" setting to toggle device visibility status, such as "Fortigate online."
6. Customize the "Schedule" by enabling or disabling it with the toggle switch, and set the schedule frequency and next run date.
7. In "Configuration," select modules relevant to the profile such as Info, Credentials, Shared Alerts, Alerts, SNMP, and TCP.
8. Enter additional details like Device Type, Importance, Location, Zone, and whether to include the Info Module.
9. Specify advanced options like "Device Status Time Window," "Make," "Model," "Wake on LAN," and "Tags."
10. Apply changes by clicking "Apply" or remove the profile with the "Delete" option.
Set a Default Filter
You can create or update a default device filter that identifies which devices this profile is intended for. The filter helps you easily locate and reapply the profile to the same group of devices in the future. This filter does not automatically apply the profile—it simply serves as a reference.
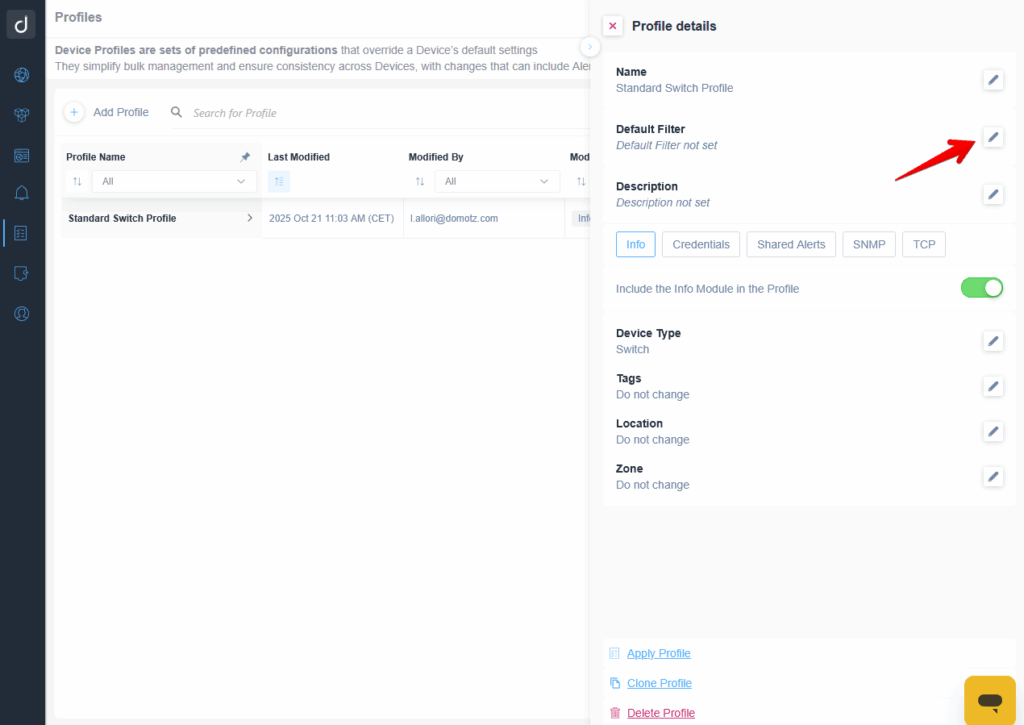
Editing a Device Profile's Default Filter
1. Open the Profiles page. You will see a list of device profiles including their names, last modified dates, and who modified them.
2. Select the "Standard Switch Profile" to view its details on the right.
3. Locate the "Default Filter" field in the Profile Details section on the right side of the screen. It is currently not set.
4. Click the edit icon next to the "Default Filter" to set or update it.
5. Other editable fields include Name, Description, Device Type, Tags, Location, and Zone. You can also include the Info Module in the profile by toggling its switch on or off.
6. Additional options at the bottom include applying, cloning, or deleting the profile.
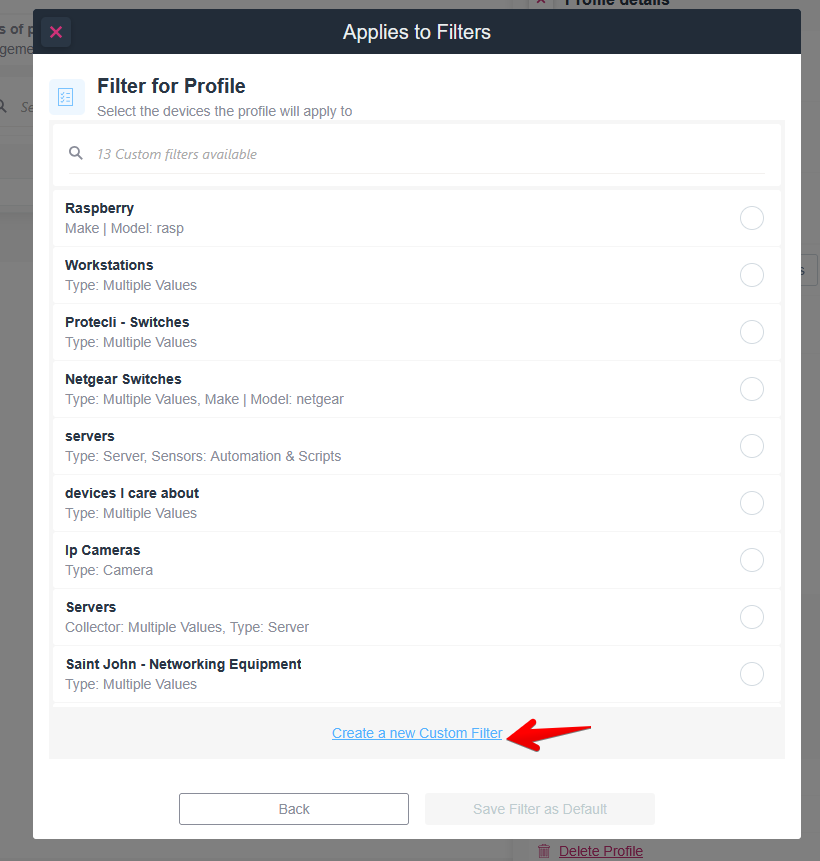
Filter Selection for Profile
1. View and select existing filters from a list. Each filter has its name and type, such as Raspberry, Workstations, and Netgear Switches, with detailed attributes like model or sensor types.
2. Use the search bar at the top to find specific filters among 13 available custom filters.
3. To create a new custom filter, click the "Create a new Custom Filter" link at the bottom.
4. Use the "Back" button to return to the previous screen or "Save Filter as Default" to apply changes and set a selected filter as the default for this profile.
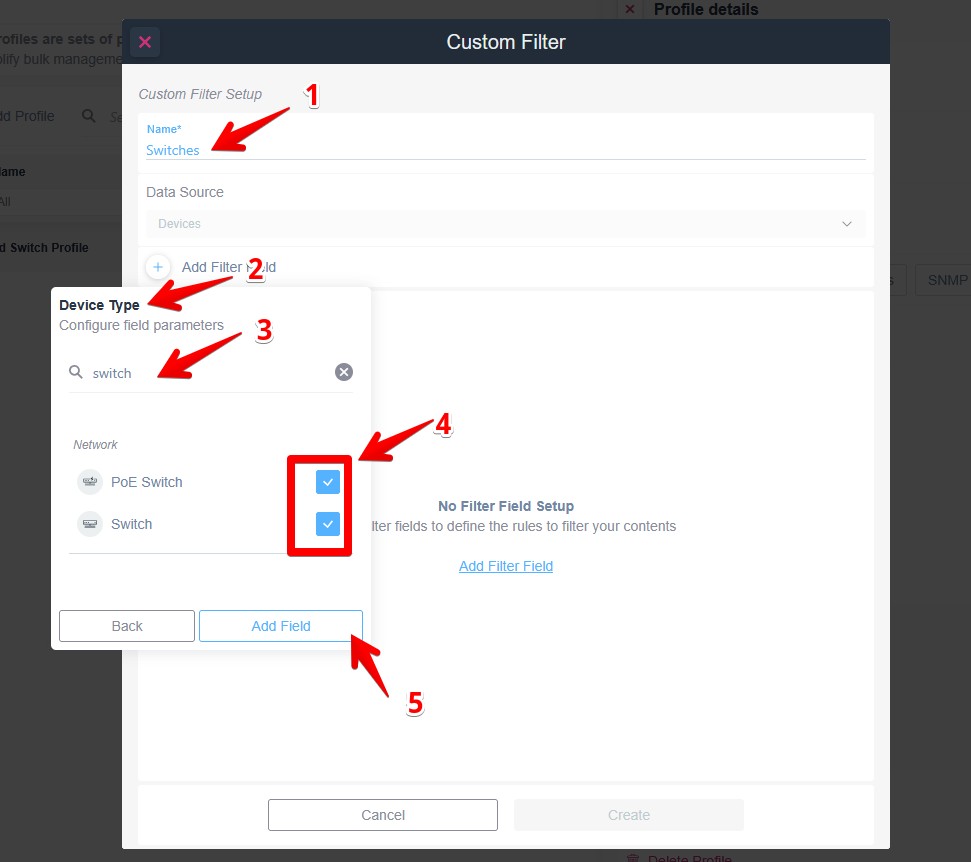
Configuring a Custom Filter in a Software Application
1. Enter a name for the custom filter in the "Name" field. In this example, it is "Switches."
2. Click on "Add Filter Field" to begin configuring the filter parameters.
3. In the "Device Type" configuration window, type "switch" into the search field to find relevant options.
4. Select the checkboxes next to "PoE Switch" and "Switch" to include these options in the filter.
5. Click "Add Field" to apply these selections to your custom filter setup.
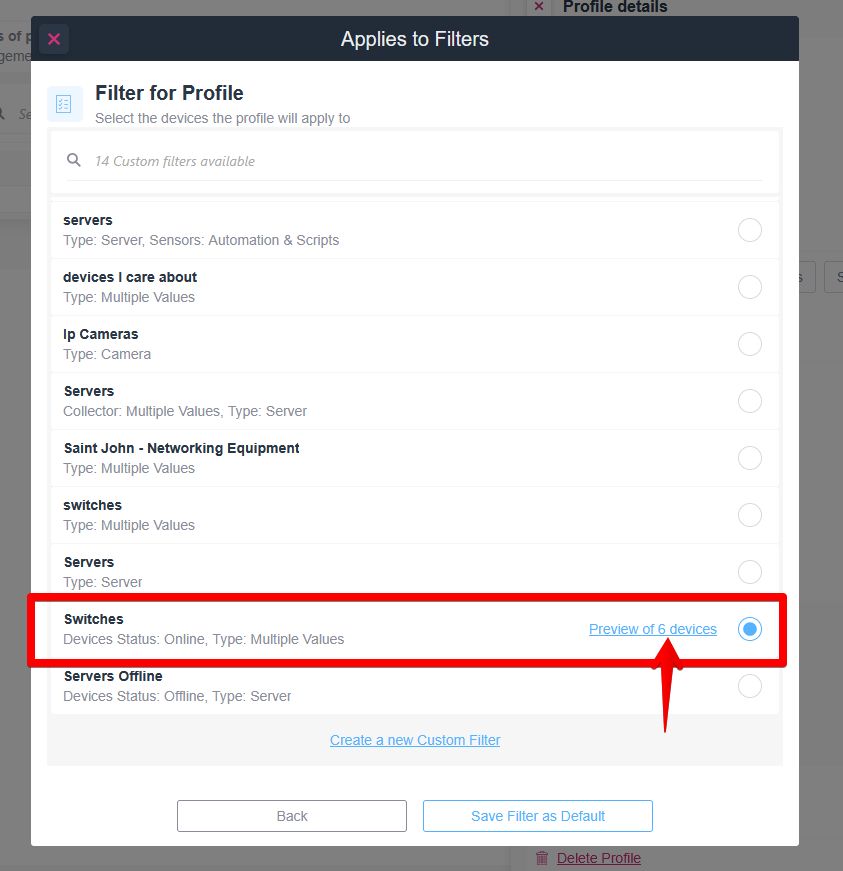
Filter Selection for Profile in Software
1. Access the "Filter for Profile" window to select devices the profile will apply to.
2. Review the list of available filters. Each entry includes the type and specific values, such as "servers," "devices I care about," or "Ip Cameras."
3. Locate the filter labeled "Switches." This filter applies to devices with an online status and supports multiple values.
4. To select the "Switches" filter, click the radio button next to it.
5. For details on the devices included in the "Switches" filter, click the "Preview of 6 devices" link.
6. Once the desired filter is selected, choose either "Save Filter as Default" or select the "Back" button to return to the previous menu.
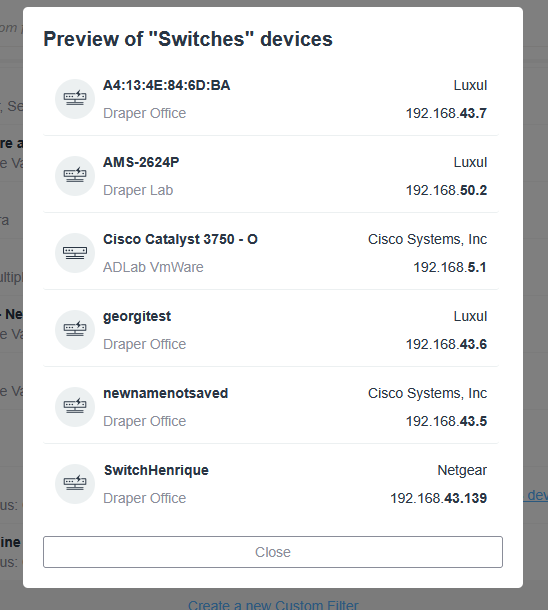
Preview of Switches Devices List
1. Device "A4:13:4E:84:6D:BA" is associated with Luxul, located in Draper Office, IP address 192.168.43.7.
2. Device "AMS-2624P" is associated with Luxul, located in Draper Lab, IP address 192.168.50.2.
3. Device "Cisco Catalyst 3750 - O" is associated with Cisco Systems, Inc, located in ADLab VmWare, IP address 192.168.5.1.
4. Device "georgitest" is associated with Luxul, located in Draper Office, IP address 192.168.43.6.
5. Device "newnamenotsaved" is associated with Luxul, located in Draper Office, IP address 192.168.43.5.
6. Device "SwitchHenrique" is associated with Netgear, located in Draper Office, IP address 192.168.43.139.
Use this list to review device associations, locations, and IP addresses. Press "Close" to exit the preview.
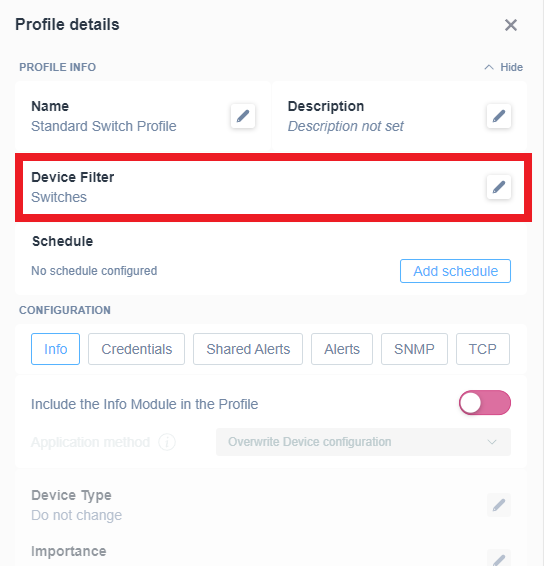
Configuring Profile Details in the Software Interface
1. View the "Profile details" section to manage profile settings.
2. Under "Profile Info," there are fields for "Name" and "Description." The name is set to "Standard Switch Profile," and the description is not set.
3. The "Device Filter" is set to "Switches." Click the pencil icon to edit the device filter.
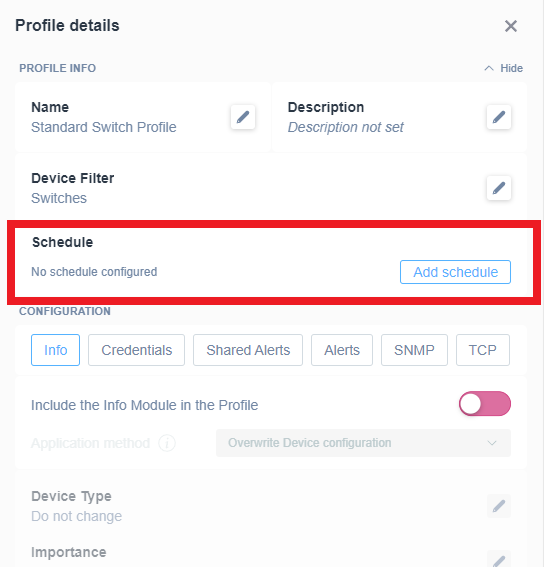
4. In the "Schedule" section, no schedule is configured. Click "Add schedule" to set up a schedule.
5. The "Configuration" tab includes options like Info, Credentials, Shared Alerts, Alerts, SNMP, and TCP.
6. Enable the "Include the Info Module in the Profile" option by toggling the switch to purple (on).
Set a Recurring Application Schedule
Once a Device Filter has been set on the profile, a Schedule becomes available. Enabling it lets Domotz automatically apply the profile, on a recurring basis, to every device that matches the filter, so that devices matching it for the first time (for example, a newly discovered and identified device) are configured without any manual action.
Profile Details and Configuration Setup
1. Under "Profile Info," check the "Name" as "Standard Switch Profile" and "Description" which is currently unset.
2. The "Device Filter" is set to "Switches."
3. In the "Schedule" section, there is no schedule configured. To add a schedule, select "Add schedule."
4. In the "Configuration" section, you can toggle between different modules: Info, Credentials, Shared Alerts, Alerts, SNMP, or TCP.
5. Ensure the "Include the Info Module in the Profile" option is toggled on, indicated by the switch being active.
6. The "Device Type" is set to "Do not change."
7. The "Importance" setting is not specified.
To configure a Schedule
- Open the profile’s details panel and locate the Schedule section, shown below the Device Filter, then click Add Schedule. This opens the Configure Schedule dialog.
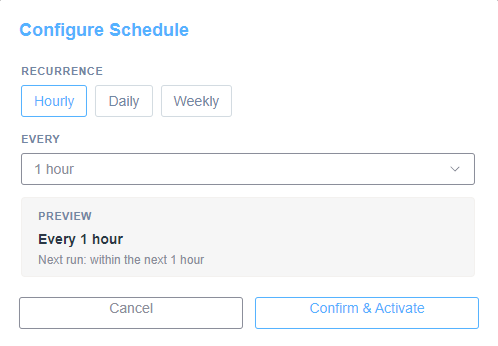
- Under Recurrence, choose Hourly, Daily, or Weekly:
- Hourly — select an interval from the Every dropdown: 15 minutes, 30 minutes, 45 minutes, 1 hour, 2 hours, 3 hours, 6 hours, or 12 hours. This is the shortest available cycle, with 15 minutes as the minimum interval.
- Daily — set an Hours / Minutes time of day for the schedule to run.
- Weekly — select the day(s) of the week, plus an Hours / Minutes time of day for the schedule to run.
- For Daily and Weekly schedules, a note under the Time fields confirms the timezone the time will be interpreted in (your account’s configured timezone, for example America/Denver).
- A Preview panel summarizes the configured cadence in plain language (for example, Every day at 09:00 or Every Mon at 09:00) along with the Next run date and time in your local timezone.
- Click Confirm & Activate to save the schedule and set it to Active, or Cancel to discard changes.
Configure Schedule Panel for Automated Tasks
1. Choose a recurrence pattern by selecting one of the options: Hourly, Daily, or Weekly.
2. Specify the interval in the "Every" dropdown menu. For example, select "1 hour" for hourly recurrence.
3. Review the schedule details in the "Preview" section, which shows the frequency and the next run time.
4. To finalize, click the "Confirm & Activate" button. To discard changes, click "Cancel".
Back in the profile’s details panel, the Schedule section reflects the saved configuration: a status badge (Active or Paused), the recurrence summary, and the Next run date and time. Use the toggle next to the edit icon to pause or resume the schedule without changing its configured recurrence.
Profile Details Configuration Interface
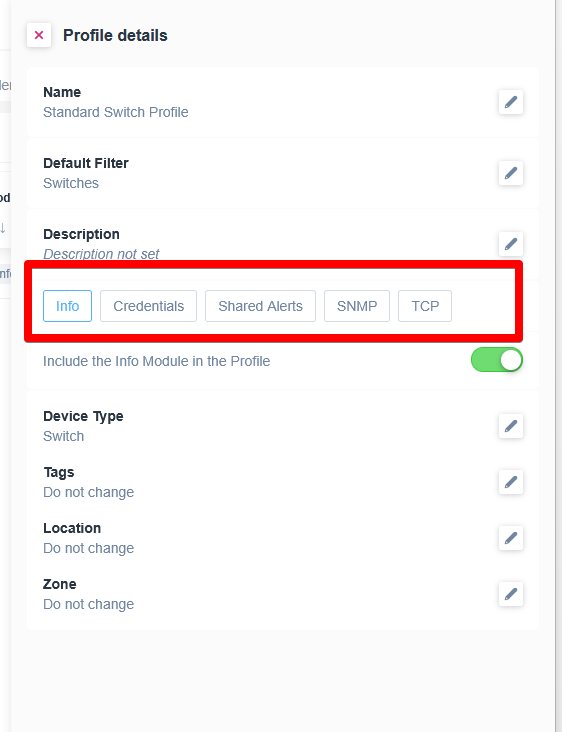
1. The "Profile details" section shows the parameters for configuring a profile.
2. The "Name" field is set to "Standard Switch Profile" and can be edited.
3. "Default Filter" is set to "Switches" with an edit option.
4. The "Description" field indicates "Description not set" and is editable.
5. Below the description, there are tabs labeled: "Info," "Credentials," "Shared Alerts," "SNMP," and "TCP," used for navigating different sections.
6. "Include the Info Module in the Profile" can be toggled on or off. It is currently on.
7. "Device Type" is set to "Switch" and can be edited.
8. "Tags," "Location," and "Zone" are marked as "Do not change" but are editable.
Creating a Profile from an Existing Device
You can also create a new Device Profile directly from an existing device. From the device details page, select Create a Profile from Device in the Actions section. Domotz will automatically generate a new profile and populate it with the current settings configured on that device for all supported modules. You can then review and adjust these settings for the newly created profile.
Saving Changes
Profile settings are saved automatically as you create or edit them. There is no need to manually save progress between module configurations. Once all desired changes are complete, return to the main profile list to see your updated or newly created profile.
Tips for Profile Management
- Start with a minimal configuration to validate desired outcomes before adding more modules.
- Use descriptive names for profiles to simplify identification and reuse.
- Use the default filter to align the profile with specific device types or groups for easier reapplication.
- Regularly review and update existing profiles to maintain configuration consistency across devices.
4. Applying a Profile
Device Profiles can be applied manually, either from the Profiles menu or directly from the Device Details page, or automatically through a recurring Schedule configured on the profile.
When a profile is applied, its configured module settings are pushed to the selected device(s). For manual applications, this copies the profile’s configuration to the device at that point in time: there is no ongoing linkage between the profile and the device, and changes made later to the profile will not automatically propagate. Profiles with an active recurring Schedule are reapplied to all matching devices at every scheduled run.
Please note:
Steps to Apply a Profile
Device Details
Apply a Profile from the right Quick View
Applying a Profile in Device Details
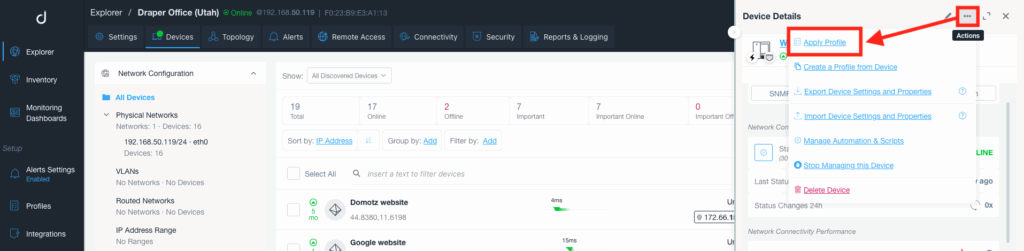
1. Navigate to the "Devices" tab in the top navigation bar to view a list of all network devices.
2. Select a specific device from the list by clicking on its row. This opens the "Device Details" panel on the right side.
3. Click the "Actions" button in the top right corner of the "Device Details" panel.
4. From the dropdown menu, select "Apply Profile" to apply a predefined configuration profile to the selected device. Use this option to ensure the device settings match network requirements.
- Go to collector Devices List or Inventory and click the device you want to configure.
The quick view opens on the right side of the screen. - Select Apply Profile.
- Choose the desired profile from the list and click Apply Profile.
- Check the acknowledgment box and click Continue to complete the operation.
- The selected profile will be immediately applied to the device.
The selected profile will be immediately applied to the device.
Apply a Profile from the Device Details Full View

Device Details and Profile Application
1. The page displays device details for a Windows Desktop, including its online status and IP address (192.168.50.115).
2. Under the "Actions" panel on the right, a red highlight indicates the "Apply Profile" option.
3. To apply a profile to this device, select "Apply Profile" from the actions menu.
4. Additional options in the "Actions" panel include creating a profile from the device, managing automation and scripts, and exporting device settings and properties.
5. The left navigation menu includes sections such as Explorer, Inventory, Monitoring Dashboards, and Alerts Settings. Select these sections for more functionalities.
1. Go to the Collector Devices List or Inventory and click the device you want to configure.
2. Click the Full View icon (or open the device directly in full view).

Network Device Information and Options
1. Check the device model labeled "R0 - UDM PRO".
2. Note the status icon showing connection for 8 months.
3. If needed, set a location or zone for the device.
4. Observe the latency, displayed as less than 1 ms.
5. Identify the manufacturer as Ubiquiti Inc.
6. Find the device’s IP address: 192.168.86.1.
7. Click the "Full view" icon to see more detailed information.
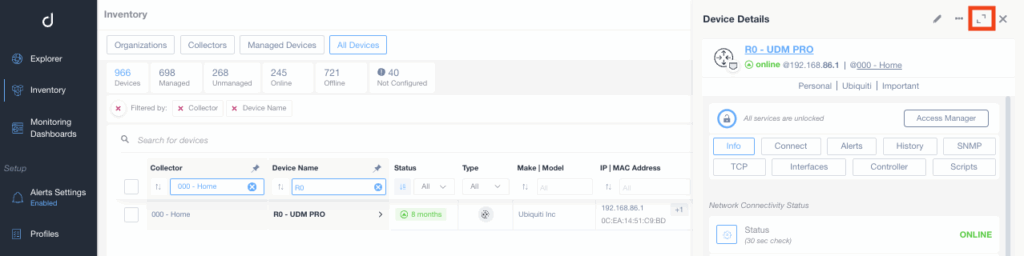
Accessing Device Details in the Inventory Dashboard
1. In the Inventory section, locate the tab labeled "All Devices" to view a list of available devices.
2. Use the search and filter options to find specific devices by "Collector" or "Device Name."
3. Look at the device list to see details such as "Collector," "Device Name," "Status," "Type," "Make/Model," and "IP/MAC Address."
4. Select a specific device row, such as "R0 - UDM PRO," to view more details on the right panel titled "Device Details."
5. In the "Device Details" panel, see further information including the device's online status, IP address, and location.
6. Access additional options like Info, Connect, Alerts, History, SNMP, TCP, Interfaces, Controller, and Scripts for more actions or details related to the device.
7. To exit or close the detailed view, click the "X" button in the top right corner of the "Device Details" panel.
4. Select Apply Profile.
5. Choose the desired profile from the list and click Apply Profile.
6. Check the acknowledgment box and click Continue to complete the operation.
The selected profile will be immediately applied to the device.
Profiles Section
Select Target Devices
A modal will appear, allowing you to select which devices the profile should be applied to. You can:
- Select individual devices manually.
- Choose a saved device filter to apply the profile to a predefined group of devices.
- If the profile has a default filter, it will be automatically selected in this step.
- Create a new device filter directly within this modal if needed.
Review Module Summary and Application Modes
The next modal displays a summary of all enabled modules in the selected profile and indicates whether each module is set to Additive or Overwrite mode.
- Overwrite mode replaces existing device configurations for that module with those defined in the profile.
- Additive mode adds the new configurations from the profile without overwriting current settings.
Users must select the confirmation checkbox acknowledging that they want to proceed with the profile application. Once confirmed, the option to continue becomes available.
Behavior and Limitations
- Profiles can be applied manually at any time, or automatically on a recurring basis if a Schedule is enabled on the profile’s saved Device Filter.
- Without an active Schedule, profiles are not automatically linked to devices; manual reapplication is required to push later configuration changes.
- Applying a profile does not modify device settings outside of the enabled modules.
- Application time increases with the number of devices and active modules.
Best Practices for Applying Profiles
- Use filters to ensure you are applying the profile to the intended devices.
- Enable a recurring Schedule on profiles intended for device categories that grow over time (for example, all switches, or all devices from a given vendor), so newly discovered devices are configured automatically rather than waiting for manual reapplication.
- Start with smaller groups of devices to confirm desired behavior before broader application.
- Review the notification history to confirm successful completion.
- Reapply profiles as needed after making edits to ensure devices are aligned with the updated configuration.
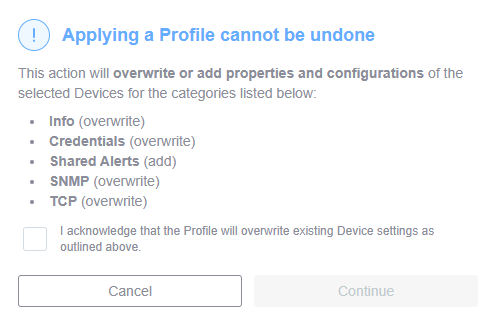
Warning about applying a profile.
1. Applying a Profile cannot be undone.
2. The action will overwrite or add properties and configurations for selected devices in the following categories:
- Info: overwrite
- Credentials: overwrite
- Shared Alerts: add
- SNMP: overwrite
- TCP: overwrite
3. Check the box to acknowledge that the Profile will overwrite existing device settings.
4. Use the "Cancel" button to abort the action.
5. The "Continue" button is disabled until the acknowledgement box is checked.
5. Managing and Reapplying Profiles
Once a profile has been created and applied, you can continue managing it from the Profiles menu. Management actions allow you to update configurations, reapply profiles, and track recent activity.
Viewing Profiles
- Each profile entry displays its Name, Last Modified timestamp, the user who made the modification, the enabled Modules, the Default filter, the Last Applied timestamp, and available actions to Apply or Clone a profile.
- Selecting a profile opens its details view, where you can review module configurations and edit settings.
Reapplying a Profile
- When a profile is edited or updated, the latest changes must be manually reapplied to propagate to devices (unless a Schedule recurrence has been configured, in which case the changes will be applied automatically within the configured time).
- To reapply a profile manually:
- Locate the profile and select Apply from either the list view or the profile details page.
- Follow the same steps outlined in Applying a Profile.
- The reapplication process overwrites or adds module settings based on the configuration defined in the profile (Overwrite or Additive mode).
Reviewing Application History
- Each entry shows which profile was applied, when it was applied, how many devices were affected, and what user applied the profile.
- Use this record to confirm completion of large-scale applications or troubleshoot missed updates.
Modifying or Deleting Profiles
- To edit a profile, open it from the list and adjust module configurations or filters as needed. All changes are saved automatically.
- To delete a profile, select the Delete Profile action from the profile list or profile view. Deleting a profile does not remove any configurations already applied to devices.
Best Practices for Ongoing Management
- Regularly review and refine profiles to align with evolving network or monitoring requirements.
- Use consistent naming conventions for easier tracking across multiple profiles.
- Keep documentation of applied profiles and their intended device groups for operational consistency.
6. Best Practices and Troubleshooting
Best Practices for Profile Management
- Validate before scaling: Always test new profiles on a small number of devices before applying them in bulk. This helps ensure settings behave as expected.
- Keep modules minimal: Only enable the modules needed for your specific device configurations. This reduces the risk of unintended changes.
- Use filters strategically: Leverage default and saved filters to quickly reapply profiles to consistent sets of devices.
- Review regularly: Schedule periodic reviews of profiles to ensure they remain aligned with current monitoring and credential requirements.
- Reapply profiles regularly, or enable a Schedule: If a profile does not have a recurring Schedule configured, reapply it on a regular basis to ensure newly discovered and managed devices are properly configured. Alternatively, enable a recurring Schedule on the profile’s Device Filter, with intervals as short as every 15 minutes, so newly matched devices are configured automatically.
Troubleshooting Profile Applications
If a profile fails to apply or does not produce the expected results, consider the following checks:
Application Fails or Is Incomplete
- Verify that all target devices are Managed.
- Ensure you have the required permissions (ACL or RBAC) to apply profiles.
Unexpected Configuration Results
- Review module modes (Overwrite or Additive) to ensure the correct application behavior.
- Confirm that modules you intended to configure were enabled in the profile before applying.
- Reapply the profile if settings were updated after the initial application.
Missing or Deleted Profiles
- Deleted profiles do not remove their configurations from devices but cannot be reapplied once removed.
- If you need to reuse a deleted profile’s configuration, recreate it from a device using Create a Profile from Device.
Scheduled Application Not Running
- Confirm the profile has a Device Filter set; a Schedule cannot be configured without one.
- Confirm the Schedule toggle is set to Active, and check the displayed Next run time.
- Verify that the devices you expect to be configured currently match the saved filter.
- Ensure you have the required permissions (ACL or RBAC) to manage and apply profiles.