
Description
This article describes the configuration of the FortiGate SNMP agent so that Domotz can retrieve device data via the SNMP protocol. It requires configuration on both the FortiGate and Domotz sides.
FortiGate configuration
The FortiGate SNMP configuration can be performed in two ways: either through the Graphical User Interface (GUI) or the Command Line Interface (CLI).
FortiGate SNMP configuration requires the following two mandatory steps:
⦁ Enable SNMP protocol on FortiGate port
⦁ Enable SNMP agent and configure the SNMP connection details
FortiGate configuration via GUI
– Enable SNMP protocol on FortiGate port:
Log in the FortiGate GUI using an administrator user and navigate to the “Network / Interface” section.
Identify the Firewall interface or port or VLAN that will be used by the Domotz collector to query the FortiGate via SNMP. Let’s assume for the scope of this article that it is “port 1”:
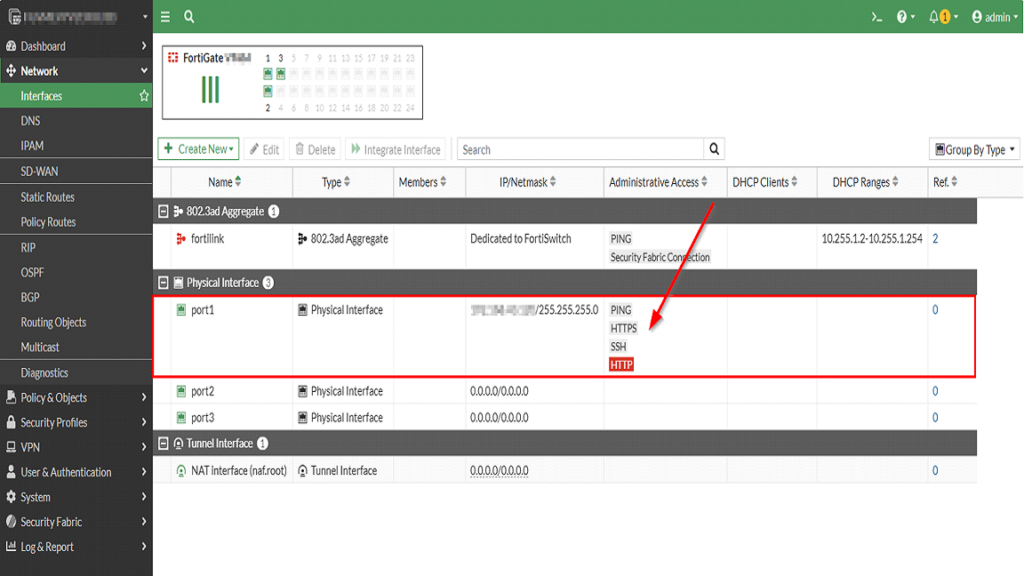
Configuring Administrative Access for a Network Interface
1. Navigate to the "Network" section and select "Interfaces" from the left sidebar.
2. In the Interfaces table, locate the row for "port1."
3. Under "Administrative Access" for "port1," ensure that necessary protocols like PING, HTTPS, SSH, and HTTP are enabled.
4. Use the "Create New" button if you need to add a new interface configuration.
SNMP is not normally enabled by default, so it requires to be set explicitly.
Edit the “port 1” by double clicking the line or using right-click on it:
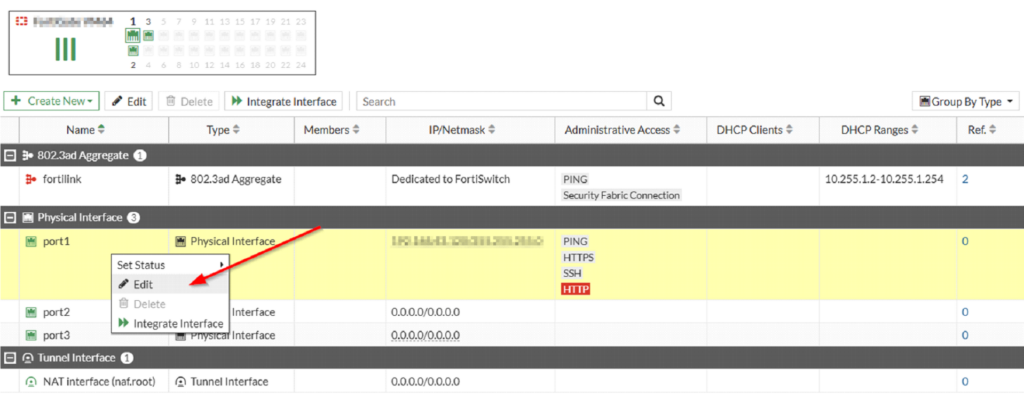
Editing a Physical Interface on Fortinet Interface List
1. Navigate to the "Interface" section where different types of interfaces are listed, including 802.3ad Aggregates, Physical Interfaces, and Tunnel Interfaces.
2. In the "Physical Interface" section, locate the row for "port1" labeled as a "Physical Interface."
3. Right-click on "port1" to open a context menu with options.
4. Select "Edit" from the menu to customize settings for "port1."
5. The interface details show that "port1" has administrative access enabled for PING, HTTPS, and SSH, with the HTTPS option highlighted.
Use these steps to alter the configuration or settings of "port1" as required.
The following page appears. Enable SNMP protocol in the “Administrative Access” section as shown in the following image:
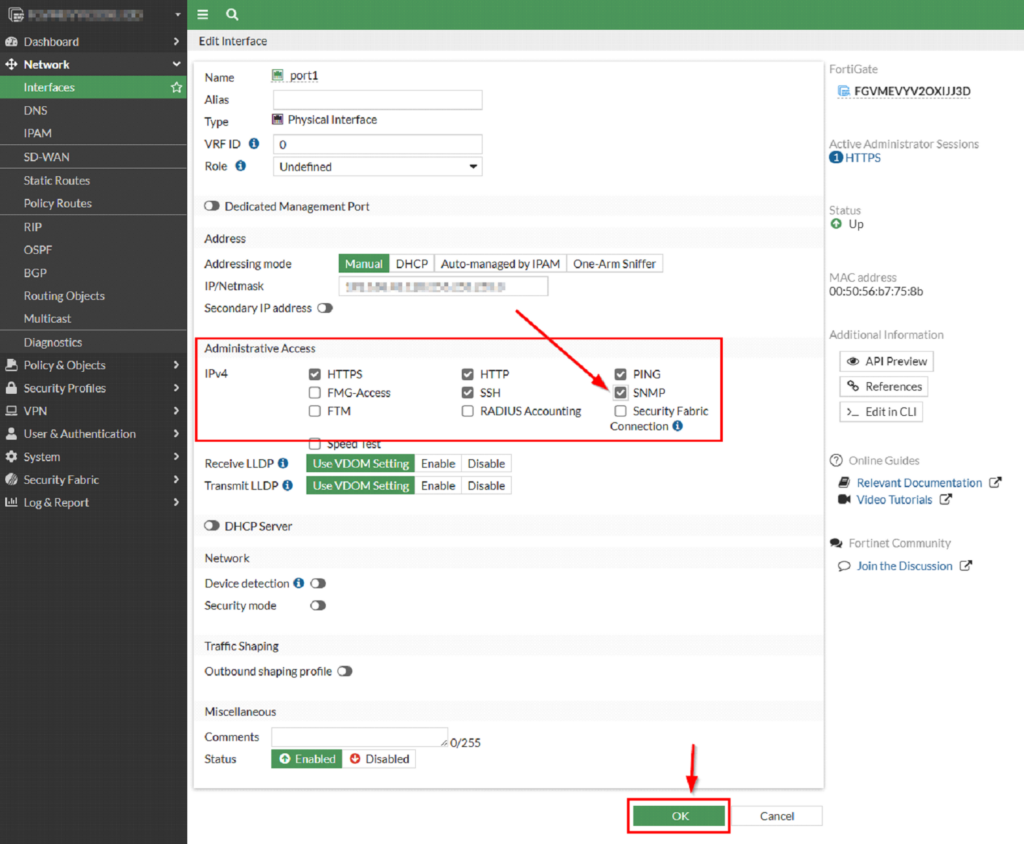
Configuring Administrative Access and Interface Settings
1. In the 'Edit Interface' section, input the desired name for the interface in the 'Name' field.
2. Set the 'Type' to 'Physical Interface'.
3. Under 'Address', choose 'Manual' for the addressing mode and enter the IP/Netmask.
4. In the 'Administrative Access' section, check the boxes for 'HTTPS', 'PING', and 'SNMP' to enable these types of access via IPv4.
5. Scroll down and adjust other settings as needed, such as enabling or disabling LLDP options under 'Receive LLDP' and 'Transmit LLDP'.
6. Verify the 'Status' in the 'Miscellaneous' section is marked as 'Enabled'.
7. Once all configurations are set, click the 'OK' button at the bottom right to save changes.
Then press OK button on the bottom of the page, read the configuration page that might appear and if ok then Confirm that you want to proceed.
After this process, SNMP administrative access will be enabled on the port and the interface page looks like the following:
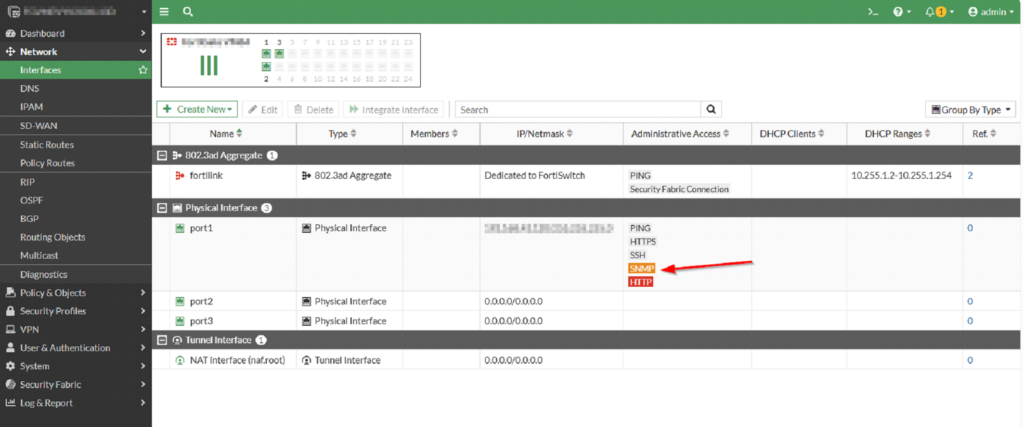
Network Interface Configuration Overview
1. Navigate to the "Network" section in the left sidebar and select "Interfaces" to view all available network interfaces.
2. The main interface panel lists interface details such as Name, Type, Members, IP/Netmask, Administrative Access, DHCP Clients, DHCP Ranges, and a reference number (Ref.).
3. The "fortilink" entry is an 802.3ad Aggregate type, dedicated to FortiSwitch, with an IP range from 10.255.12 to 10.255.1.254, and administrative access through PING and Security Fabric Connection.
4. "port1" is a Physical Interface allowing PING and HTTPS administrative access, also showing a Security entry for SSH, SNMP, and HTTP access.
5. Other ports like "port2" and "port3" show as Physical Interfaces with IPs set to 0.0.0.0.
6. The "NAT Interface (natroot)" categorized under Tunnel Interface also displays its IP as 0.0.0.0.
Use this interface to manage, configure, and monitor the network connections and access permissions for each interface listed.
– Enable SNMP agent and configure the SNMP connection details:
This example uses SNMP v3 between Domotz and FortiGate. SNMP v3 is recommended SNMP version of important network devices.
The configurations are in the “System / SNMP” page as depicted below.
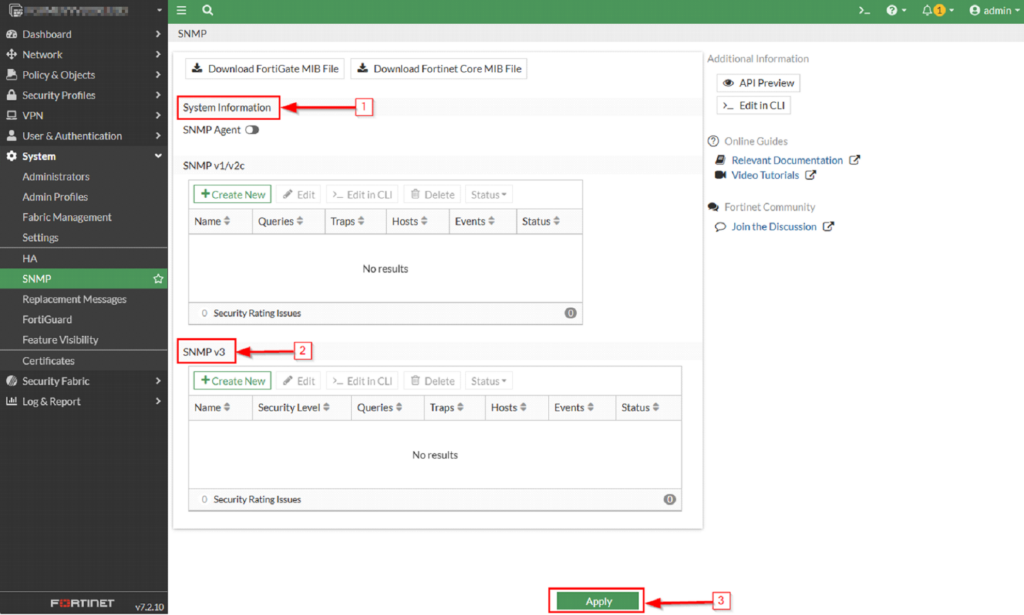
SNMP Configuration in Fortinet Interface
1. In the Fortinet interface, navigate to the SNMP section under the System menu.
2. Within the SNMP section, you will find two subsections: "SNMP v1/v2c" and "SNMP v3." Choose the appropriate SNMP version for your configuration.
3. After configuring your desired settings for the chosen SNMP version, click the "Apply" button at the bottom to save the changes.
If no SNMP option is under the system, check the VDOM options, maybe global is not selected. This happens when the VDOM option is enabled. In that case, the SNMP option is visible under global VDOM.
System Information
Enable the SNMP agent or snmpd and type your device Description, Location and the Contact info (enabling SNMP agent is the only mandatory activity here). An example is shown below.
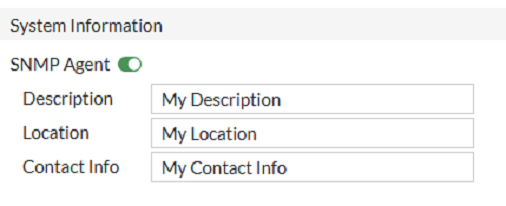
System Information Configuration Panel
1. Enable or disable the SNMP Agent using the toggle switch.
2. Enter the system description in the "Description" field labeled as "My Description."
3. Specify the location information in the "Location" field labeled as "My Location."
4. Provide contact information in the "Contact Info" field labeled as "My Contact Info."
Configure the SNMP community and protocols (section ”SNMP v1/v2c” or “SNMP v3”)
Click “Create New” button in the SNMP v3 section (or use SNMP v1/v2c in case you want to configure v1 or v2c).
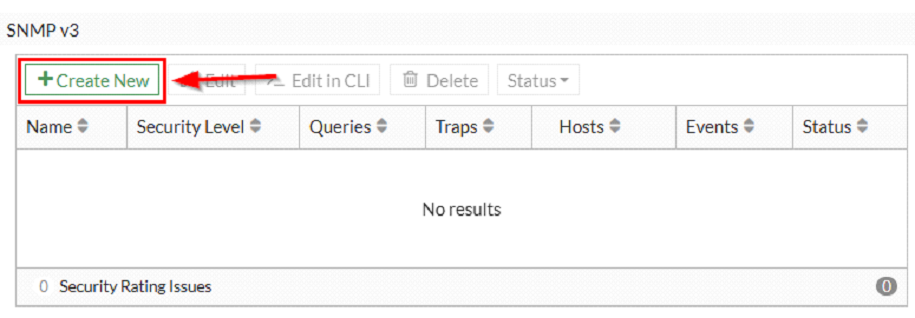
Creating a New SNMP v3 Entry
1. To create a new SNMP v3 entry, click the "Create New" button, located at the top-left corner of the menu.
2. The main table displays columns including Name, Security Level, Queries, Traps, Hosts, Events, and Status.
3. Currently, the table shows "No results," indicating no entries are present.
Use the "Create New" button to initiate the setup of a new entry within this interface.
The following pop-up appears:
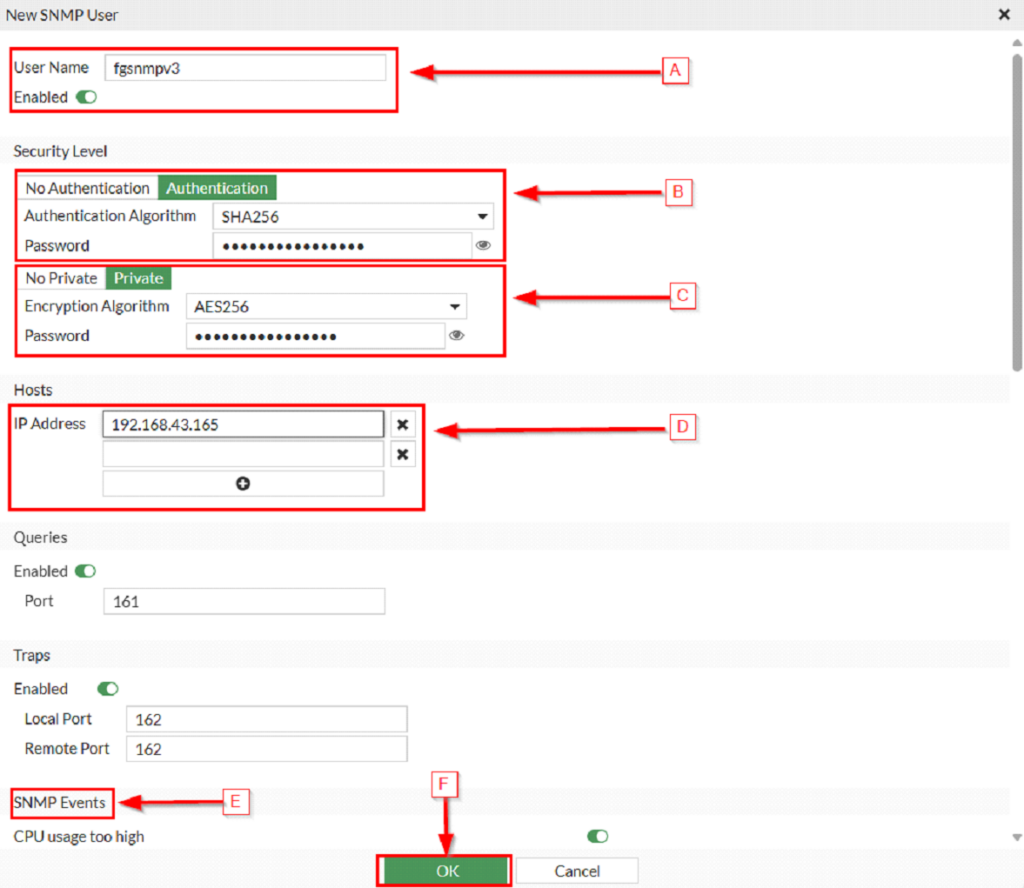
Creating a New SNMP User Configuration
1. Enter a username in the "User Name" field and ensure the "Enabled" toggle is active.
2. In the "Security Level" section, select either "No Authentication" or "Authentication." If "Authentication" is selected, choose an "Authentication Algorithm" and enter the corresponding password.
3. Choose either "No Private" or "Private" for privacy options. If "Private" is selected, select an "Encryption Algorithm" and input the necessary password.
4. Under "Hosts," input the IP address in the "IP Address" field.
5. Enable or configure "Queries" and "Traps" as needed. Default port values are 161 for queries and 162 for both local and remote traps.
6. Ensure "SNMP Events" such as "CPU usage too high" are configured properly.
7. Click the "OK" button to save the configuration.
A. Set the SNMP v3 username and enable the configuration. fgsnmpv3 is used in this example.
B. Set the Authentication in the Security level section (if necessary). In case it is required (suggested configuration for a Firewall), set the Authentication Algorithm e.g. SHA256 (as shown in the picture) and type the Authentication password.
C. Set the Encryption in the Security level section (if necessary). In case it is required (suggested configuration for a Firewall), set the Encryption Algorithm e.g. AES256 (as shown in the picture) and type the Encryption password.
D. Set the allowed SNMP host, for our purposes set the Domotz collector IP (in our example it is 192.168.43.165). In case the Domotz collector has got more IPs (for instance if connected to more than one VLAN) then specify the IP which is used to reach the Firewall being configured.
E. Enable further SNMP Events, if necessary. In our case, it is not strictly required for Domotz to work correctly.
F. Press the OK button at the bottom of the pup-up to save the configuration.
Press the “Apply” button at the bottom of the page to save the configuration. This is very important, and everyone tends not to do it, so please bear in mind that it is a mandatory action.
FortiGate configuration via CLI
Connect to FortiGate via CLI on the GUI or though SSH using an administrator user.
– Enable SNMP on FortiGate port
Identify the Firewall interface or port or VLAN that will be used by the Domotz collector to query the FortiGate via SNMP. Let’s assume for the scope of this article that it is “port 1”. Show the port 1 configuration using the following command:show system interface port1
An output like this might be printed in the console:
config system interface
            edit "port1"
                set vdom "root"
                set ip 192.168.43.xxx 255.255.255.0
                set allowaccess ping https ssh http
                set type physical
                set snmp-index 1
            next
end
Let’s focus our attention on allowaccess attribute. Normally, SNMP is not enabled by default in the allowaccess. Add the SNMP protocol to the rest of the other already enabled administrative access for the port you want to configure. Then run the following commands, preferably one line at a time (read output messages and if ok then acknowledge pressing “y”).config system interface
edit "port1" set allowaccess ping https ssh http snmp
next
end
That is because administrative access “ping https ssh http” where already configured in this example so SNMP was the only protocol to add at the end.
Check that SNMP protocol was added to the Allowed administrative Access running again the following command:show system interface port1
The following output should be printed:config system interface
edit "port1" set vdom "root" set ip 192.168.43.xxx 255.255.255.0 set allowaccess ping https ssh http snmp set type physical set snmp-index 1
next
end
Showing that besides previously enabled protocols there is also SNMP.
– Enable SNMP agent and configure the SNMP connection details
Customize the following commands to set up the System Information:
config system snmp sysinfo
set status enable
set description "My Description"set contact-info "My Contact Info"set location "My Location"
end
Actually, the only mandatory activity here is enabling the status. The other field might be used to enrich the SNMP retrieved information.
Customize the following commands to set up the SNMP community (here SNMP v3 is used and suggested).config system snmp user
# [A]
edit "fgsnmpv3"
# [B] set notify-hosts 192.168.43.165 set security-level auth-priv # [C] set auth-proto sha256 # [D] set auth-pwd my-auth-password # [E] set priv-proto aes256 # [F] set priv-pwd my-priv-password next
end
The italic text must be changed according to your environment as follows:
A. Set the SNMP v3 username. fgsnmpv3 is used in this example.
B. Set the allowed SNMP host, for our purposes set the Domotz collector IP (in our example it is 192.168.43.165). In case the Domotz collector has got more IPs (for instance if connected to more than one VLAN) then specify the IP which is used to reach the Firewall being configured.
C. Set the Authentication (if necessary). In case it is required (suggested configuration for a Firewall), set the Authentication Algorithm e.g. sha256 (as shown in the command).
D. Set the Authentication password.
E. Set the Encryption (if necessary). In case it is required (suggested configuration for a Firewall), set the Encryption Algorithm e.g. aes256 (as shown in the command)
F. Set the Encryption password.
Please use strong passwords for Authentication and Encryption.
Domotz Configuration
Using the Domotz dashboard explored view, open Collector and then click on the firewall you want to configure.
For instance, in my case it is Fortigate-Firewall device.
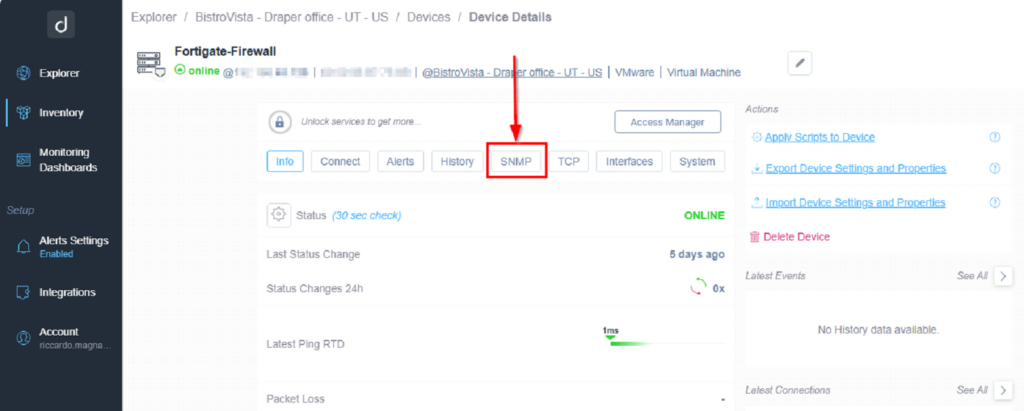
Access the SNMP Tab in Device Details
1. Navigate to the Device Details page for the Fortigate-Firewall.
2. Locate and select the "SNMP" tab among the options, such as Info, Connect, Alerts, History, TCP, Interfaces, and System.
3. The SNMP tab will display any relevant SNMP configurations or options for the device.
4. Use the Actions section on the right to apply scripts, export, or import device settings and properties as needed. Delete Device option is also available here.
5. Check the Latest Events and Latest Connections sections for recent device activity and connectivity details.
Open the SNMP tab:
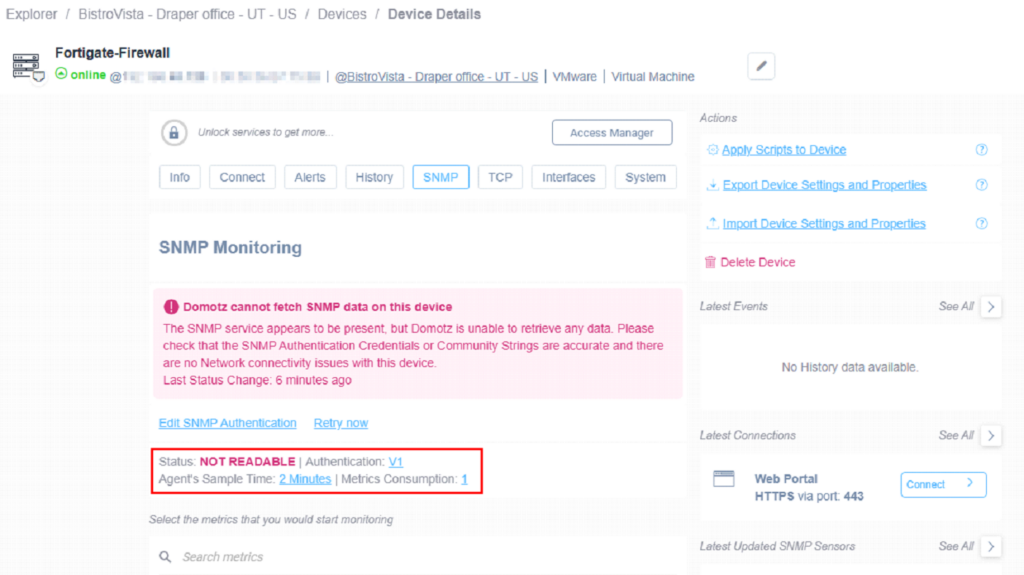
SNMP Monitoring Error in Device Details
1. The SNMP Monitoring section indicates an error: "Domotz cannot fetch SNMP data on this device". Verify SNMP Authentication Credentials and network connectivity.
2. Options available include editing SNMP Authentication and retrying to connect.
3. Status is shown as "NOT READABLE" with Authentication set to "V1". The Agent’s Sample Time is 2 minutes, and Metrics Consumption is 1. Adjust these settings if necessary.
4. On the right, actions include applying scripts and exporting or importing device settings. You can also delete the device.
5. The latest connections detail a Web Portal connection via HTTPS port 443 with the option to connect.
The SNMP status will be NOT READABLE initially (red).
Click the “Edit SNMP Authentication” hyperlink and then the following pop-up will appear:
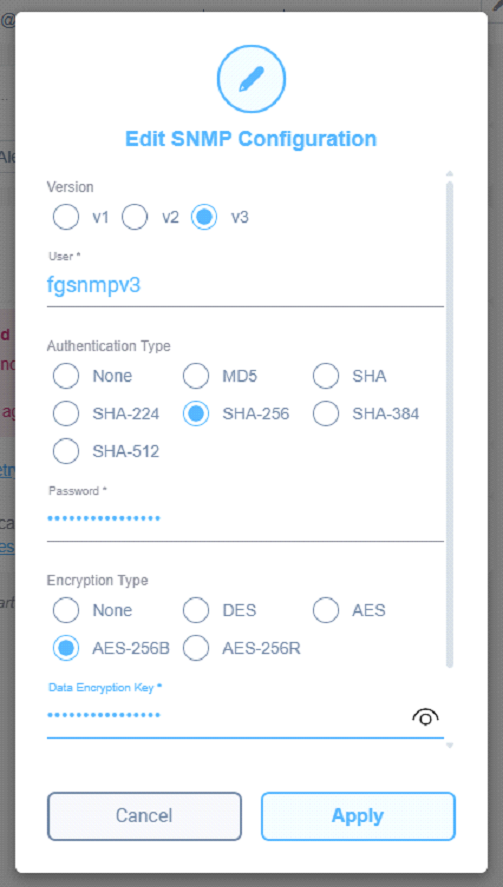
Edit SNMP Configuration Settings
1. Select the SNMP version by choosing one of the options: v1, v2, or v3. The current selection is v3.
2. Enter the user name in the "User" field, which is currently set to "fgsnmpv3."
3. Choose an Authentication Type. Available options are: None, MD5, SHA, SHA-224, SHA-256, SHA-384, and SHA-512. The selected option is SHA-256.
4. Enter the password in the "Password" field.
5. Select an Encryption Type from the following options: None, DES, AES, AES-256B, and AES-256R. The current selection is AES-256B.
6. Enter the Data Encryption Key if required.
7. Use the eye icon to show or hide the entered password.
8. Click "Cancel" to discard changes or "Apply" to save the configuration.
Set the same values:
⦁ Version: e.g. v3
⦁ Username: e.g. fgsnmpv3
⦁ Authentication type: e.g. SHA-256
⦁ Authentication password: e.g. my-auth-password
⦁ Encryption type: AES-256B
⦁ Encryption password: e.g. my-priv-password
in accordance with the parameters specified in the FortiGate configuration section, press “Apply”.
If everything was correctly set, then the FortiGate device on Domotz will result connected to the FortiGate real device:
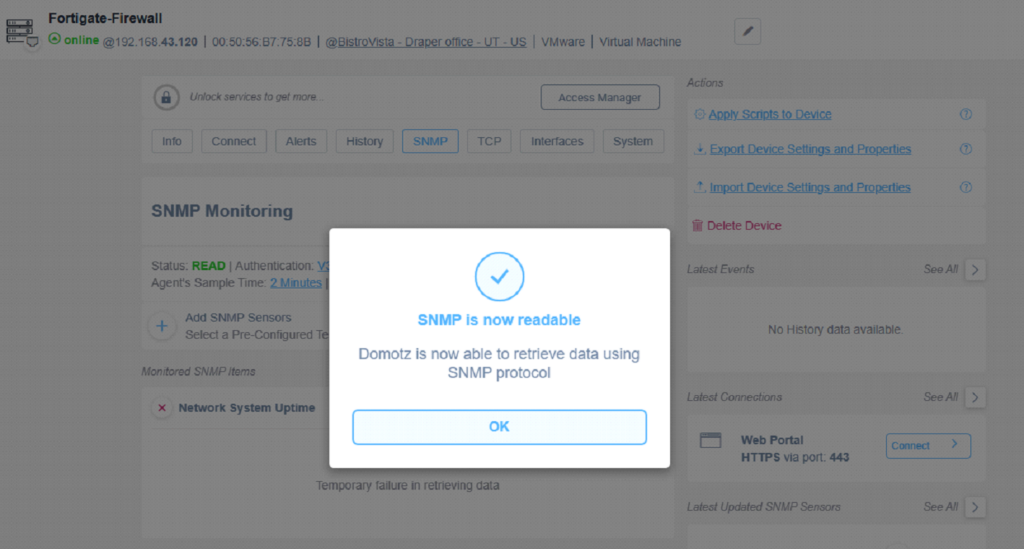
SNMP Monitoring Configuration and Status
1. The section titled "SNMP Monitoring" shows the current status of the system. The status is marked as "READ," indicating successful communication. Authentication is currently masked for security.
2. The sample time for the agent is set to "2 Minutes." This defines how often the system samples SNMP data.
3. An option is available to "Add SNMP Sensors," which allows users to select pre-configured templates for monitoring.
4. Under "Monitored SNMP Items," "Network System Uptime" is listed, but it displays an error indicating a "Temporary failure in retrieving data."
5. A central dialogue confirms that "SNMP is now readable." It indicates that Domotz can retrieve data using the SNMP protocol.
6. The "Actions" menu provides options such as "Apply Scripts to Device," "Export Device Settings and Properties," "Import Device Settings and Properties," and "Delete Device."
7. Under "Latest Connections," a "Web Portal" is available using HTTPS on port 443 with a "Connect" option.
And the SNMP status should turn to READ (green).
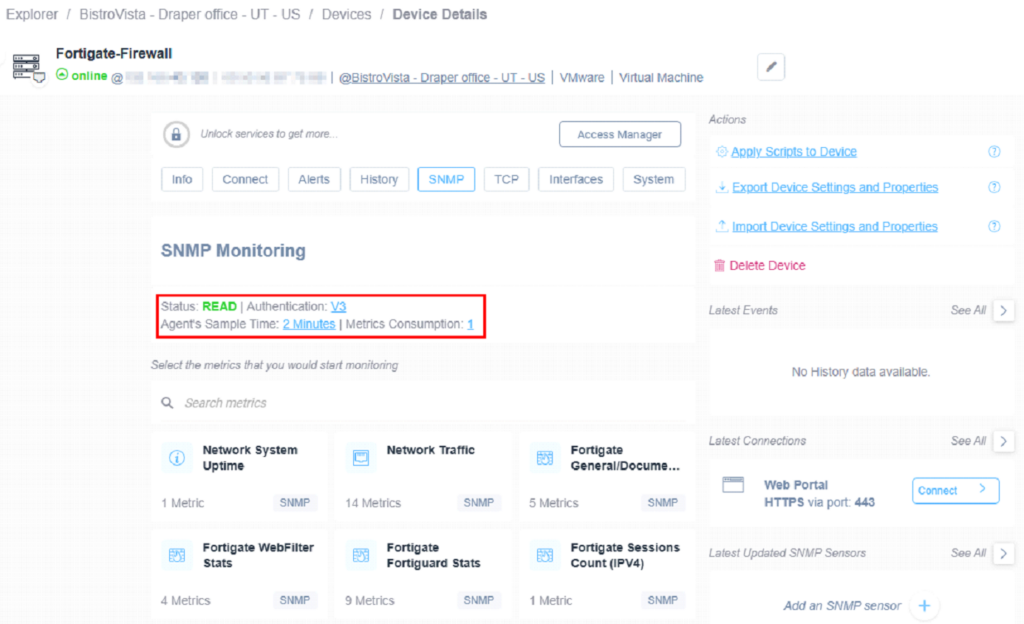
SNMP Monitoring Section in Fortigate-Firewall Device Details
1. At the top of the SNMP Monitoring section, the status is displayed as "READ", indicating active monitoring status.
2. Authentication is set to "V3", which refers to the SNMP version being used for secure communication.
3. The "Agent's Sample Time" is set to "2 Minutes", indicating the data collection interval.
4. "Metrics Consumption" is shown as "1", specifying the number of metrics being consumed.
5. Below these details, users can select metrics to monitor by entering a search term or choosing from listed metrics like "Network System Uptime" or "Network Traffic".
6. Additional actions are available in the Actions panel, such as applying scripts, exporting settings, importing settings, or deleting the device.
7. Recent events, connections, and updates to SNMP sensors are also visible, with the option to connect to the Web Portal via HTTPS.
More information
In case of problem or advanced configuration e.g. VDOM on FortiGate, please have a loot at the following articles:
https://community.fortinet.com/t5/FortiGate/Technical-Tip-How-to-Configure-FortiGate-SNMP-Agent-for/ta-p/196866
and
https://community.fortinet.com/t5/FortiGate/Technical-Tip-How-to-perform-queries-usning-SNMPv3-to-non/ta-p/335112