
The Domotz integration with Autotask PSA streams the information about your devices from Domotz to Autotask PSA, such as name, make, model, MAC address, serial number and IP address, and keeps it up to date. Domotz creates Configuration Items (CIs) in Autotask for your monitored devices, or matches them to the CIs you already have.
The following entities are synchronized:
- Domotz Collectors with Autotask PSA Accounts (companies)
- Domotz Devices with Autotask PSA Configuration Items. Only devices listed as Managed are pushed and kept in sync.
Keeping accurate asset information in your PSA helps with documentation, billing and maintenance, without having to enter device details manually.
This integration is separate from the Autotask PSA ticketing integration, which creates tickets from Domotz alerts. For ticketing, see the Autotask PSA article in the Integrations section.
Setting up the integration takes two phases. First, in Autotask PSA, enable the Domotz – RMM integration vendor and create an API user for it. Then, in Domotz, connect using that API user’s Key and Secret, link your Collectors to Autotask Accounts, and choose which fields to synchronize.
On Autotask PSA: How to set up the integration
Before you start, make sure that:
- You have administrator access to Autotask PSA, to manage integration vendors and create API users.
- Your Autotask instance has at least one active billing code of type Material Cost whose name does not refer to a discount, credit, refund, shipping or freight. Domotz uses it to create the Domotz Monitored Device Product, which is assigned to every Configuration Item created by the integration.
Enable the Domotz integration vendor
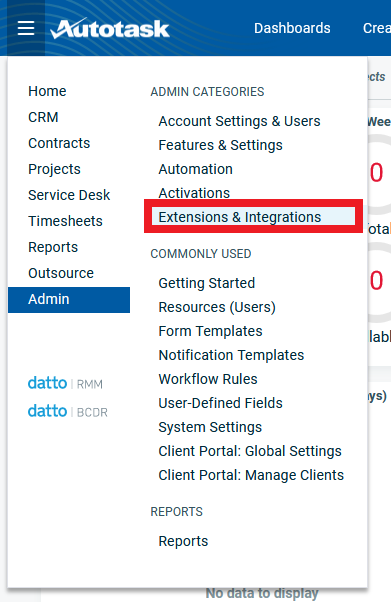
In Autotask, go to Admin > Extensions & Integrations :
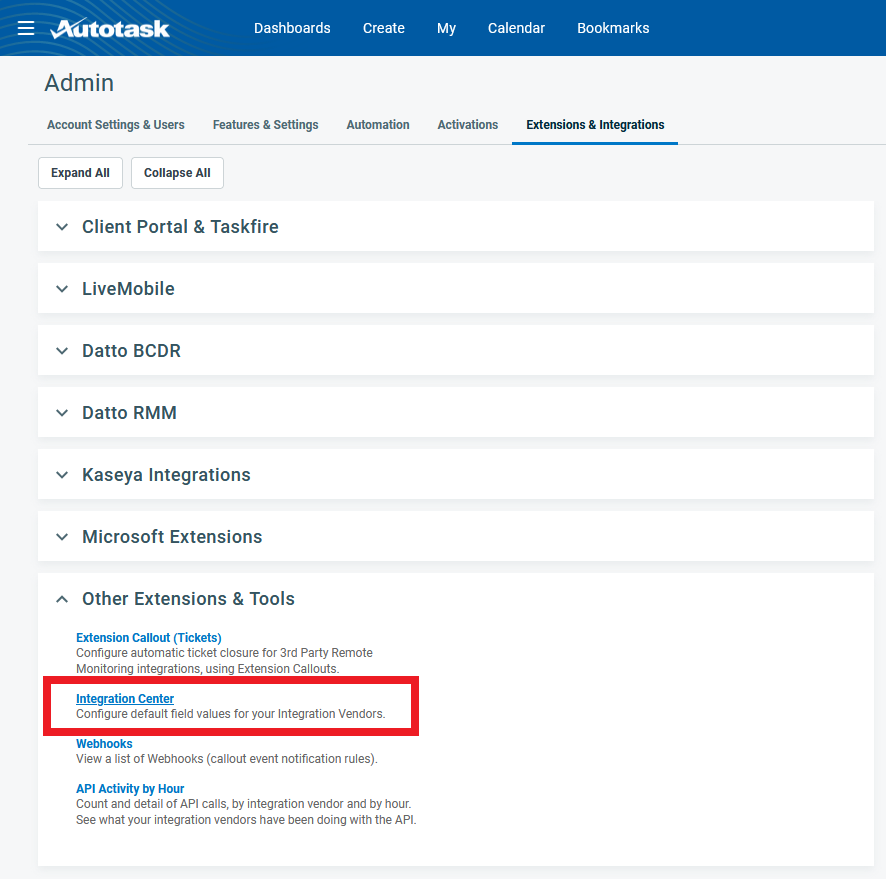
Under “Other Extensions & Tools” click on “Integration Center”:
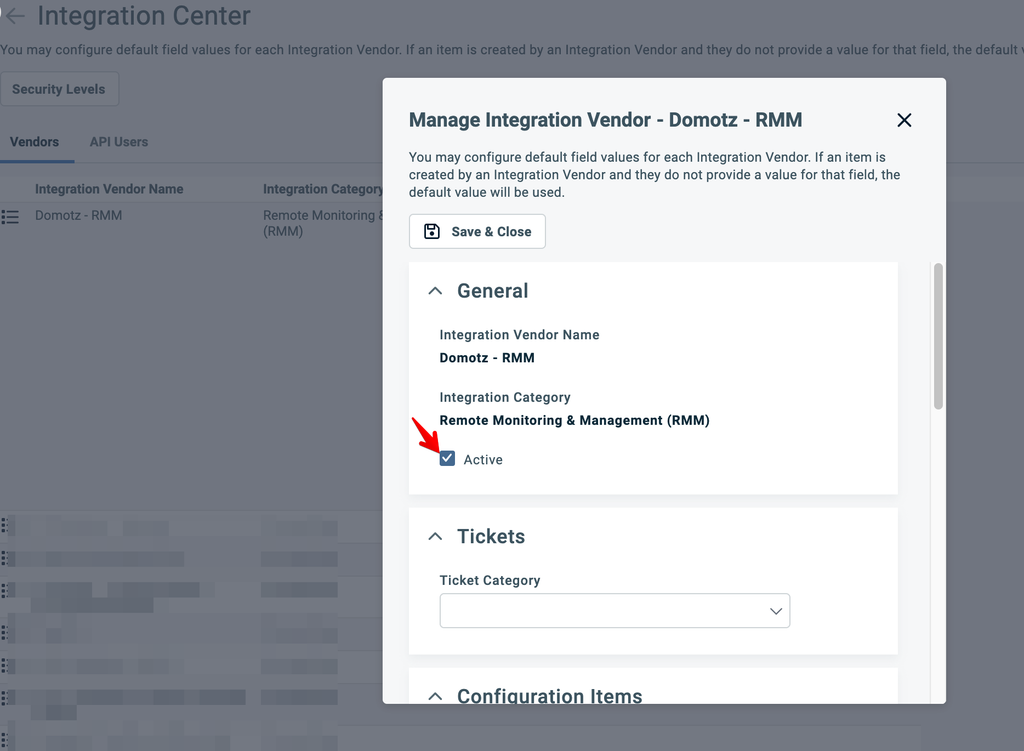
Search for “Domotz – RMM” and place your Mouse over the burger menu and click “Edit”:

Click on checkbox “Active” and then press on “Save & Close”:
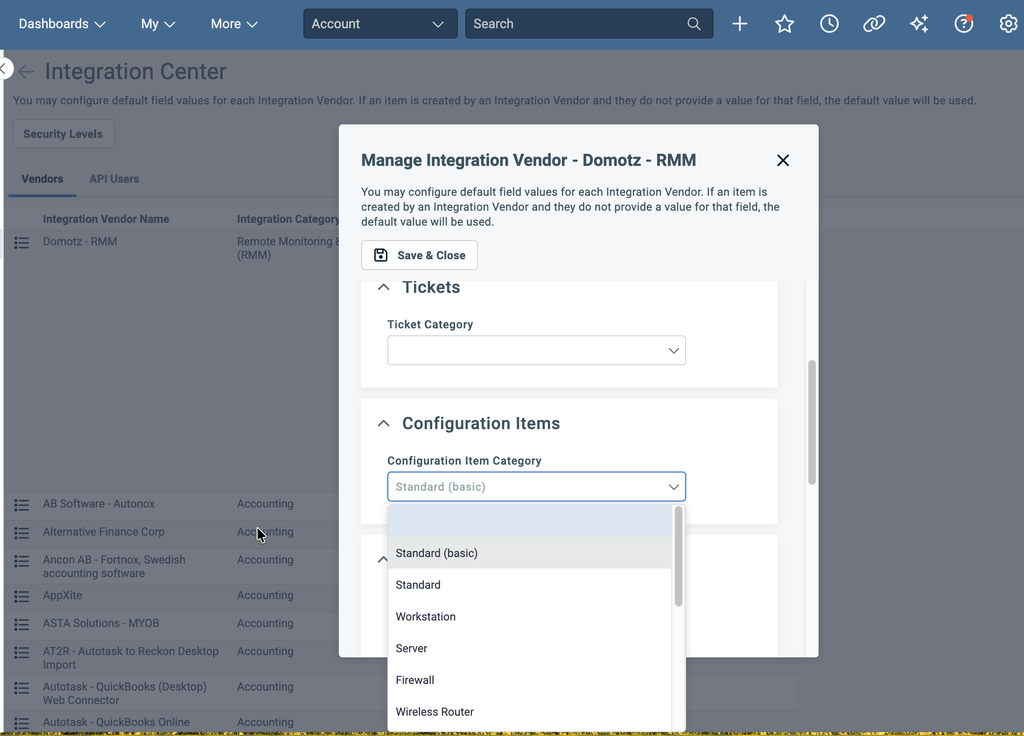
Optionally, under Configuration Items, select the Configuration Item Category that Domotz will assign to the Configuration Items it creates. If you leave it empty, Autotask uses your default Configuration Item category.
Create the API User
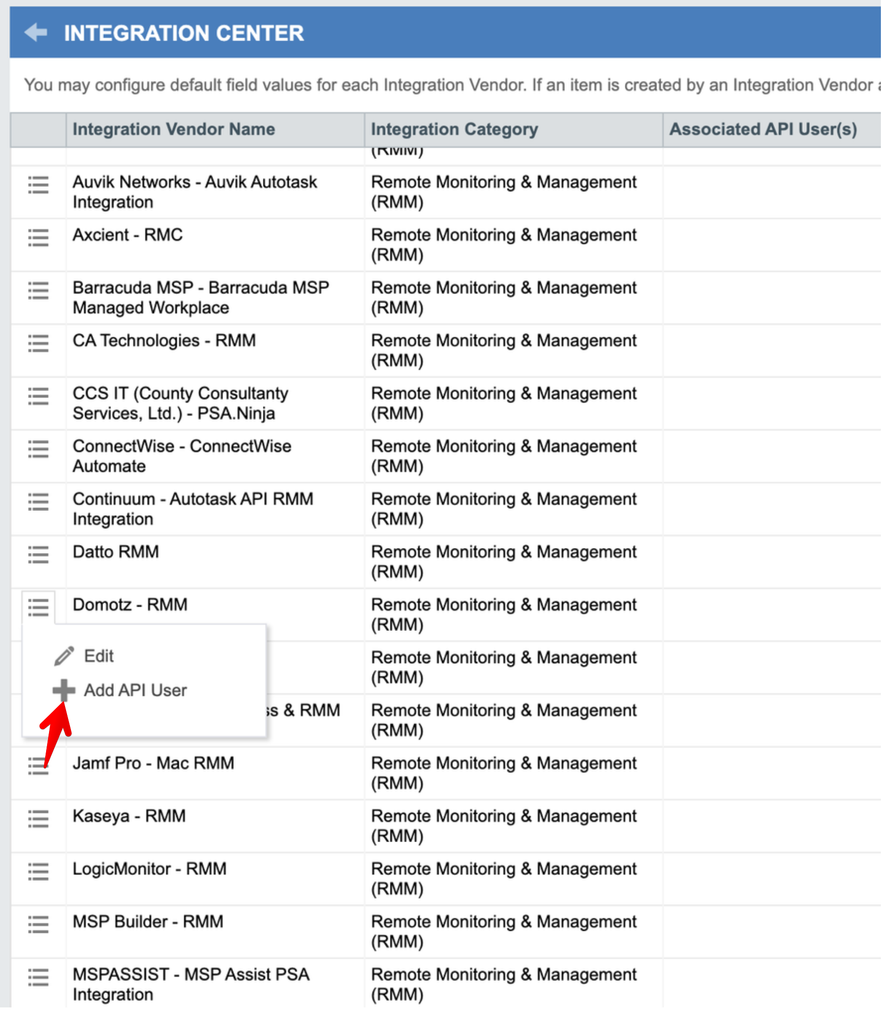
On the same Integration Center page, hover over the menu icon next to Domotz – RMM and click Add API User:
Enter the API user details. We recommend a descriptive name, such as Domotz Integration: this user appears as the creator (Installed By) of every Configuration Item added by the integration.
Fill the General tab accordingly to your organization details use the API User (system) security level. In the Credentials section, click Generate Key and Generate Secret. Copy the Username (Key) and Password (Secret) and keep them safe: you will need them to connect Domotz.
In the API Tracking Identifier section, leave Integration Vendor selected, with Domotz – RMM pre-filled. It cannot be changed later.
In the Line of Business section, keep Resource can view items with no assigned Line of Business selected.
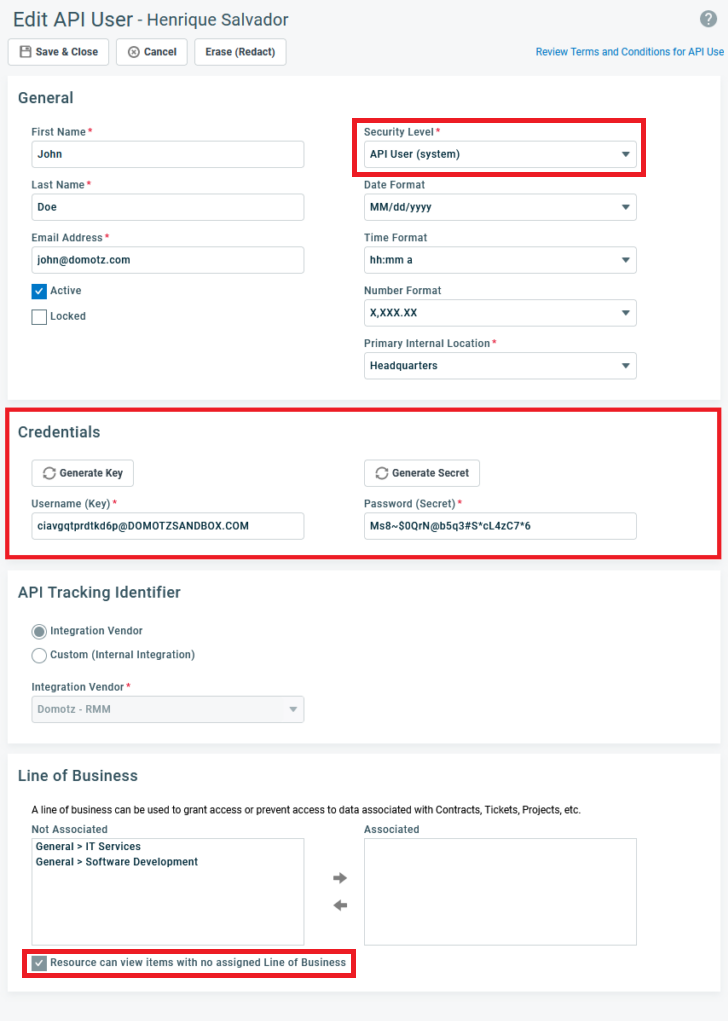
Click Save & Close.
Using a custom Security Level
If you prefer not to use the API User (system) security level, create a custom API security level with at least the following permissions:
| Entity | Permissions |
|---|---|
| Configuration Items | Create, Update, Query |
| Configuration Item Types | Create, Query |
| Companies | Create, Query (Create is used to add Vendor companies) |
| Company Locations | Query |
| Products | Create, Query |
| Billing Codes | Query |
| User-Defined Field Definitions | Create |
On Domotz: How to set up the integration
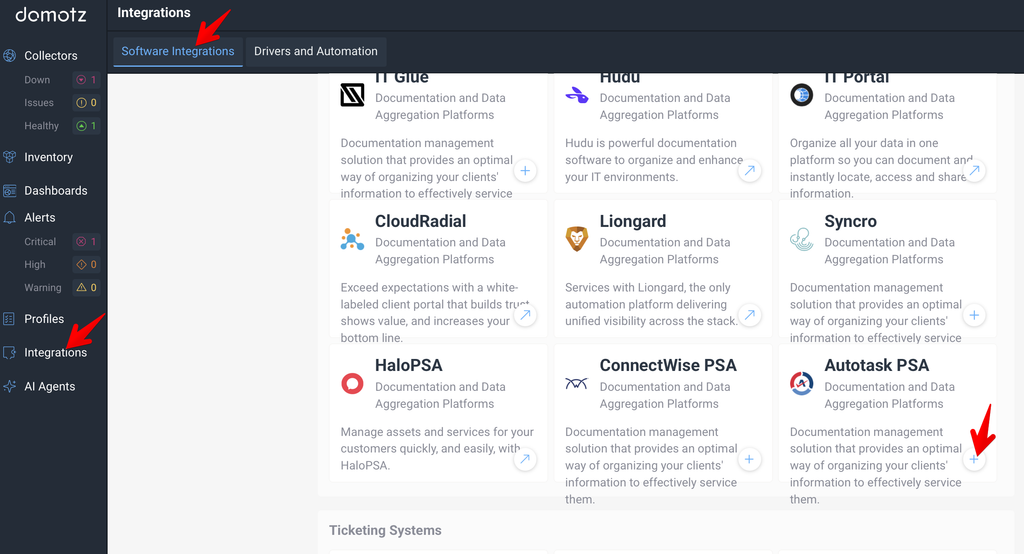
In the Domotz webapp, navigate to Integrations section > Software Integrations.
In the Documentation and Data Aggregation Platforms list, find Autotask PSA and click the + icon.
Fill in the connection form:
API User Name: the API Key generated in Autotask
Secret: the API Secret generated in Autotask
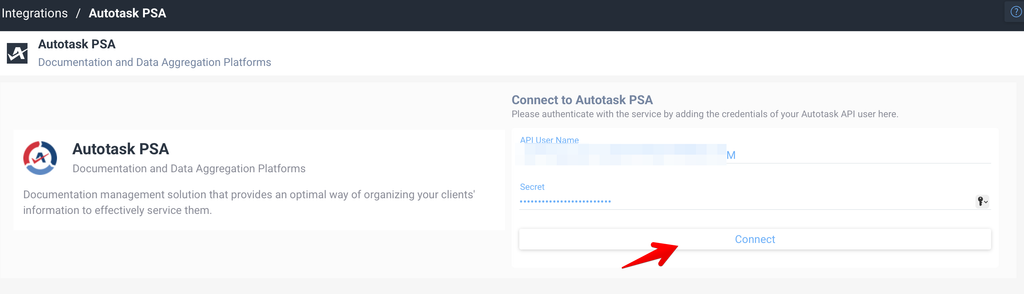
Then click Connect.
Once connected, the integration page shows three tabs: Mapping, Match Fields and Manage Integration.
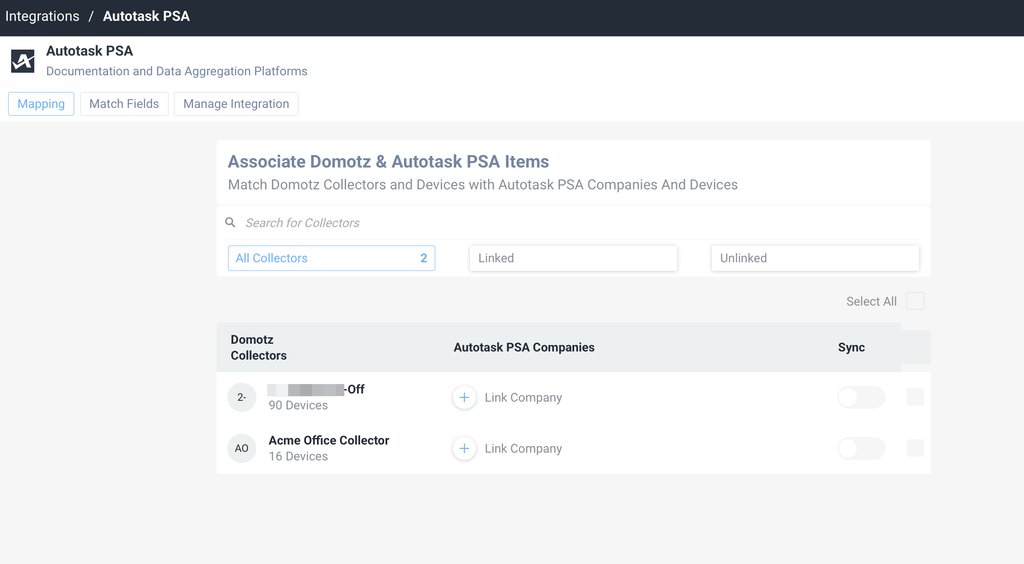
Link Domotz Collectors to Autotask Accounts
After a successful connection, link each Domotz Collector to the Autotask Account its devices belong to.
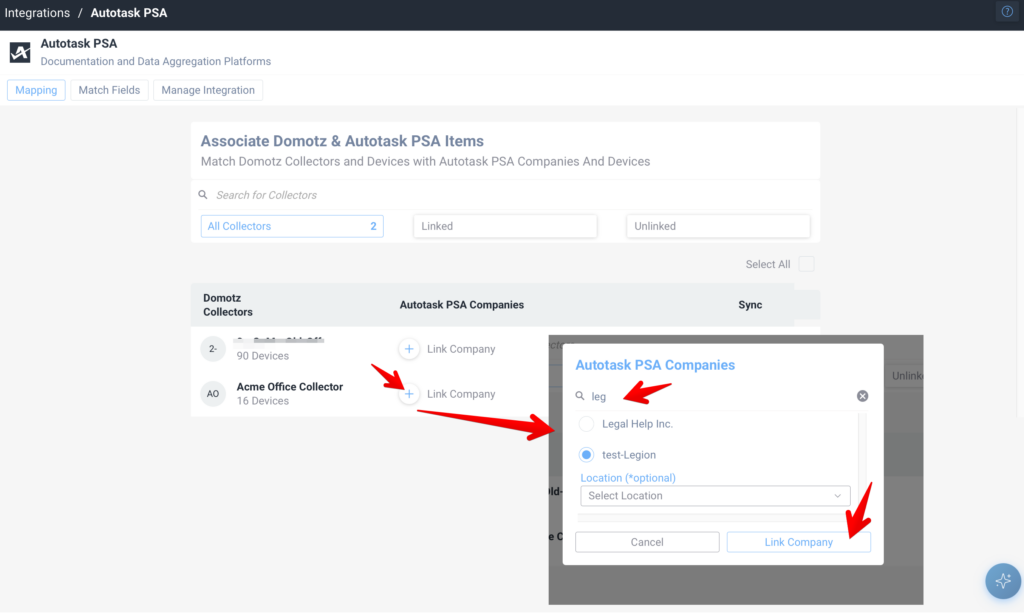
On the Mapping tab, click + Link Company next to the Collector.
Select the Autotask Account. Use the filter to search, as the list can be long.
Select a Location for the Configuration Items: No Location or one of the Account’s locations (for example its Primary Address).
Set up Match Fields
Automatic synchronization follows the direction configured for each field, so review the field mapping before enabling it. Open the Match Fields tab.
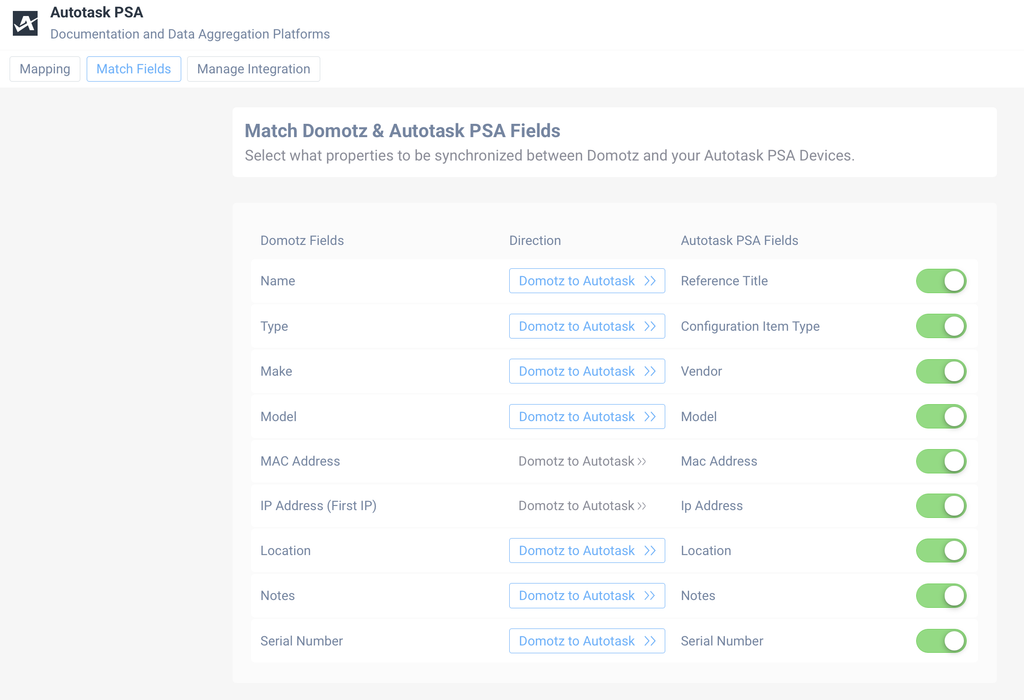
| Domotz field | Autotask PSA field | Direction |
|---|---|---|
| Name | Reference Name | Configurable |
| Type | Configuration Item Type | Configurable |
| Make | Vendor | Configurable |
| Model | User-defined field Domotz Model | Configurable |
| MAC Address | User-defined field Domotz MAC Address | Domotz to Autotask only |
| IP Address (First IP) | User-defined field Domotz IP Address | Domotz to Autotask only |
| Location | Location | Configurable |
| Notes | Notes | Configurable |
| Serial Number | Serial Number | Configurable |
- Use the toggle to enable (green) or disable each field. Type field is disabled by default: enable it if you want the Domotz device type synchronized to the Autotask Configuration Item Type.
- For configurable fields, click the Direction button to switch between Domotz to Autotask and Autotask to Domotz. By default, all fields are set to Domotz to Autotask.
- When synchronizing from Autotask to Domotz, fields that have no value in Autotask are skipped, so they don’t overwrite the existing value in Domotz.
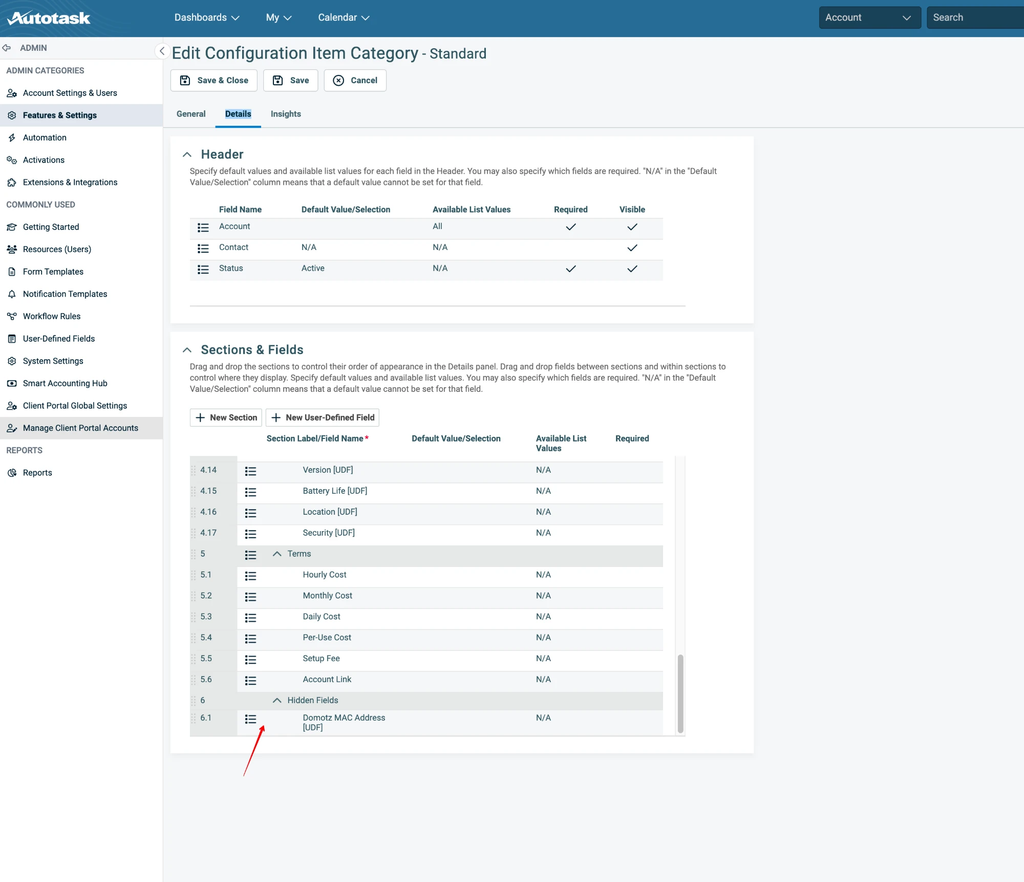
Depending on your Configuration Item Category layout, Autotask may place the Domotz MAC Address field under Hidden Fields, so it doesn’t appear on the Configuration Item page. To show it:
- In Autotask, go to Admin > Features & Settings > Configuration Item Categories.
- Open the category used by the integration and select the Details tab.
- Drag Domotz MAC Address from Hidden Fields into the User-Defined Fields section.
- Click Save. The change applies to every Configuration Item in that category.
Match Devices to Autotask Configuration Items
Open the Mapping tab. For each linked Collector, check its status (for example a Failed Sync message) and the number of matched devices.
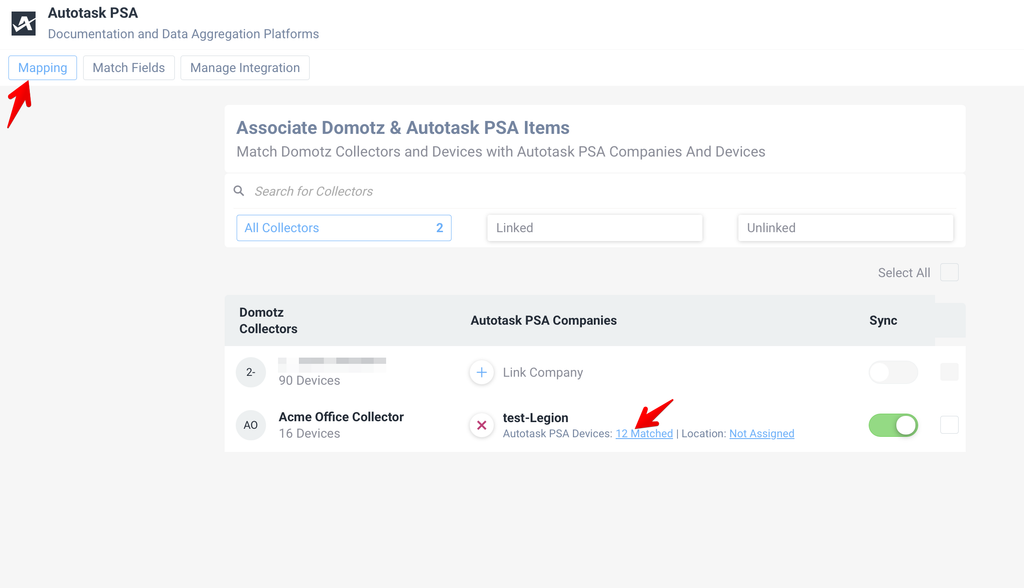
Click the Matched link to open the Device Autotask PSA Configuration Matching page. Use the All Devices, Unmatched and Matched filters to narrow the list. To match an unmatched device, click + Match Device.
In the pop-up, choose Create a new Device, or select an existing Configuration Item from the list. Each Configuration Item is shown with its MAC address to help you identify it. Configuration Items already linked to another device are marked Already mapped and can’t be selected. Click Save.
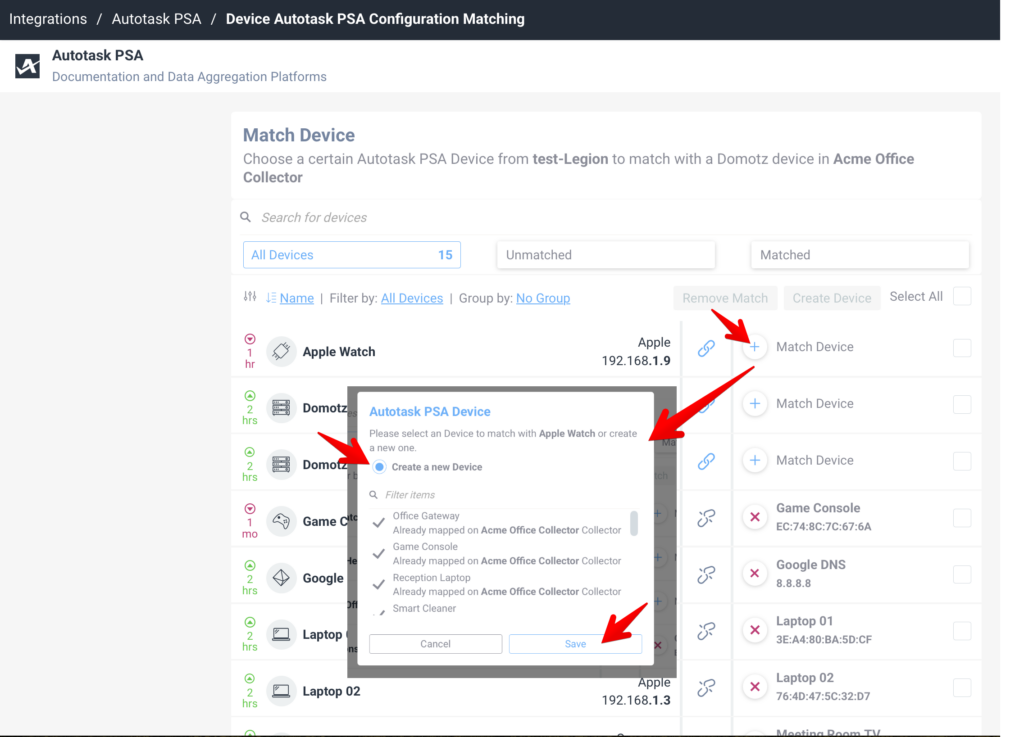
If you want to create Configuration Items for many devices at once, select them with their checkboxes (or Select All) and click Create Device.
A newly created Configuration Item contains the basic device details (Reference Name, Serial Number, Configuration Item Type, Location, Product and Category). The remaining fields, such as IP Address, MAC Address and Model, are filled in at the first synchronization. Once a device is linked, its Configuration Item is updated by every synchronization, whether it already existed or was created by Domotz.
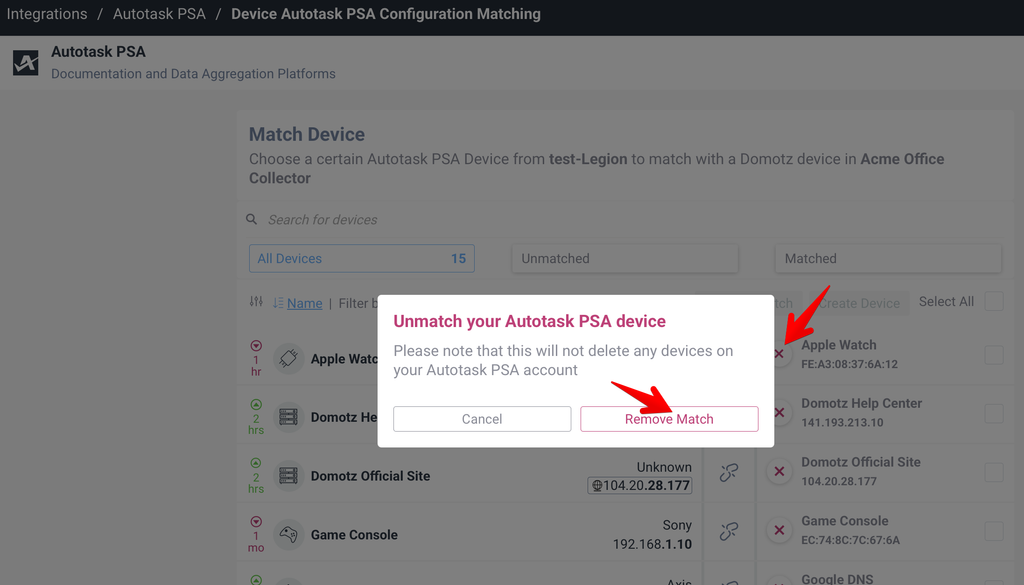
To unlink a device, select it and click Remove Match, then confirm. The link is removed, but the Configuration Item remains in Autotask.
Synchronization Configurations
The synchronization can be performed automatically or manually.
Manual Synchronization
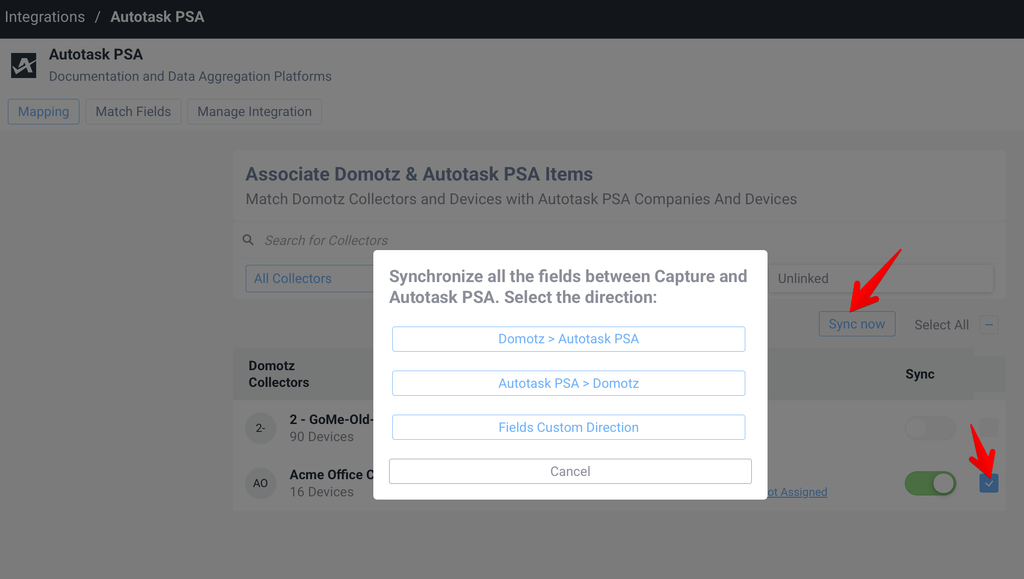
A manual synchronization applies to all matched devices of the selected Collector. To do so:
- On the Mapping tab, select the Collector.
- Click Sync now.
A pop-up asks you to choose the synchronization direction:
- Domotz > Autotask PSA: Domotz data overwrites the Autotask data for all enabled fields.
- Autotask PSA > Domotz: Autotask data overwrites the Domotz data for all configurable fields.
- Fields Custom Direction: each field follows the direction set in Match Fields.
Automatic Synchronization
Automatic synchronization is disabled by default. To enable it, switch on the Sync toggle next to the Collector on the Mapping tab.
- As soon as the Sync toggle is enabled, the first synchronization occurs within the next 5 minutes.
- After that, automatic synchronization occurs every 12 hours.
- Automatic synchronization follows the direction set for each field in Match Fields.
Unmanaged and deleted devices
If a device is set to Unmanaged or deleted in Domotz, its link is removed, but its Configuration Item remains in Autotask.
How to remove the integration between Autotask PSA and Domotz
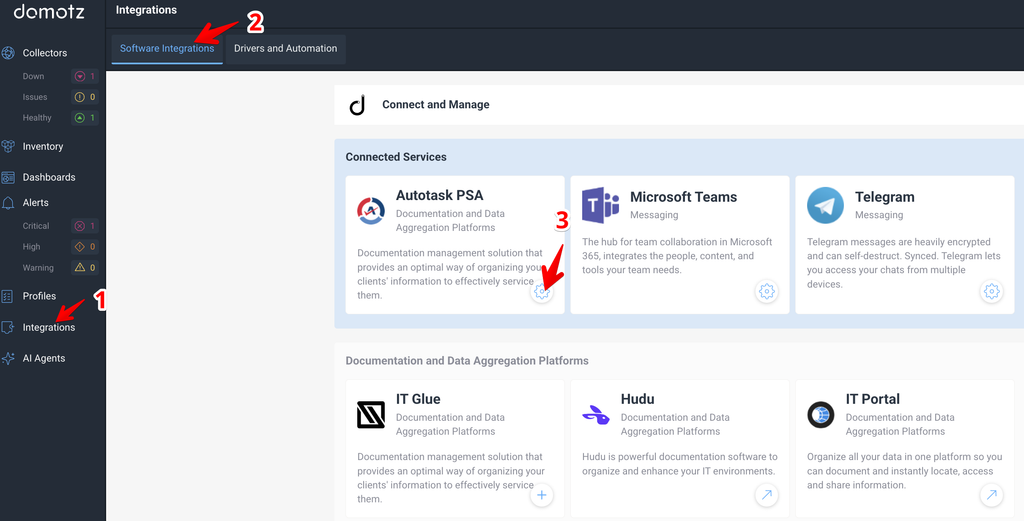
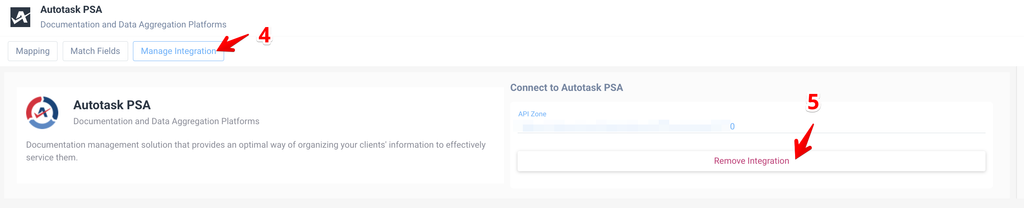
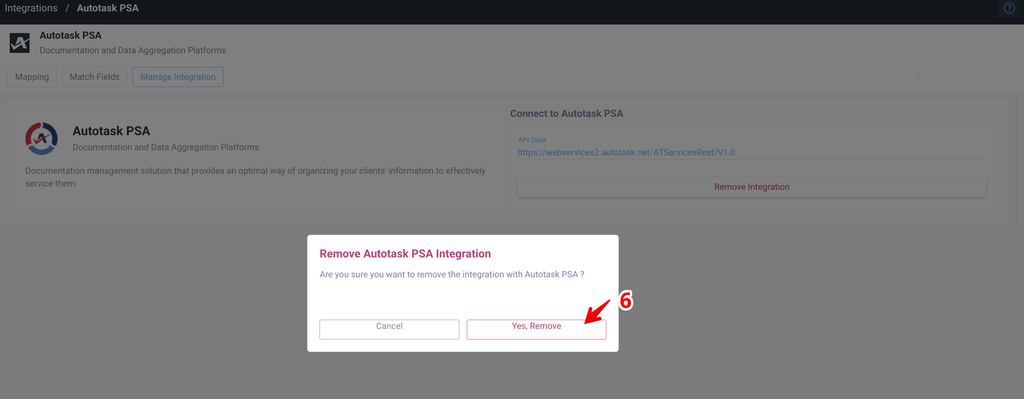
To completely disconnect the integration between Autotask PSA and Domotz, open the Manage Integration tab and click Remove Integration.
If you have any questions or encounter any issues, please feel free to reach out to us at support@domotz.com. We’re always here to help!