
Domotz Autotask Integration
Domotz network monitoring and management software integrates with Autotask PSA so you can monitor, manage, track and resolve issues with your network and devices.
This integration helps you with better tracking and troubleshooting of network and device issues that are discovered by Domotz.
Learn more about the Domotz integration with Datto Autotask.
Setting up Autotask Integration
You can connect your Autotask PSA Account into Domotz. Autotask PSA will become one of the Contact Channels available when creating a Shared Alert. This means that you can create or update an Autotask ticket when a specific event occurs in Domotz.
You’ll need:
- Autotask PSA User Name/Password
- Autotask API user
Autotask PSA API user creation
Firstly, you’ll need to set up the integration on the Autotask PSA side. Please follow these steps.
Open the Autotask Main Menu and click over Admin and Extensions & Integrations.
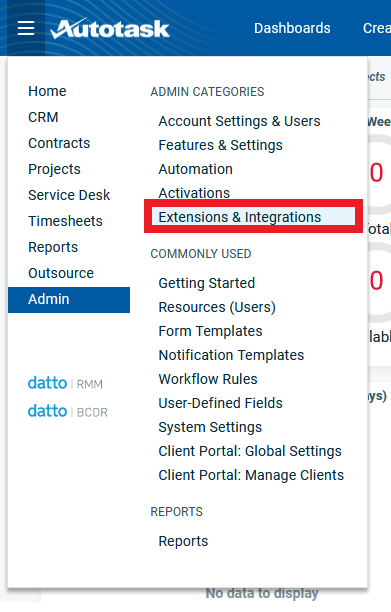
Accessing Extensions and Integrations in Autotask
1. Navigate to the left sidebar menu and click on the "Admin" section.
2. Under "Admin Categories," locate and select "Extensions & Integrations."
Under “Other Extensions & Tools” click on “Integration Center”:
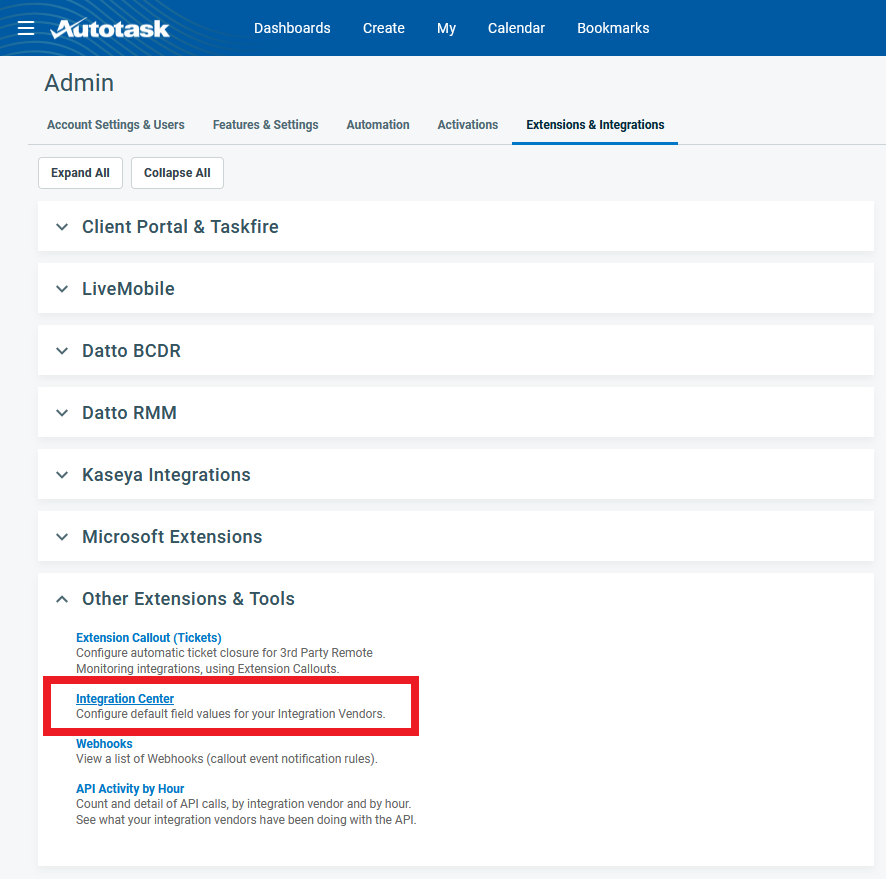
Navigating to the Integration Center in Autotask.
1. From the Autotask Admin interface, select the "Extensions & Integrations" tab.
2. Locate the section labeled "Other Extensions & Tools."
3. Click on "Integration Center" to configure default field values for your integration vendors.
Search for “Domotz – RMM” and place your Mouse over the burger menu and click “Edit”.
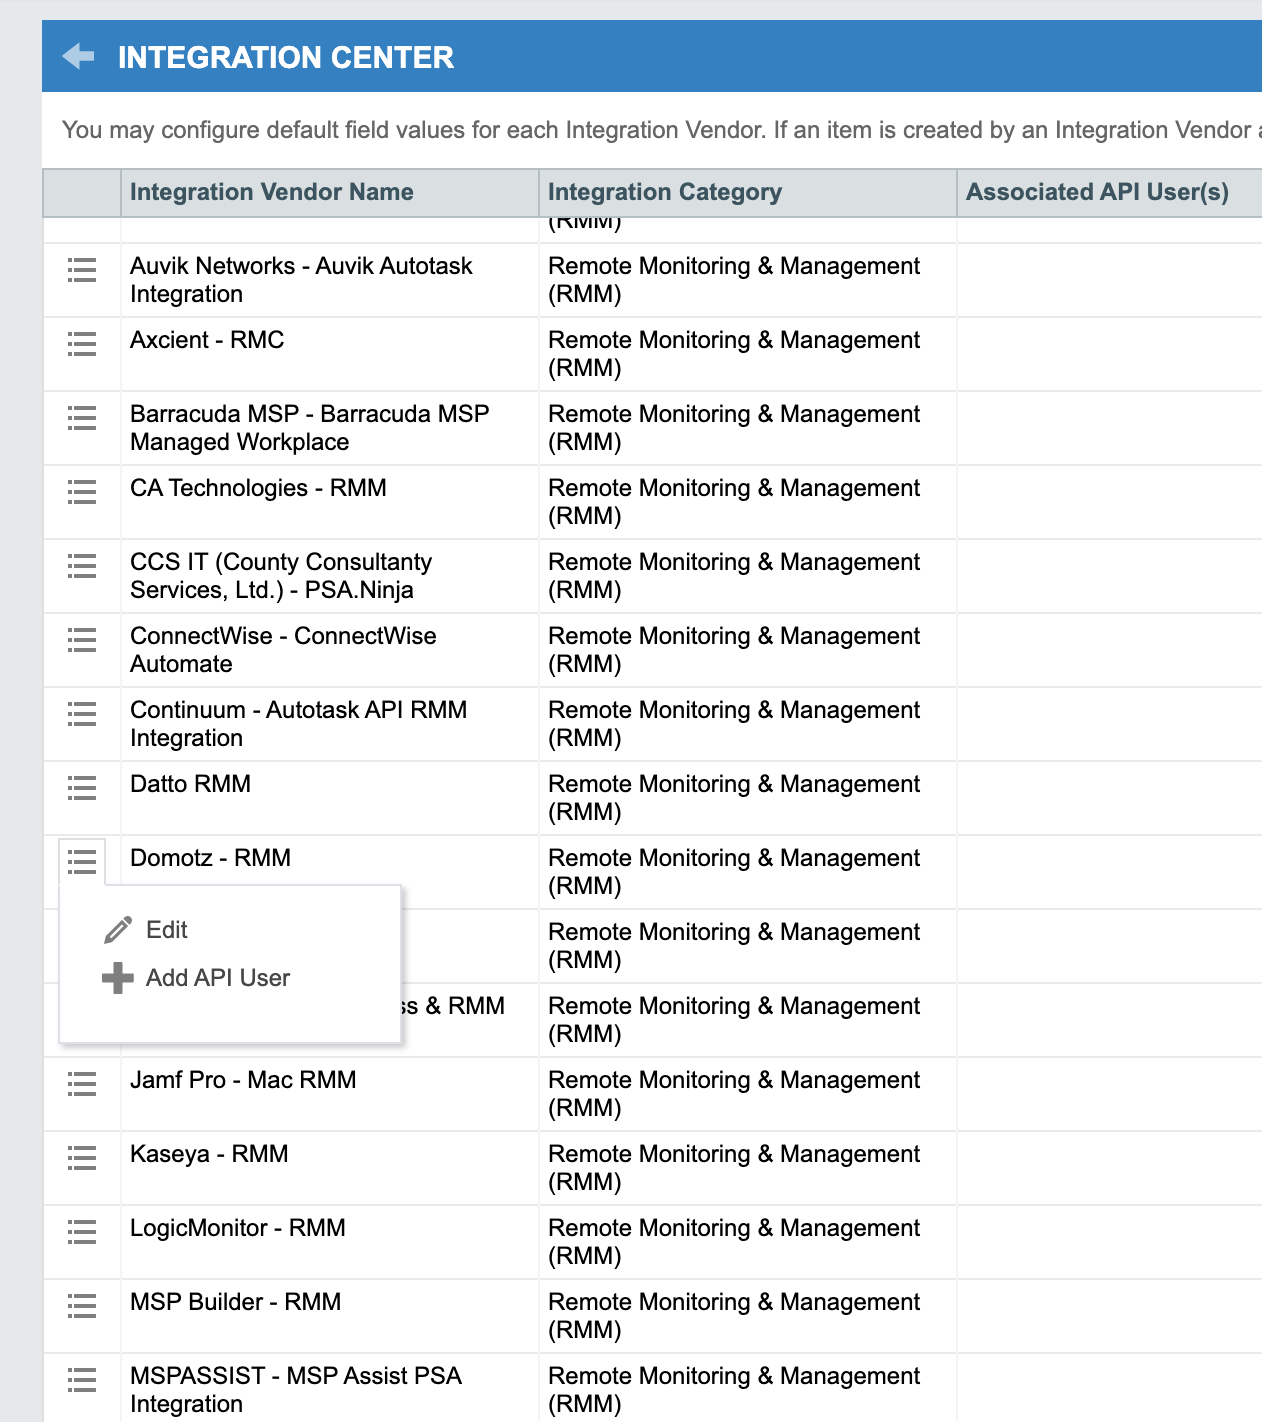
Integration Center interface for managing integration vendors.
1. The table lists integration vendors with columns for "Integration Vendor Name," "Integration Category," and "Associated API User(s)."
2. Each row represents a different vendor, detailing their name, category as "Remote Monitoring & Management (RMM)," and associated API users.
3. The "Domotz - RMM" row is highlighted with options to "Edit" the entry or "Add API User," allowing modification or expansion of vendor details.
Mark as “Active” and then press on “Save & Close”
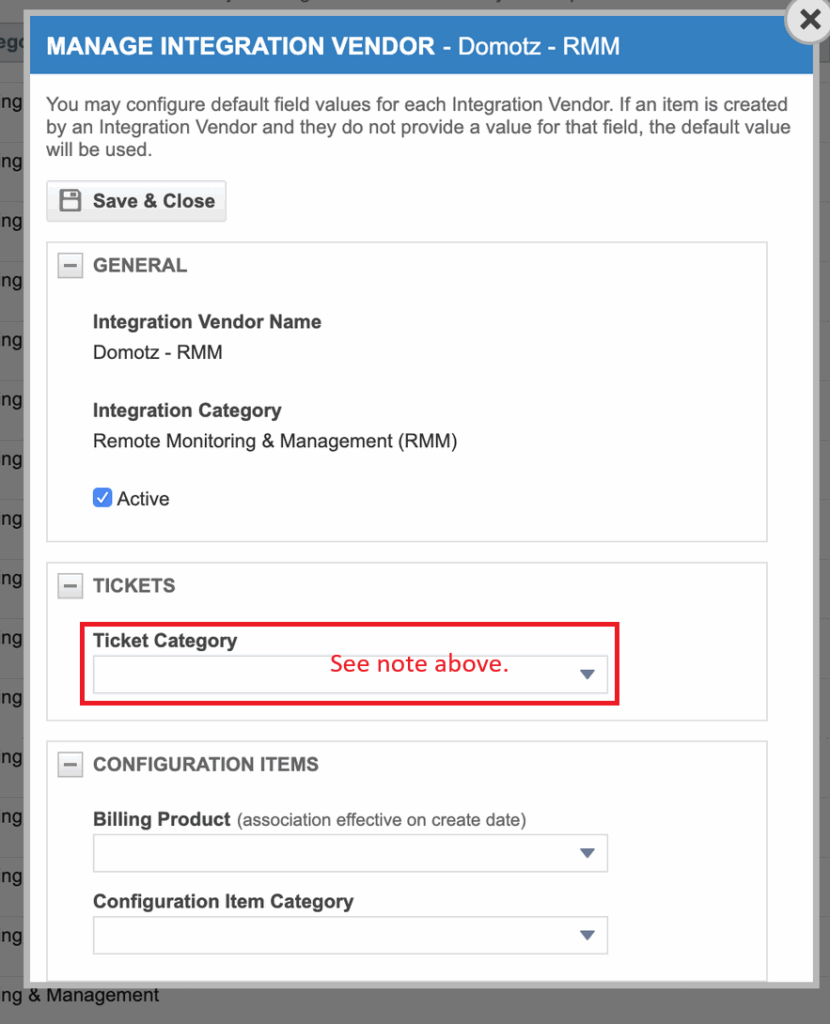
Managing Integration Vendor in Software Settings
1. The dialog box is titled "Manage Integration Vendor - Domotz - RMM".
2. Click "Save & Close" to apply changes.
3. Under "General", the "Integration Vendor Name" is set to "Domotz - RMM", and the "Integration Category" is "Remote Monitoring & Management (RMM)". Ensure the "Active" checkbox is selected.
4. In the "Tickets" section, the "Ticket Category" requires attention — follow the note above to configure it appropriately.
5. In "Configuration Items", select options for "Billing Product" and "Configuration Item Category" from their respective dropdown menus.
Once done, search again for the “Domotz – RMM” (should be on the top of the list), and place your Mouse over the burger menu and click “Add API User”.
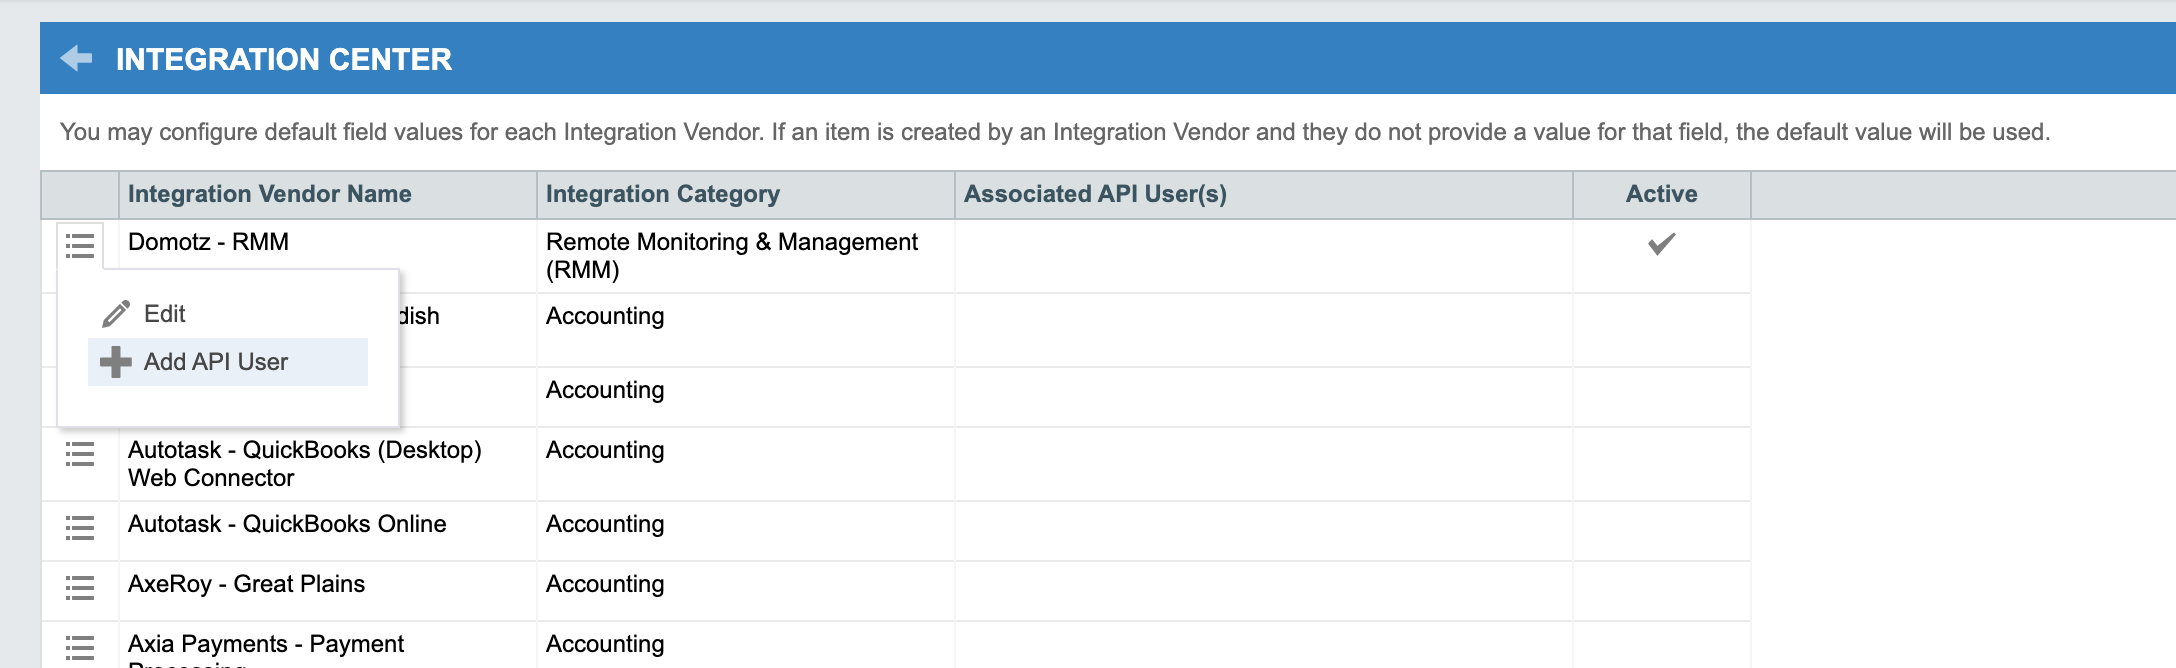
Configuration Options in the Integration Center.
1. In the Integration Center interface, locate the list of vendors under the "Integration Vendor Name" column.
2. To configure a vendor, such as "Domotz - RMM," click the associated menu icon.
3. From the menu, select "Add API User" to add a user for API integration.
4. Check the "Active" column to ensure the integration is enabled; active integrations are marked with a checkmark.
Fill the General tab accordingly to your organization details use the API User (system) security level. The Credentials section generate the Username and Password or use a secure custom credentials.
Select a secure password, and copy both the Username and Password. On previous versions of the Autotask version, the tool will also ask you to fill in HR, Approvers, Associations.
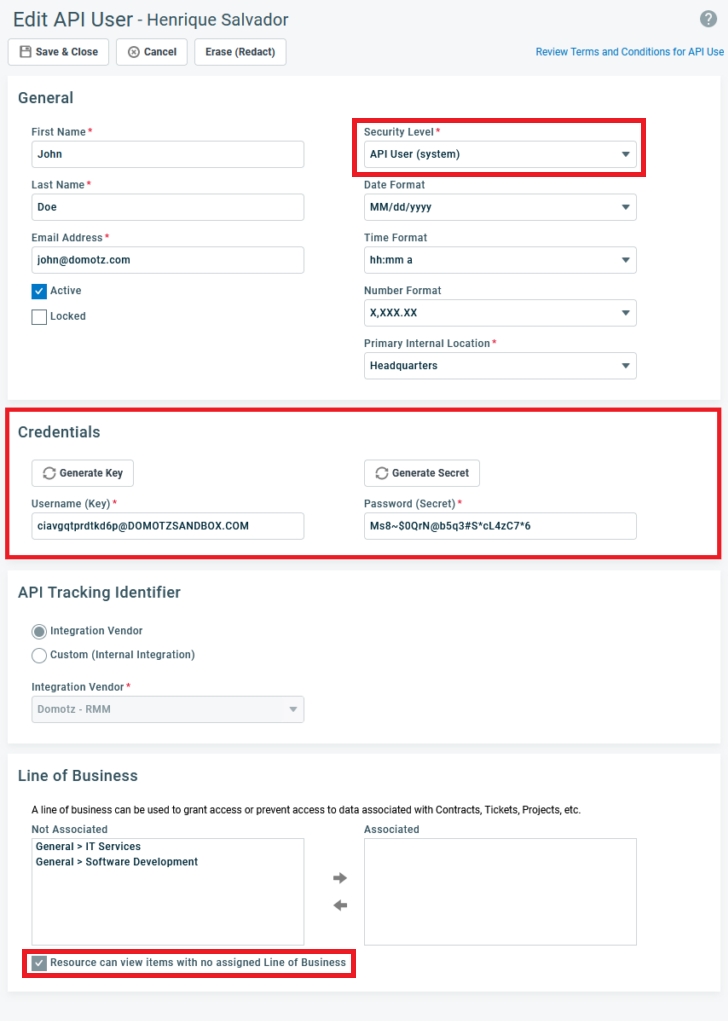
Edit API User Settings.
1. In the "General" section, enter the user's first name (John), last name (Doe), and email address (john@domotz.com). Ensure the "Active" checkbox is selected.
2. Set the "Security Level" to "API User (system)".
3. Fill in format options for date, time, and number according to your preferences. Choose the primary internal location as "Headquarters".
Generate API Credentials.
4. In the "Credentials" section, use "Generate Key" and "Generate Secret" to create a username and password. Existing values are visible for guidance.
Configure API Tracking.
5. Under "API Tracking Identifier," select "Integration Vendor" and choose an integration vendor from the dropdown menu.
Set Line of Business Access.
6. In "Line of Business," determine associations by using the arrows to move items between "Not Associated" and "Associated". Ensure the checkbox for "Resource can view items with no assigned Line of Business" is marked.
The above highlighted area have the credentials you’ll use inside Domotz to connect your Autotask Account.
Autotask Contact Channel creation
Now that you have your Autotask API user created, you can proceed in connecting it to Domotz. Please click on Connect Account button under the “Shared Alerts and Ticketing System” section in Domotz and then insert your Autotask PSA username and password:
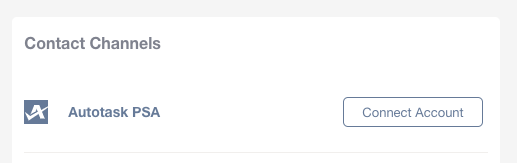
Connecting an Autotask PSA Account
1. Locate the "Contact Channels" section.
2. Find the "Autotask PSA" label with its icon.
3. Click the "Connect Account" button next to the label to initiate the connection process.
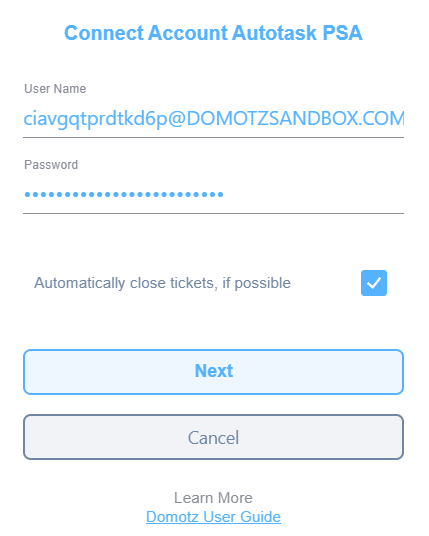
Connect Account Autotask PSA Login Steps
1. Enter your user name in the "User Name" field. Example provided is "ciavgqtprdtkd6p@DOMOTZSANDBOX.COM".
2. Enter your password in the "Password" field. The password is masked for security.
3. To enable ticket auto-closure, ensure the checkbox next to "Automatically close tickets, if possible" is selected.
4. Click the "Next" button to proceed.
5. If you need to cancel the process, select the "Cancel" button.
6. For further information, refer to the "Domotz User Guide" link at the bottom.
Now select the Autotask queue in which Domotz will create support tickets.
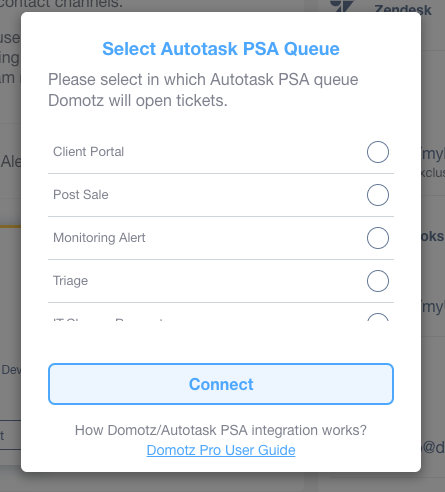
Selecting an Autotask PSA Queue for Ticket Management
1. Review the list of available queues including options like Client Portal, Post Sale, Monitoring Alert, Triage, and others.
2. Choose the appropriate queue where Domotz will open tickets by selecting the corresponding radio button.
3. Click the "Connect" button to finalize your selection.
4. For more information on integration, refer to the "Domotz Pro User Guide" link at the bottom.
Click on Manage Agents and select which Autotask PSA Accounts each Domotz Agent should create support tickets on:
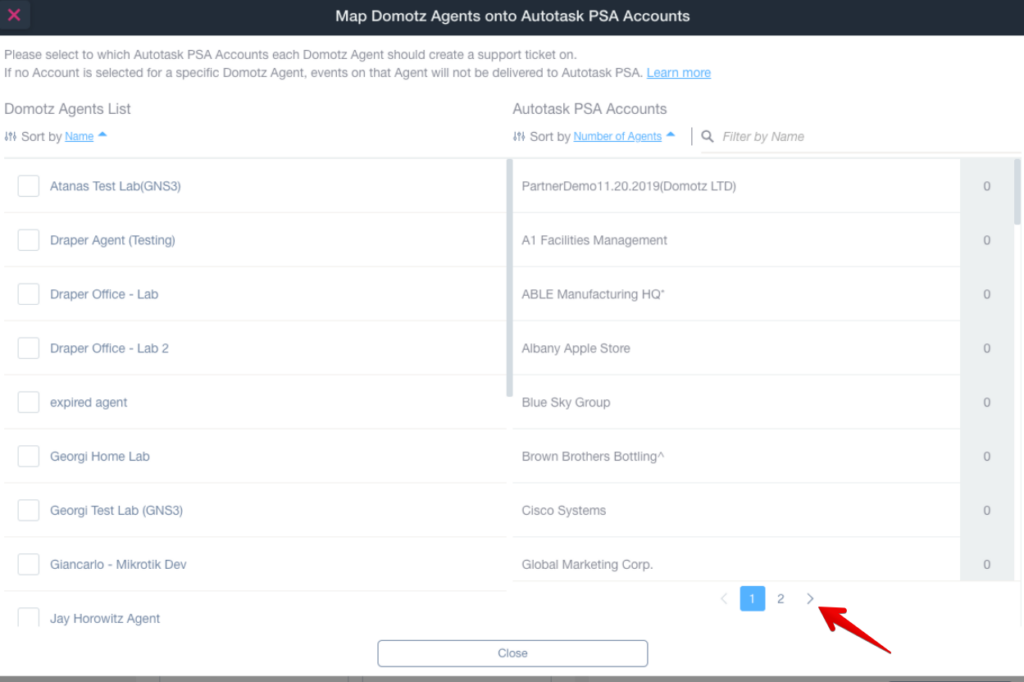
Mapping Domotz Agents to Autotask PSA Accounts
1. Select the Autotask PSA account for each Domotz agent by clicking the checkbox next to the agent's name in the "Domotz Agents List" on the left.
2. The selected Domotz agent will then need to be mapped to an account listed under "Autotask PSA Accounts" on the right.
3. Use the sorting options above each column to sort agents by "Name" or "Number of Agents."
4. Filter agents by name using the search box next to the filter icon.
5. Navigate through pages of agents using the pagination controls at the bottom. Click on numbers or the arrow to move between pages.
6. Click "Close" when mappings are complete.
Please note that the Domotz Agent mapping is mandatory. If you do not select any choice, tickets will not deliver to Autotask.
You are now able to use the Contact Channel for Autotask PSA, within the Shared Alert profile. Once the Shared Alert profile is created, apply the Shared Alert to the Agents and Device for which you are willing to automatically open tickets in your Autotask PSA.
Automatic Ticket Closure
We’ve now released functionality for automatically closing Autotask PSA integration tickets when the following events occur:
- Device Status Events > Device Goes Up
- Network Events > Connection Recovered
- Device TCP Events > Retrieve any TCP Event
You have the option to select whether the tickets will close automatically:
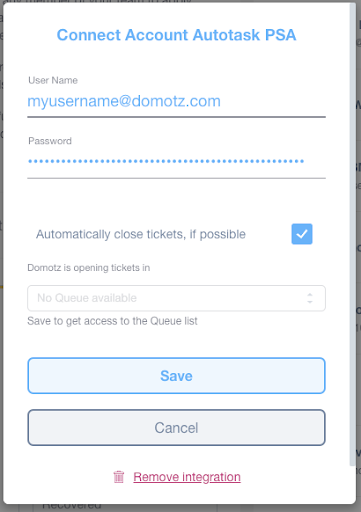
Connecting Autotask PSA Account
1. Enter your user name in the "User Name" field.
2. Enter your password in the "Password" field.
3. Optionally, check the box to "Automatically close tickets, if possible" if you want tickets to close automatically.
4. Choose a queue from the "Domotz is opening tickets in" dropdown menu if available.
5. Click the "Save" button to connect the account.
6. Use the "Cancel" button to exit without saving changes.
7. Click "Remove integration" to disconnect the Autotask PSA account.
As soon as you connect with Autotask PSA, a label “Tickets will be closed automatically” will appear under the Device Status Events list for the supported auto-close events as shown below:
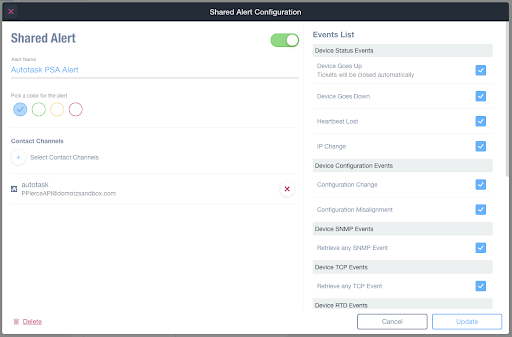
Shared Alert Configuration Interface
1. Enter the alert name in the "Alert Name" field, such as "Autotask PSA Alert."
2. Choose a color for the alert from the options provided to visually classify the alert.
3. Under "Contact Channels," click "Select Contact Channels" to choose how notifications will be sent.
4. Verify selected contact channels, such as an email address shown below the field.
5. In the "Events List" on the right, check the boxes next to the desired event types to enable them. Options include "Device Goes Up," "Device Goes Down," "IP Change," and others.
6. Use the toggle switch at the top to activate or deactivate the alert configuration.
7. Click "Delete" if you need to remove the shared alert configuration.
8. Press "Update" to save any changes made to the configuration. Use "Cancel" to exit without saving.
Auto-closing of tickets is also available for TCP Events:
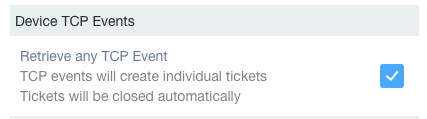
Device TCP Events Configuration
1. To retrieve TCP events, click "Retrieve any TCP Event."
2. Note that each TCP event will generate an individual ticket.
3. Tickets are designed to close automatically, as indicated by the checked box.
Here is how you’ll see the labels in the Network events section:
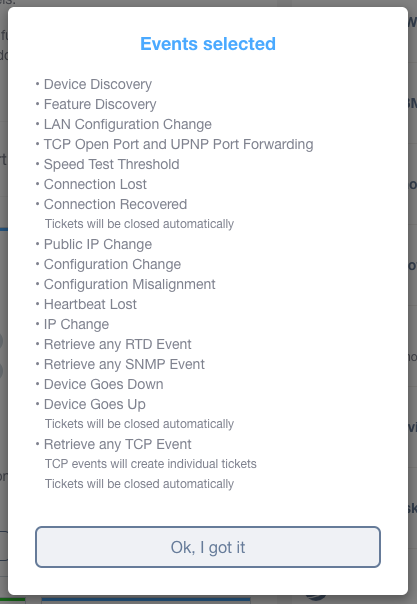
Event Selection Overview
1. The dialog box lists selected events for monitoring, such as Device Discovery, Feature Discovery, and LAN Configuration Change.
2. It includes network-related events like TCP Open Port and UPNP Port Forwarding, and Speed Test Threshold.
3. Connection status events such as Connection Lost and Connection Recovered are displayed, with notes about automatic ticket closure.
4. Public IP Change and various Configuration Changes are included.
5. The list covers critical status updates like Device Goes Down and Device Goes Up, again noting automatic ticket handling.
6. Events like Heartbeat Lost, IP Change, and several retrieval options (RTD, SNMP, TCP) are included.
7. The dialog concludes with a confirmation button labeled "Ok, I got it" to acknowledge the selections.
Here is how you’ll see the same labels in the Device events screen:
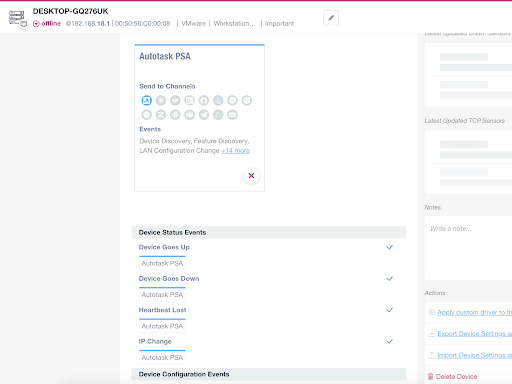
Autotask PSA Event Configuration Interface
1. Locate the "Autotask PSA" section at the top, which allows you to configure automation events.
2. Under "Send to Channels," select the appropriate icons to specify where notifications should be sent.
3. The "Events" section lists current events like Device Discovery, Feature Discovery, and LAN Configuration Change. Click "14 more" to view additional events.
4. Below this, in "Device Status Events," you can manage events such as "Device Goes Up," "Device Goes Down," "Heartbeat Lost," and "IP Change." Check or uncheck boxes to enable or disable notifications for each event.
5. Use the "Delete Device" and other options on the right side for further configuration or removal actions.