- Domotz Ubiquiti UniFi Integration
- Introduction
- Controller Type Compatibility
- 1. Cloud API Key Method
- 1.1 Creating the API Key
- 1.2 Adding the API Key to Domotz
- 2. Username and password Method
- 2.1 Option A: Local Username and password
- 2.1.1 Create a Local Admin Account
- 2.1.2 Connect Domotz Using the Local Admin Account
- 2.2 Option B: Cloud Username and Password with 2FA
- 2.2.1 Retrieve the UniFi MFA Seed
- 2.2.2 Connect Domotz Using the MFA Seed
- 2.2.3 Cloud Controller Connection
- 3. Important Notes
- 4. Features
- 4.1 Examples of Ubiquiti/UniFi Remote Monitoring and Management
Domotz Ubiquiti UniFi Integration
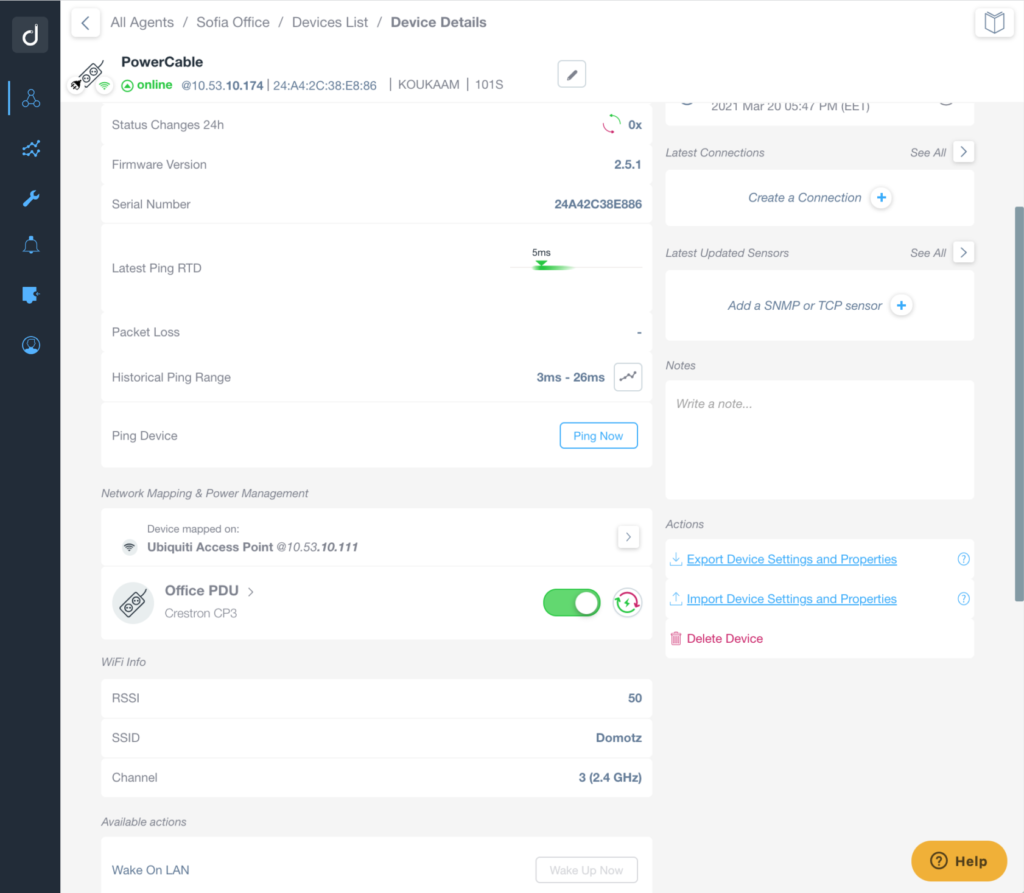
If you have a Local controller or a Cloud controller (e.g. Ubiquiti Cloud, or a third-party cloud controller like Hostifi), you can unlock advanced features inside Domotz.
Specifically, you can remotely monitor your UniFi devices, including network switches, WiFi controllers, and access points, get device status alerts, and access enhanced network management features for certain UniFi devices.
Introduction
To integrate Domotz with your Ubiquiti UniFi Controller and monitor controlled devices such as managed switches and wireless access points, you’ll need to connect using one of the following three methods:
- Cloud API Key (recommended)
- Username and Password:
- Cloud Username and Password with 2FA
- Local Username and password
Controller Type Compatibility
Not all connection methods are available on every controller type. Use this table to check which methods your setup supports before proceeding.
| Controller Type | Local Username & Password | Cloud Username & Password (+2FA) | Cloud API Key |
|---|---|---|---|
| Self-hosted UniFi Network Server (legacy) | ✅ | ✅ (if remote-access enabled) | ❌ (not supported) |
| Self-hosted UniFi OS Server | ✅ | ✅ (if remote-access enabled) | ✅ (if remote-access enabled) |
| CloudKey (Gen1, Gen2, Gen2 Plus, CloudKey+, CloudKey Enterprise) | ✅ | ✅ | ✅ |
| Cloud Gateway (Dream Machine, UCG-Ultra, UCG-Max, etc.) | ✅ | ✅ | ✅ |
| Official UniFi Hosting | ❌ | ✅ | ✅ |
| Third-party hosting (e.g. HostiFi) | ❌ | ✅ | ✅ |
Notes: “if remote-access enabled” means the self-hosted controller must be connected to a UI.com account with remote access enabled for cloud-based methods to work. To check it: on the legacy UniFi Network Server, go to Settings > System > Advanced and toggle Remote Management; on UniFi OS Server (and other UniFi OS consoles), go to OS Settings > Console and toggle Remote Access. The legacy UniFi Network Server does not support API key authentication — only UniFi OS consoles and UniFi OS Server support API keys.
1. Cloud API Key Method
1.1 Creating the API Key
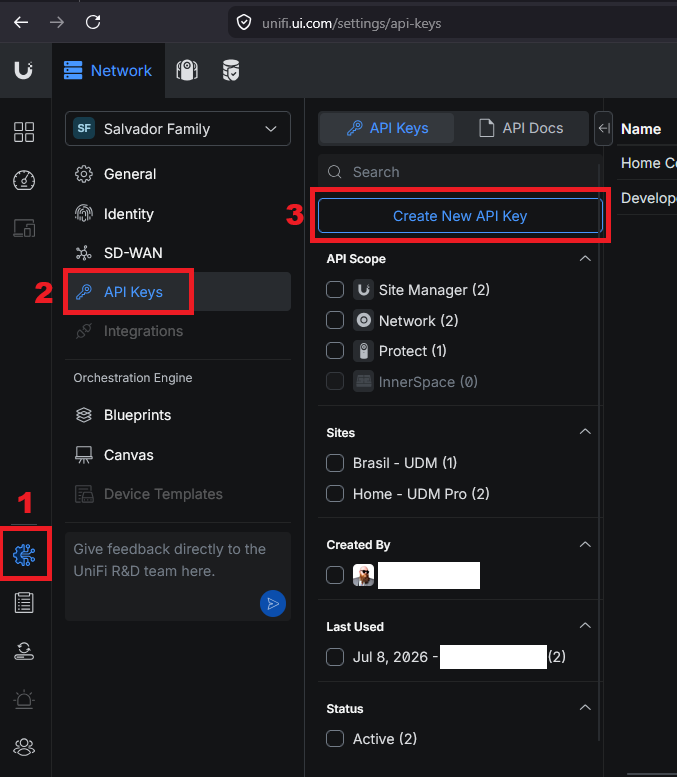
To create the API Key on your UniFi Cloud navigate to https://unifi.ui.com and login with your UniFi username and password.
- Access the Site Manager Settings section.
- Follow to the sub-section called API Keys
- Click on Create New API Key
On the new API Key configure the following:
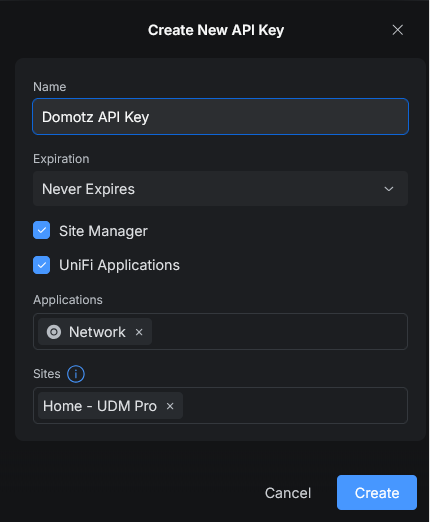
- Name: Choose any name you’d like.
- Expiration: Set it to never expire.
- Permissions: Check the boxes for Site Manager and UniFi Applications.
- Application: Select Network as the application we need access to, and remove the others.
- Sites: Grant access to at least one site you want to connect via the UniFi integration. If you select All Sites, you’ll be able to reuse the same API key across multiple Domotz Collectors.
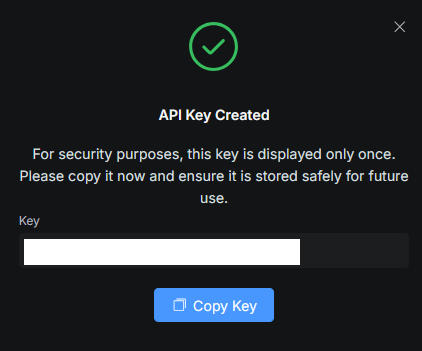
Click on Create and copy the API Key. You will not have another opportunity to do it.
1.2 Adding the API Key to Domotz
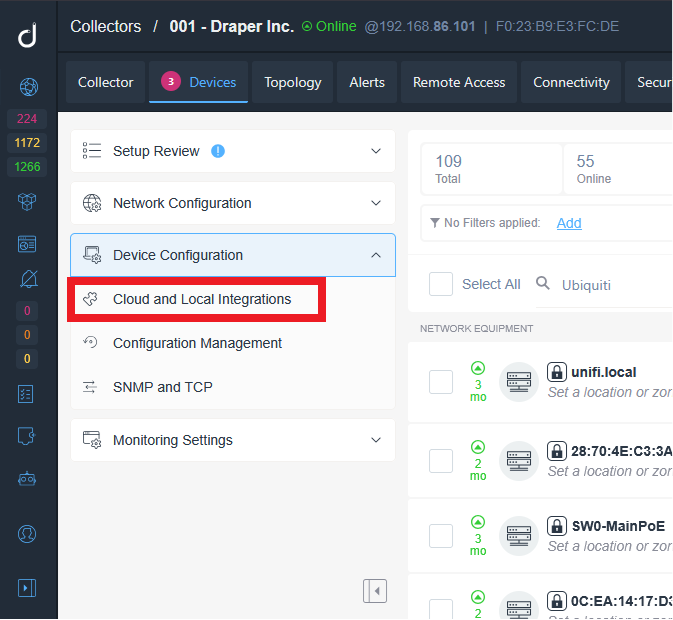
Navigate to the Domotz Webapp > Collectors > Select the collector with your UniFi network > Devices section > at the Device Configuration options click on Cloud and Local Integrations:
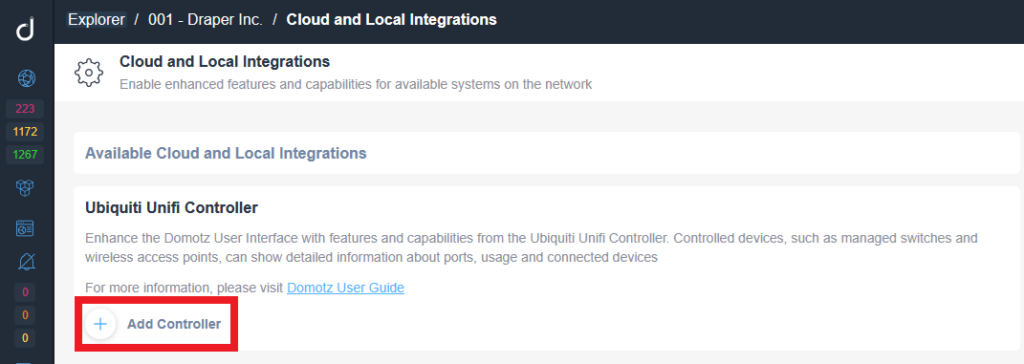
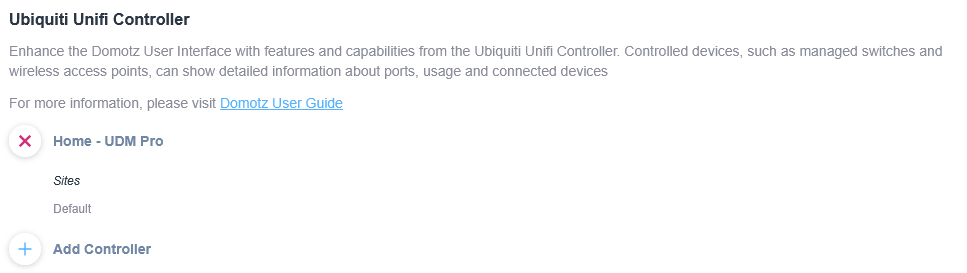
On the new screen, click on Add Controller at the Ubiquiti Unifi Controller
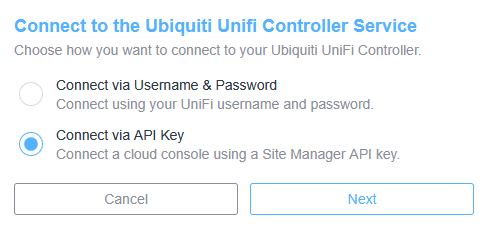
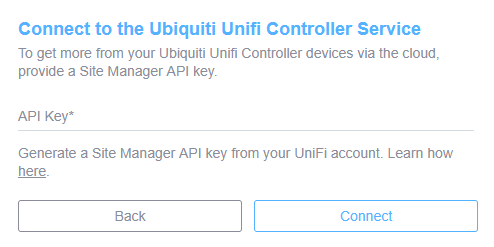
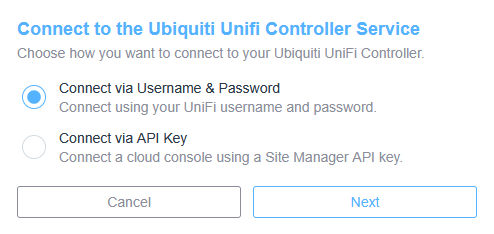
Select Connect via API Key
Paste your API Key and click on Connect
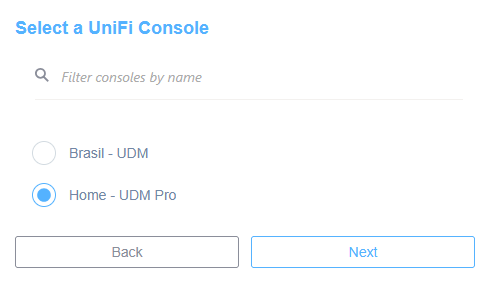
Select the UniFi Console and click on Next
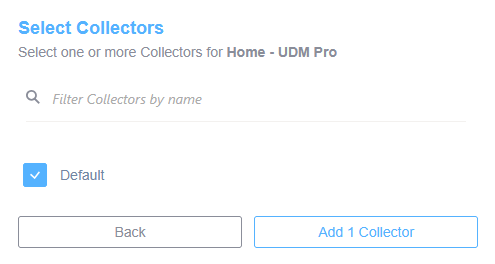
Select the Network your collector is monitoring and click on Add 1 Collector
Your Domotz Collector will now integrate with the UniFi Cloud via API, generating the Topology map and enriching UniFi device details.
2. Username and password Method
2.1 Option A: Local Username and password
Use this option if you’d rather not expose an MFA seed to Domotz, or if your UniFi Controller is managed locally.
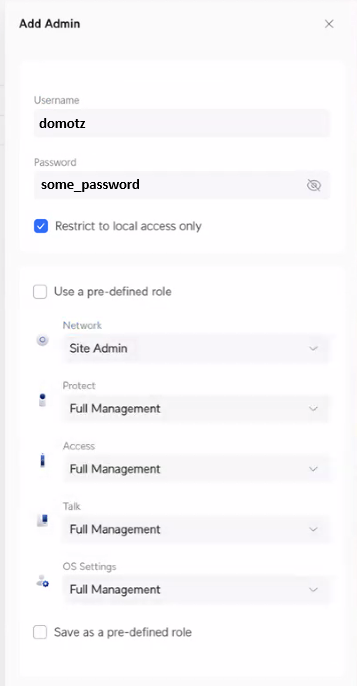
2.1.1 Create a Local Admin Account
- Log in to your UniFi Controller
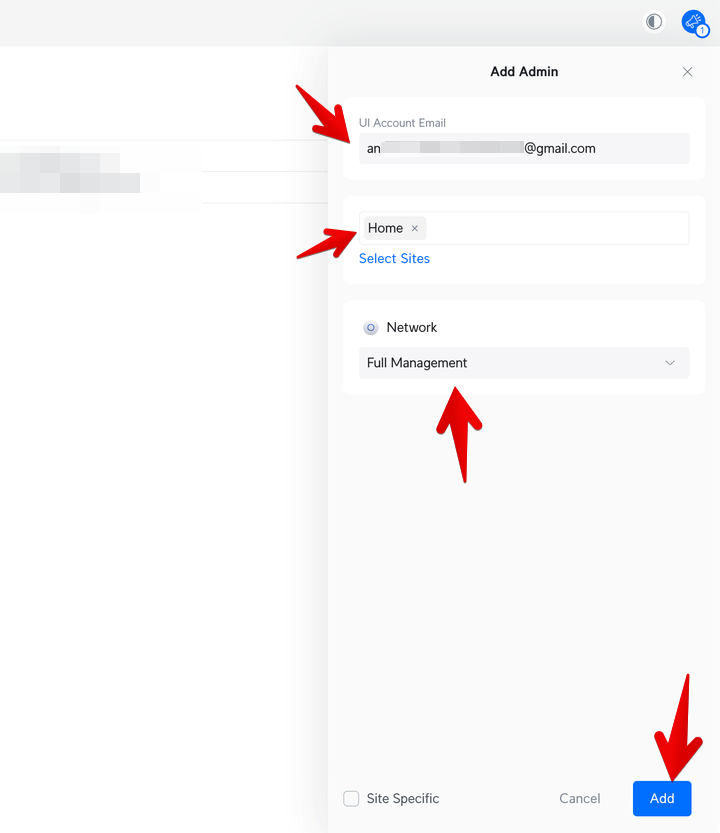
- Under Admins, click to add a new admin user, and make sure the Restrict to local access only checkbox is enabled.
- Enter a username (it doesn’t need to be an email address) and set a password. Make a note of both.
- Uncheck Use a pre-defined role, and set the Network permission to Site Admin.
- Click Add.
2.1.2 Connect Domotz Using the Local Admin Account
Navigate to the Domotz Webapp > Collectors > Select the collector with your UniFi network > Devices section > at the Device Configuration options click on Cloud and Local Integrations:
Select Connect via Username & Password and click on Next
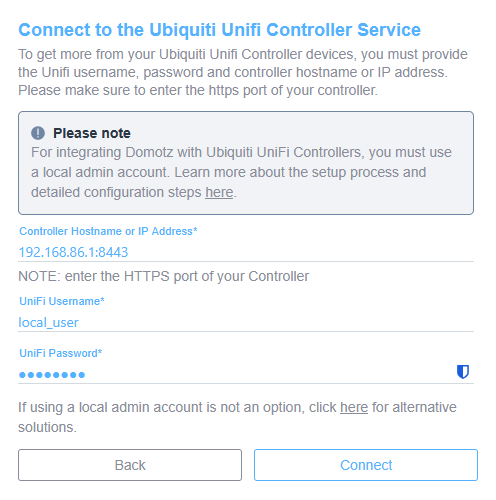
Add the local controller IP Address and port (the same address you use to manage it locally):
Select the Network your collector is monitoring and click on Add 1 Collector
Your Domotz Collector will now integrate with the UniFi Cloud via API, generating the Topology map and enriching UniFi device details.
2.2 Option B: Cloud Username and Password with 2FA
Use this option if you want to connect using a Cloud (ui.com or third-party Cloud controller) account rather than a local admin account. Since Ubiquiti’s API doesn’t support MFA-protected logins directly, Domotz needs the account’s MFA seed instead.
2.2.1 Retrieve the UniFi MFA Seed
- Open an incognito browser window (or log out of your main UniFi account first).
- Create a new account at https://account.ui.com/register.
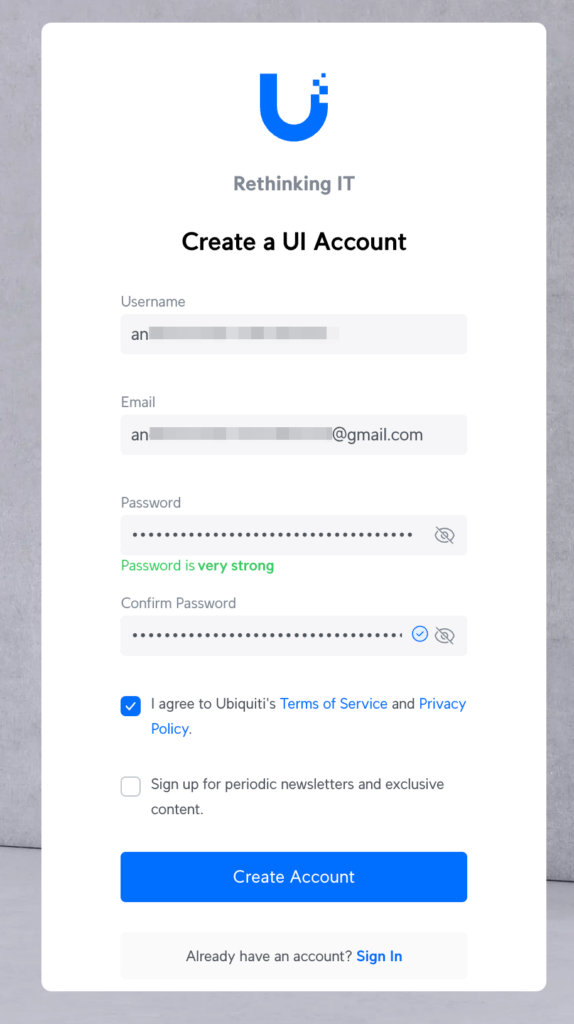
- Configure MFA using the App Authentication option, then click Enter code manually to reveal the MFA seed code.
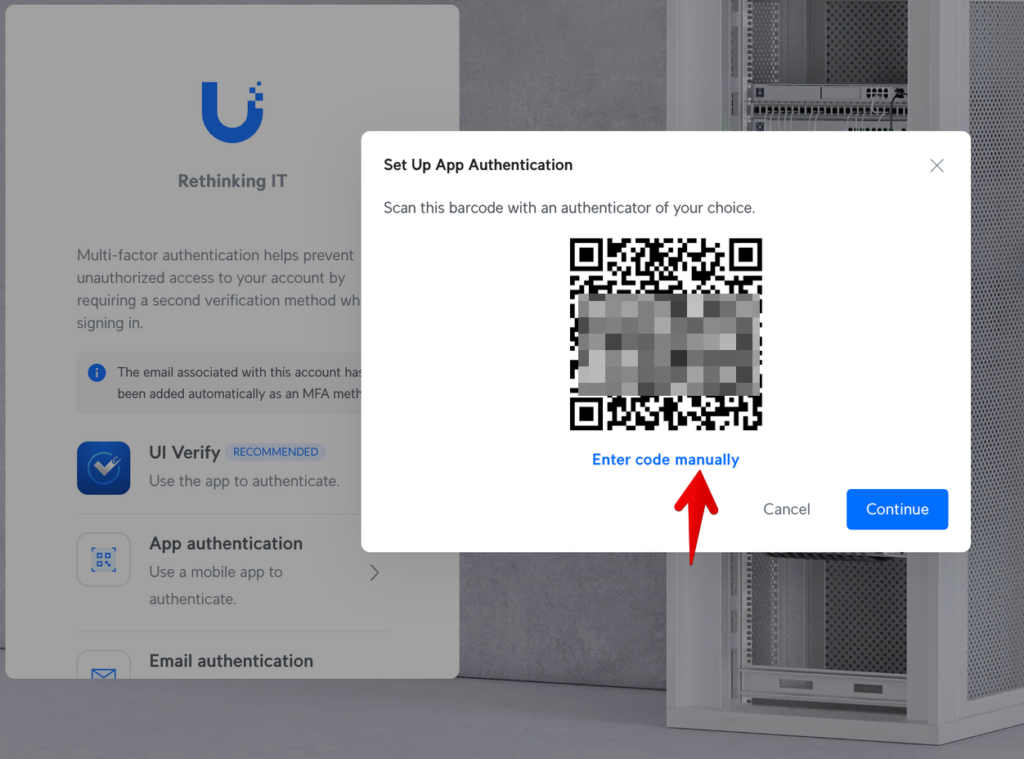
- Copy and securely save the MFA seed code. You’ll enter it into Domotz later.
- Finish setting up MFA using your preferred authenticator app.
- Log in to your main Admin account and go to the Admins page: https://unifi.ui.com/admins-list.
- Invite the new account as an Admin, using the same email address. The admin role can be global or site-specific.
- After sending the invite, wait for the confirmation email and accept it from the new account.
Make sure this new account has access to all the sites you plan to monitor.
2.2.2 Connect Domotz Using the MFA Seed
- Navigate to the Domotz Webapp > Collectors > Select the collector with your UniFi network > Devices section > at the Device Configuration options, click on Cloud and Local Integrations.
- Select Connect via Username & Password and click on Next
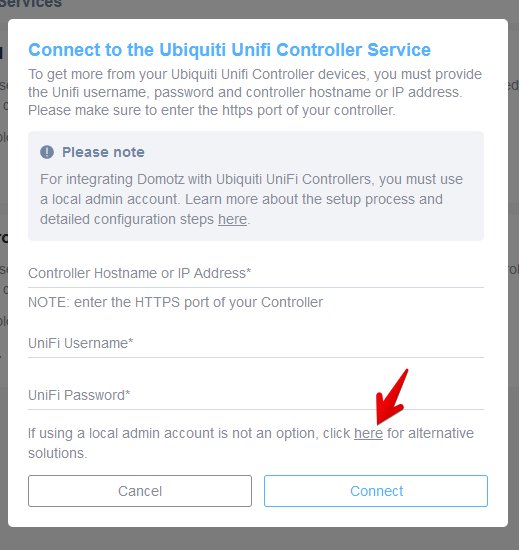
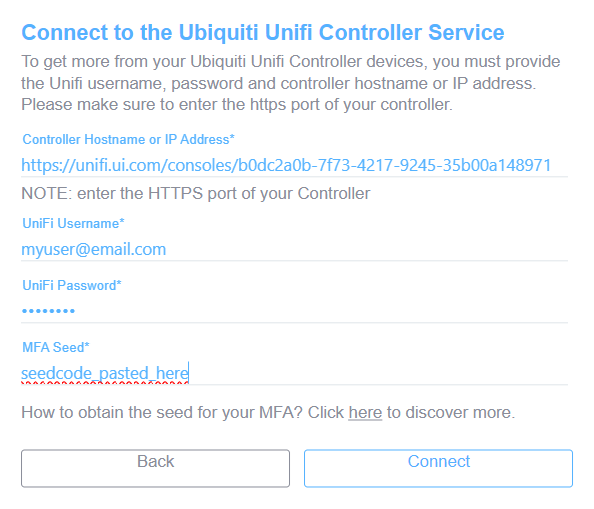
- In the standard connection modal, click the here link to switch to the alternative modal for entering the MFA seed.
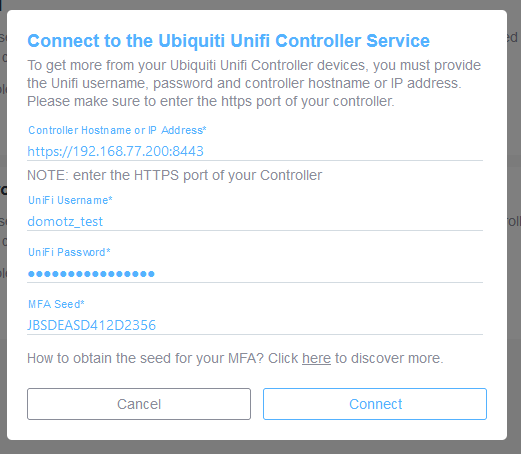
- Fill in the required fields, including the MFA seed. If your controller doesn’t use the default port, remember to include the port number in the Controller field, as shown below.
- Select the Network your collector is monitoring and click on Add 1 Collector.
2.2.3 Cloud Controller Connection
If you’re configuring a Cloud Controller (rather than a local one), you’ll need the controller URL from the Cloud Controller console.
For example, given the URL:
https://unifi.ui.com/consoles/b0dc2a0b-7f73-4217-9245-35b00a148971/network/default/settings/wifiDomotz only needs the portion up to the console ID:
https://unifi.ui.com/consoles/b0dc2a0b-7f73-4217-9245-35b00a148971Anything after that must be left out.
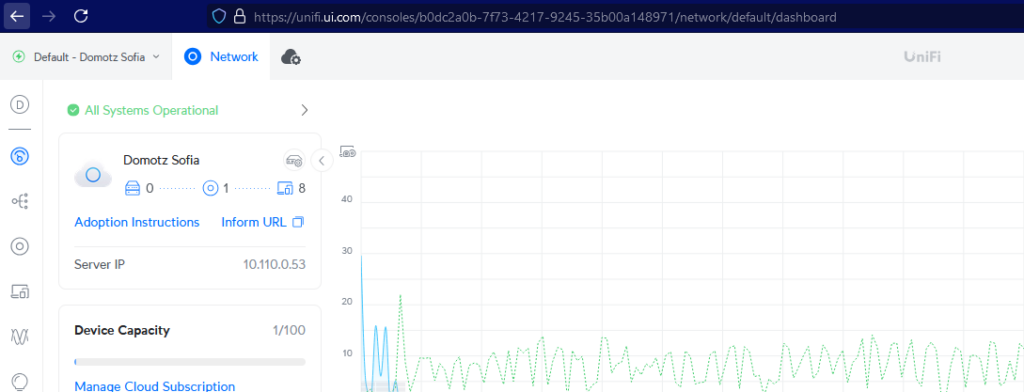
Use the URL as shown below when connecting to the Cloud Controller:
3. Important Notes
These apply regardless of which connection method (API Key, Local Admin, or Cloud + MFA) you used:
4. Features
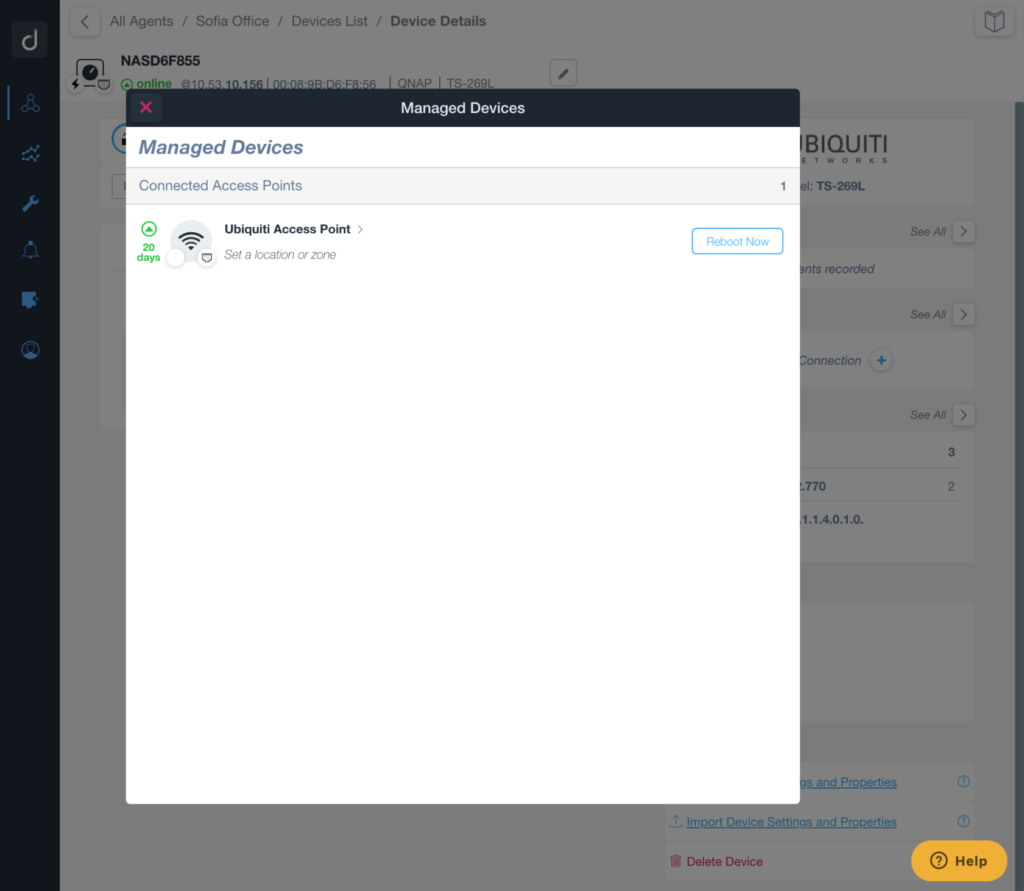
These are some of the additional info/features that you’ll get once the UniFi controller is Connected (Cloud Controller) or Unlocked (Local Controller):
Ubiquiti UniFi AP
- Reboot
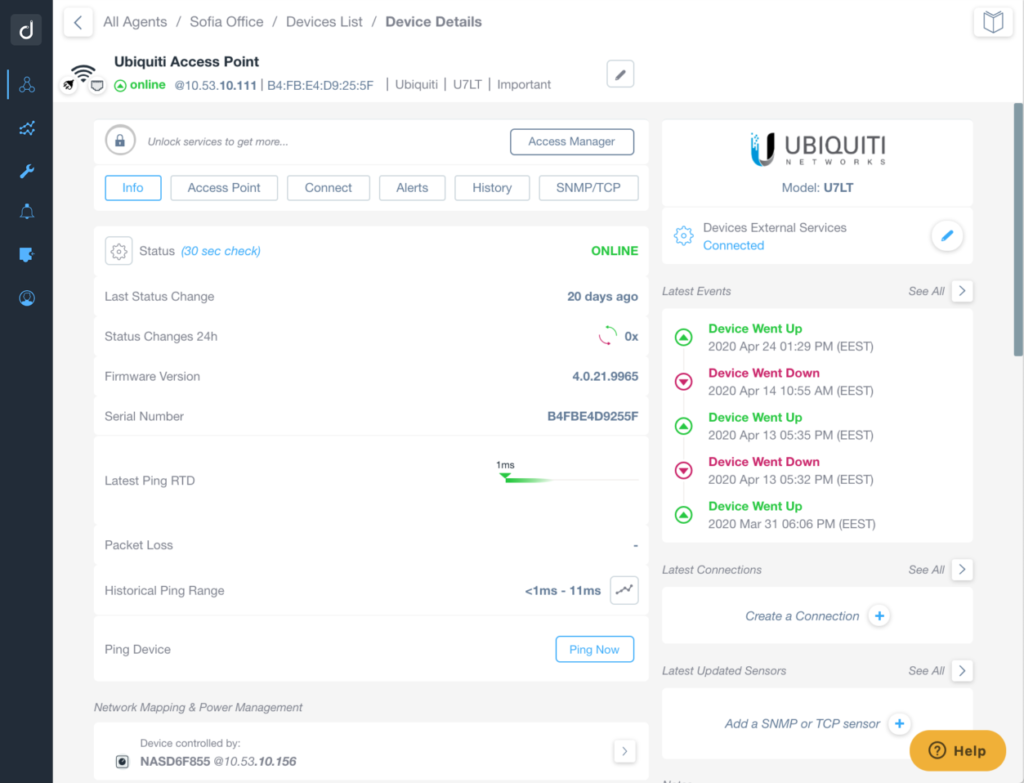
- Basic information like:
- firmware
- model
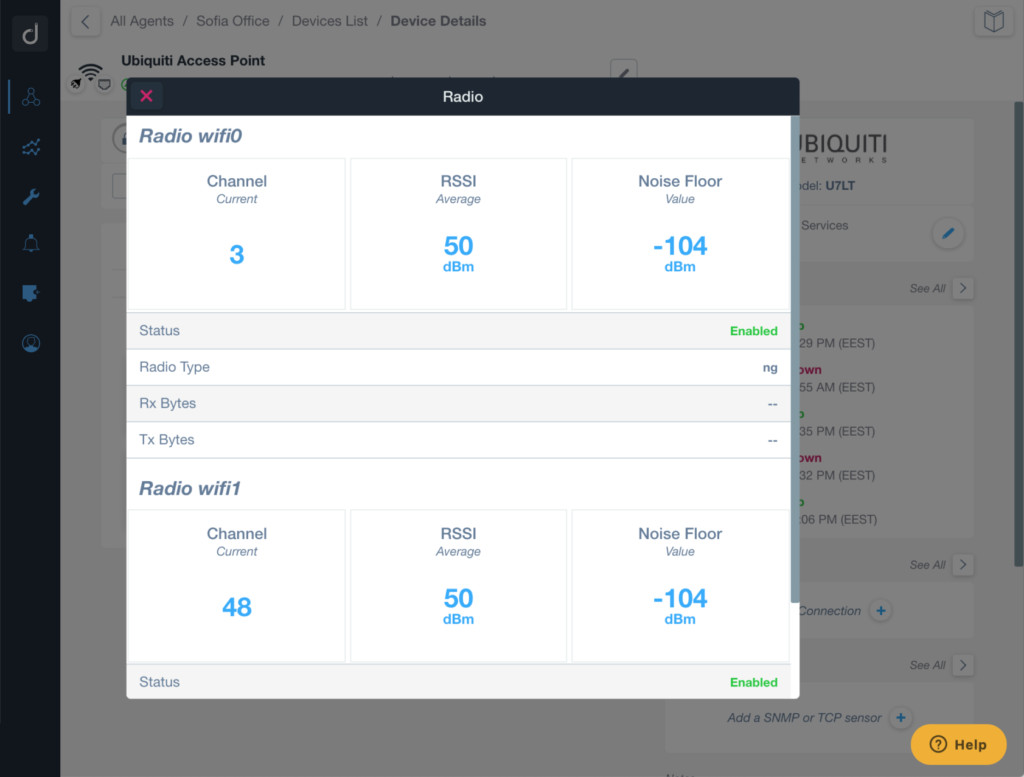
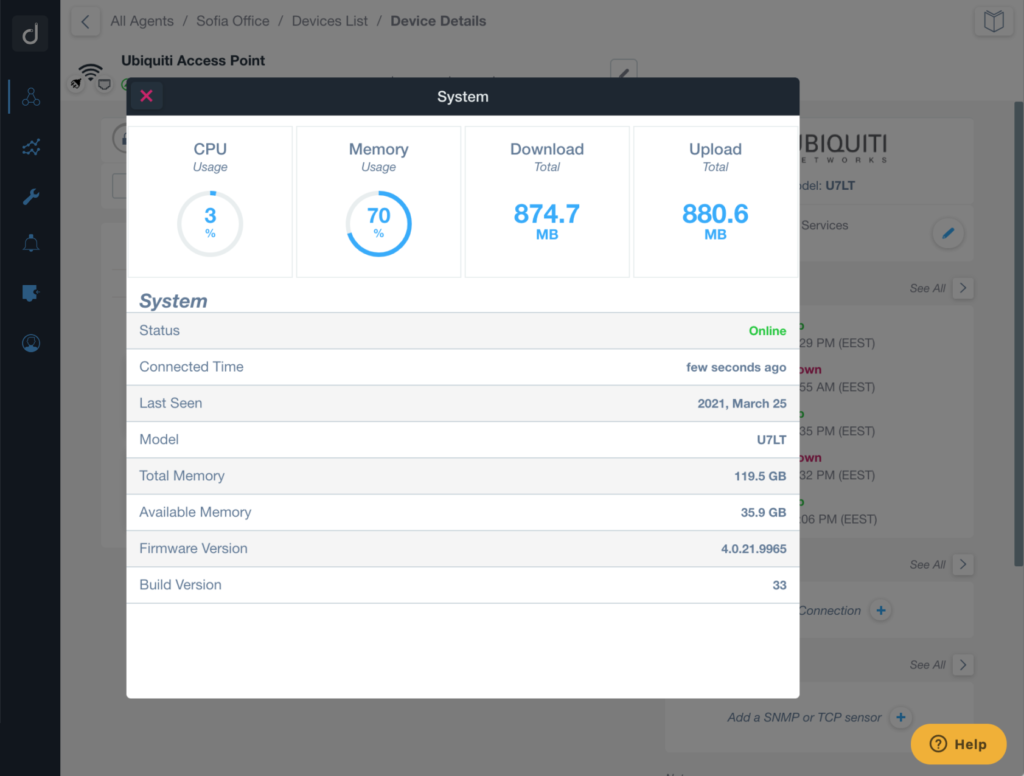
- Advanced information like:
- Monitor signal strength and noise level of APs by channel
- Monitor signal strength of connected clients
- Monitor access point traffic/hardware utilization
- etc
Ubiquiti UniFi Switches
- On/Off of PoE ports
- Port Mapping
- Port PoE consumption
4.1 Examples of Ubiquiti/UniFi Remote Monitoring and Management