This document provides a step-by-step guide on configuring VLANs on a Debian Linux (running Domotz Pro Agent) system using Network Manager and monitor them using the Domotz Pro Agent.
Prerequisites
- A Debian Linux system with root or sudo privileges.
- Domotz Pro Agent from Snap is installed and activated on the system.
- Network Manager installed and running on the system.
- Important: Ensure that the PC (running Debian) or VM is connected to a properly configured trunk port on the switch, with the VLANs you plan to define on the OS allowed on that trunk. If the trunk port is not correctly configured, the Domotz agent will be unable to discover devices on those VLANs. If the system is a VM hosted on Hyper-V, please refer to this guide to configure VLANs: Configuring VLANs on Hyper-V
Step 1: Install Necessary Packages
Before configuring VLANs, please run the below commands to ensure that the required packages are installed:sudo apt-get update
sudo apt-get install network-manager vlan
The VLAN package is required for VLAN tagging, and network-manager provides the interface for managing network connections.
Step 2: Ensure the Main Interface is Managed by Network Manager
Before proceeding with VLAN configuration, it is important to ensure that the main network interface (e.g., eth0) is managed by the network-manager. If the interface is unmanaged, Network Manager will not be able to configure VLANs on it.
Check the Interface Management
To list managed interfaces please run:
nmcli device status
The output should list the main interface (e.g., eth0) with the status connected, disconnected, or unavailable, indicating that Network Manager is managing it. If the status shows as unmanaged, you need to configure Network Manager to manage the interface.
Enable Management (if needed)
If the interface is unmanaged, follow these steps:
- Edit the Network Manager configuration by modifying the below file:
sudo nano /etc/NetworkManager/NetworkManager.conf
- Modify or add the following lines to ensure that all interfaces are managed:
[main]
plugins=ifupdown,keyfile
[ifupdown]
managed=true
- Run the below command to restart Network Manager to apply the changes:
sudo systemctl restart NetworkManager
- To verify the interface is now managed, run:
nmcli device status
Ensure that the main interface (e.g., eth0) no longer appears unmanaged.
Step 3: Create a VLAN Interface Using Network Manager
You can create a VLAN interface using the command line utility (nmcli).
Using nmcli (Command Line)
- Identify the parent interface: Determine the name of the physical network interface that will be the parent of the VLAN interface. This is typically
eth0,ens33, or similar.
Run the below command and Identify the interface you want to use for VLAN tagging:ip link show - Create the VLAN interface: Use the following command to create a VLAN interface. Replace
eth0with your interface name,100with the VLAN ID, andVLAN100with a descriptive name for the VLAN interface.sudo nmcli connection add type vlan con-name VLAN100 dev eth0 id 100 - Assign an IP address: If you want to assign a static IP address to the VLAN interface, please run the below commands and don’t forget to change the IP address with your desired IP address of the VLAN. You can skip
ipv4.gatewayif you don’t want to allow inter-VLAN communication:sudo nmcli connection modify VLAN100 ipv4.addresses 192.168.100.10/24
sudo nmcli connection modify VLAN100 ipv4.gateway 192.168.100.1
sudo nmcli connection modify VLAN100 ipv4.method manual
– For a DHCP configuration:
sudo nmcli connection modify VLAN100 ipv4.method auto - Bring up the VLAN interface:
sudo nmcli connection up VLAN100
Step 4: Verify the VLAN Configuration
After creating the VLAN interface, you should verify that it has been configured correctly. Follow the below steps to verify the settings:
- Restart Network Manager Service:
sudo systemctl restart Network Manager - Check the interface status:
ip link showLook for a new interface named similarly toeth0.100(if your parent interface waseth0and VLAN ID was100). - Check the IP address:
ip addr show eth0.100
Ensure the correct IP address is assigned to the VLAN interface. - Ping to test connectivity:
ping -c 4 <VLAN_Gateway_IP>
Replace<VLAN_Gateway_IP>with the gateway address of your VLAN network.
Step 5: Persistent Configuration
Network Manager automatically makes VLAN configurations persistent across reboots. No further action is needed.
Step 6: Restart The Domotz Pro Agent Service
Restart the Domotz Pro Agent Service by running the following command:
sudo snap restart domotzpro-agent-publicstore
Step 7: Verify The Network Settings on the Domotz Portal
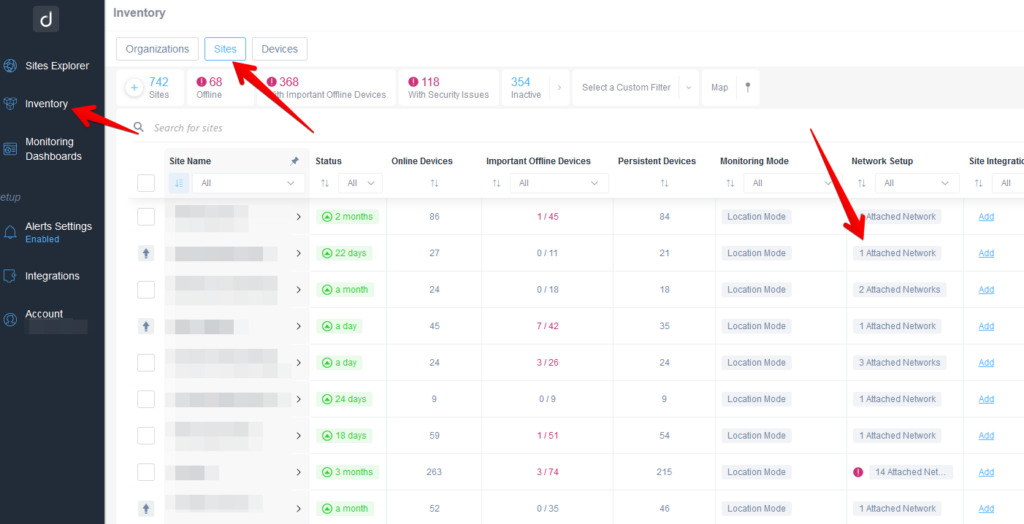
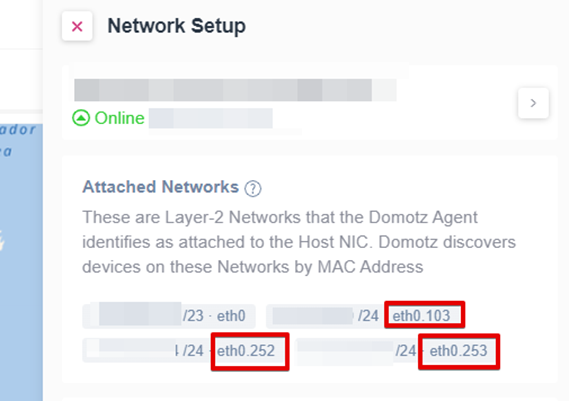
Now please log in to your Domotz portal (portal.domotz.com), select your agent, navigate to the Inventory menu, and click on the Sites tab. Then, select Network Setup for the chosen agent. You should see the VLAN interfaces detected by the Agent. The image below is for reference only; in your case, you should see the VLAN interfaces configured in Step 3.
Step 8: Troubleshooting
- Interface not showing: Ensure the VLAN module is loaded.
sudo modprobe 8021q - Check logs for errors:
journalctl -xe | grep NetworkManager - Verify network connectivity by checking routing tables and pinging other devices within the VLANs configured.
- If the Domotz Agent is not discovering devices on new VLANS:
- Please make sure the system is connected to the Trunk Port on the switch and the configured VLANS are allowed in the trunk port configuration.
- Please check the configuration files of VLAN interfaces at:
/etc/NetworkManager/system-connections- In the
system-connectionsdirectory, you will find configuration files for the VLAN interfaces of the configured VLANs, as shown below:
- Please open these configuration files with a text editor:
sudo nano vlan-ens3.20.nmconnection - Verify under the
[vlan], flag value is set to1, if it is0,please set it to1,and save the file. Similarly, check other VLAN configuration files and modify the flag value if needed.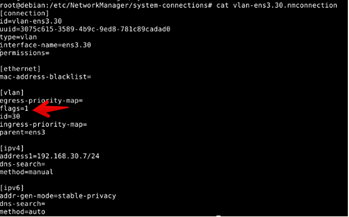
- Restart the Network Manager service to apply the changes:
sudo systemctl restart network-manager - Restart the Domotz Pro agent service:
sudo snap restart domotzpro-agent-publicstore - (Optional) reboot the system
:
sudo reboot - If the issue persists after following the above steps, please contact Domotz support at support@domotz.com and include screenshots of the steps you completed.
- In the