
How to create Custom SNMP Alerts for specific SNMP sensors
This article covers how to create a custom SNMP alert for specific SNMP sensors on Domotz.
Firstly, when creating a Custom SNMP Alert, remember that you need to define a Custom SNMP Sensor Alert inside your device. Otherwise, if you’ve not done this, the Retrieve any SNMP Event, even if selected in the Shared Alert, will not trigger any notification.
To create a Custom SNMP sensor alert, go to the ‘Alerts’ tab of your device.
Then select the ‘Custom’ option from the ‘Personal Alerts’ tab.
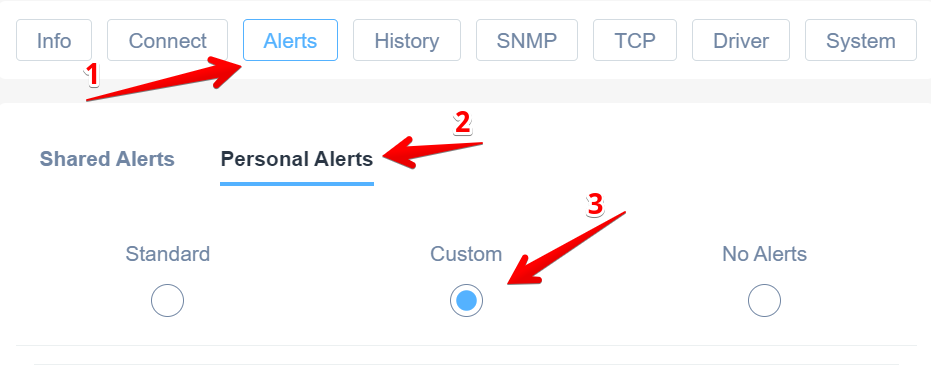
Configuring Custom Personal Alerts
1. Navigate to the top navigation menu and select "Alerts".
2. Within the alerts section, click on "Personal Alerts" to access personal notification settings.
3. Choose the "Custom" option by selecting the corresponding radio button to customize alert preferences.
Next, at the bottom of the page in the section called ‘SNMP Sensors‘, you can create an SNMP alert by selecting a sensor and then defining a threshold for it. Or, you can also create an SNMP Sensor if one does not yet exist.
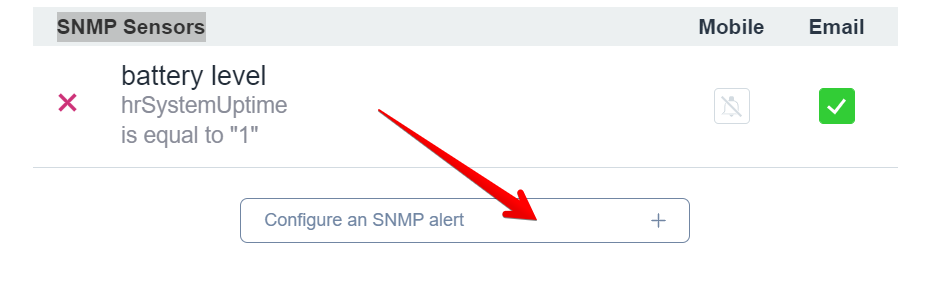
Configuring an SNMP Alert
1. Navigate to the "SNMP Sensors" section.
2. Locate the alert condition labeled "battery level hrSystemUptime is equal to '1'."
3. To configure a new SNMP alert, click the "Configure an SNMP alert" button, which is located below the alert condition.
4. This action will allow you to set up notifications based on the specified alert condition.
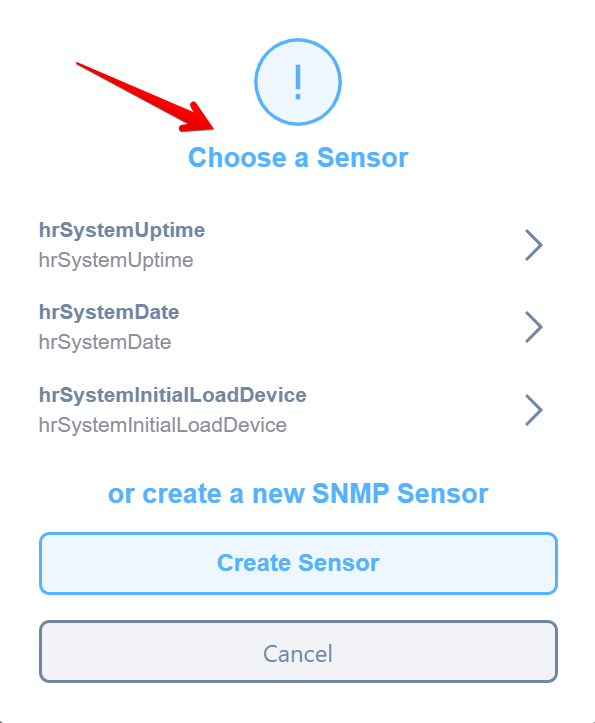
Choose or Create an SNMP Sensor
1. Select an existing sensor from the list: "hrSystemUptime," "hrSystemDate," or "hrSystemInitialLoadDevice."
2. To add a new SNMP sensor, click the "Create Sensor" button.
3. Cancel the operation by clicking the "Cancel" button.
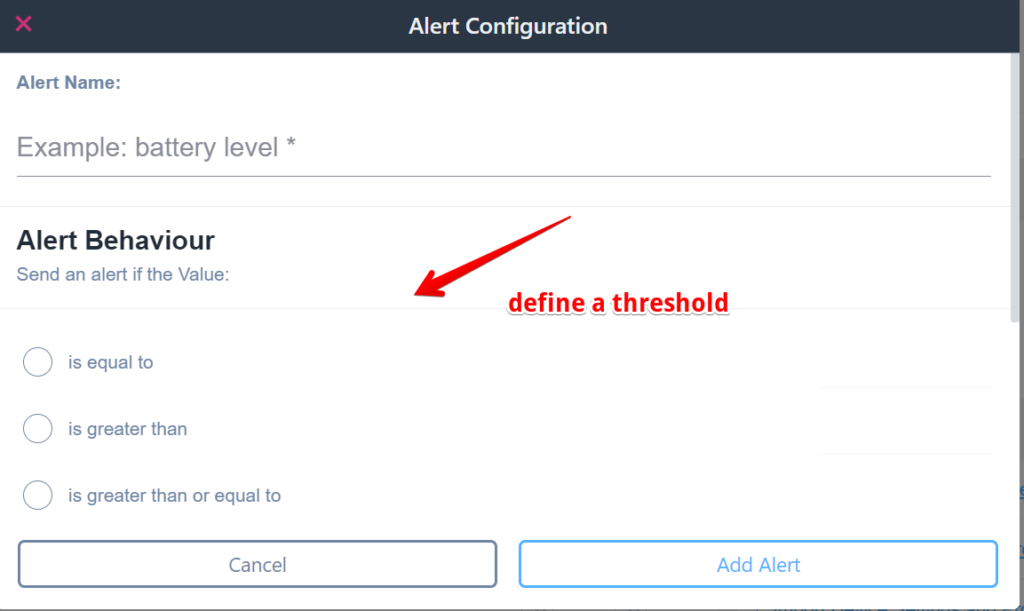
Alert Configuration Setup
1. In the "Alert Name" field, enter a descriptive name for your alert, such as "battery level."
2. Under "Alert Behaviour," choose when to send an alert by selecting one of the following options: "is equal to," "is greater than," or "is greater than or equal to."
3. Define the specific threshold value for the alert.
4. Click "Add Alert" to save your configured alert.
5. Use the "Cancel" button to discard changes if necessary.
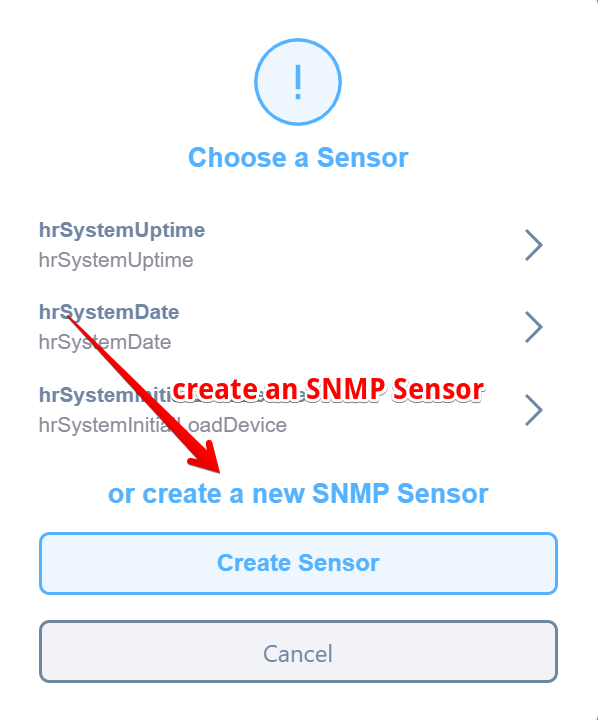
If you do not see the sensors you want to monitor in the ‘Choose a Sensor’ list, you can also create a new one to fit your needs:
Creating an SNMP Sensor
1. Select an existing sensor from the list by choosing between options such as "hrSystemUptime," "hrSystemDate," or "hrSystemInitialLoadDevice."
2. To create a new SNMP sensor, click on the link titled "or create a new SNMP Sensor."
3. To finalize the process, press the "Create Sensor" button.
4. If you wish to cancel the action, click the "Cancel" button.
SNMP Monitoring Interface Overview
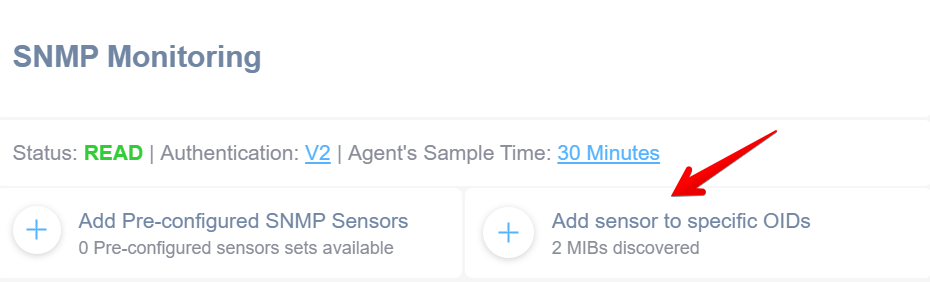
1. The status of the SNMP Monitoring is displayed as "READ" in green.
2. The authentication protocol in use is "V2."
3. The agent's sample time is set to "30 Minutes."
4. To add a sensor configured to specific OIDs, select "Add sensor to specific OIDs." Two MIBs have been discovered.
5. For pre-configured sensor options, "Add Pre-configured SNMP Sensors" is available, though currently, there are 0 pre-configured sensor sets available.
Adding Sensors to Monitor SNMP Objects
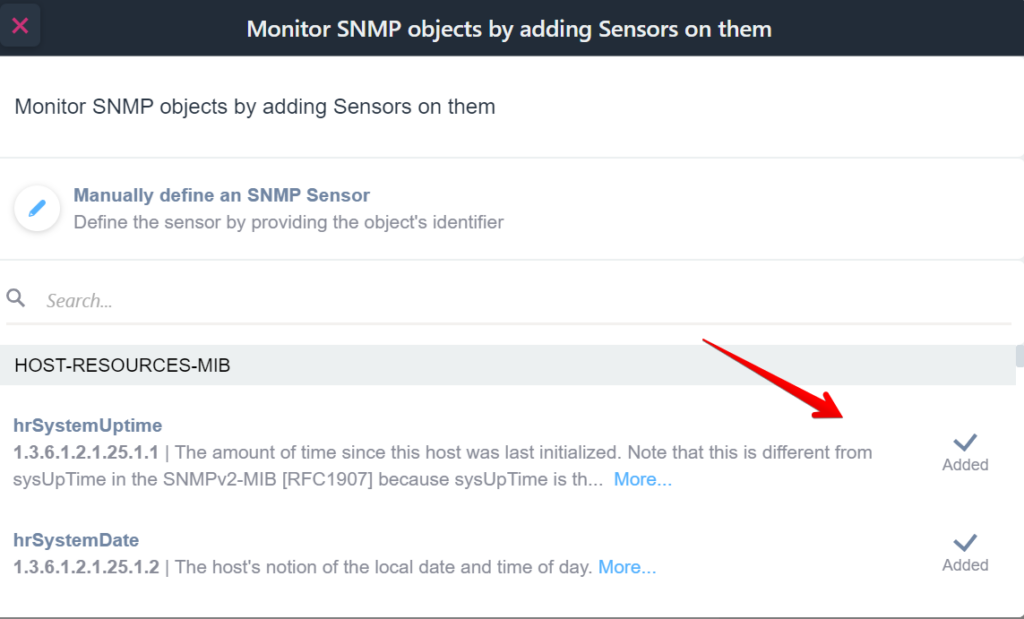
1. Begin by selecting "Manually define an SNMP Sensor" to create a sensor using the object's identifier.
2. Use the search bar if needed to find specific MIB objects.
3. The "HOST-RESOURCES-MIB" section lists available objects.
4. Identify "hrSystemUptime" with the identifier "1.3.6.1.2.1.25.1.1", displaying information about the system's uptime since last initialized.
5. Select "hrSystemUptime" to add it; the status will show as "Added".
6. Similarly, you can select "hrSystemDate" with identifier "1.3.6.1.2.1.25.1.2" to monitor the system's date and time.
Next, after adding the SNMP sensor you’d like to monitor and get alerts about, you can now go back and choose it from the ‘Choose a Sensor’ list.
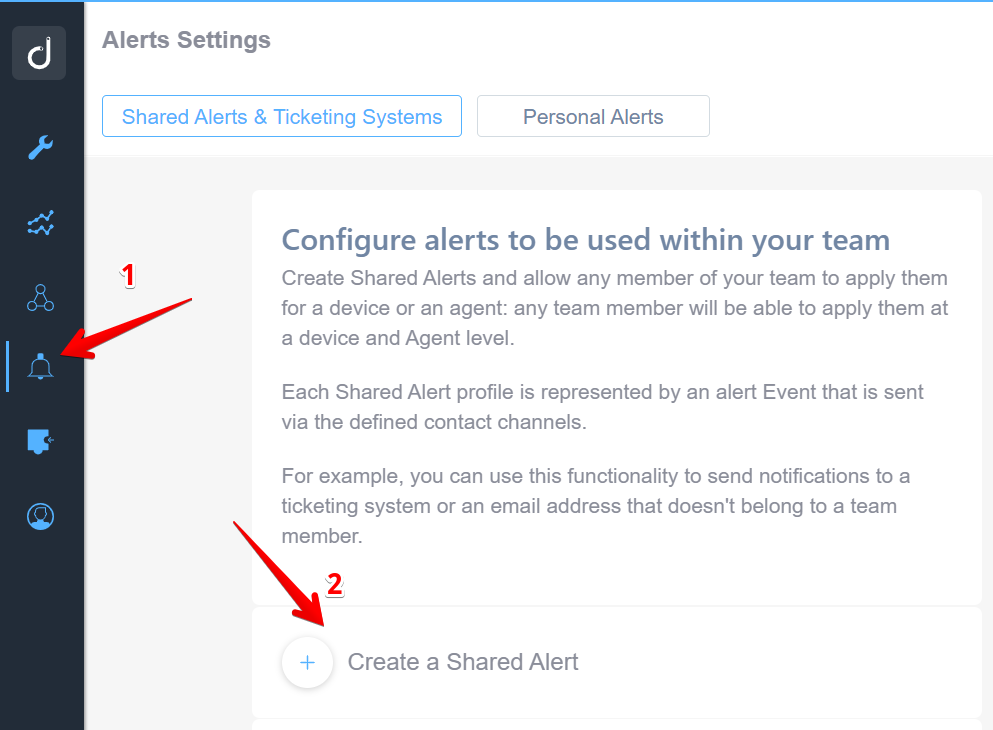
Then from ‘Alert Setting’ you should be able to create a shared alert:
Configuring Shared Alerts in Alert Settings
1. In the left sidebar, select the bell icon to access Alert Settings.
2. Within the "Shared Alerts & Ticketing Systems" tab, click "Create a Shared Alert" to start setting up a new shared alert for your team.
3. Follow the guided process to configure the alert settings and notification channels as required for your team’s needs.
Define a name for an alert, add your contact channel and check the ‘Retrieve any SNMP Events’ check box:
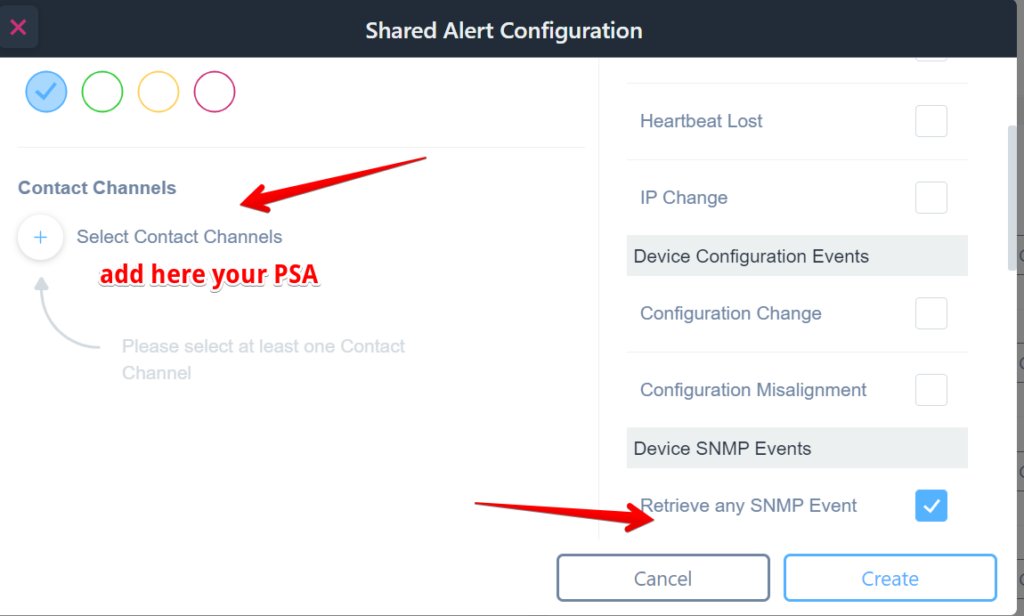
Shared Alert Configuration Setup
1. In the "Contact Channels" section, click on "+ Select Contact Channels" to add a contact method. This is necessary to ensure you receive alerts.
2. On the right-hand side, you can choose alert events by checking the boxes, such as "Heartbeat Lost," "IP Change," "Device Configuration Events," and more. Ensure you check the box for "Retrieve any SNMP Event" if needed.
3. Once selections are made, click "Create" to finalize the setup or "Cancel" to discard changes.
Next, after this, you need to attach your alert to your device.
From Inventory, select Manage, then Device tab. In the Device tab you should select your proper device/s and from ‘Edit Device Details’ you can attach the shared alerts to your device by selecting ‘Shared Alerts’.
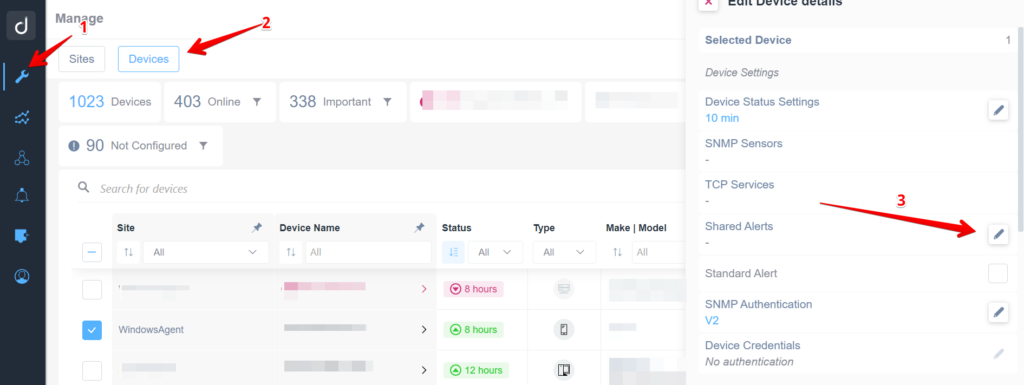
Device Management and Alert Configuration
1. In the management dashboard, click on the "Devices" tab located next to the "Sites" tab at the top of the screen to access the device list.
2. Review the device overview section showing the total number of devices, online devices, and important devices. A search bar is available to filter devices by site, name, status, type, make, or model.
3. On the right panel, under "Edit Device Details," find the section for "Shared Alerts." Click the pencil icon next to it to configure shared alerts for the selected device. Adjust settings as needed to customize device alerts.
This article explained how to create a custom SNMP alert for SNMP sensors.
Learn more about pre-configured SNMP sensors and shared alerts.
Learn more about what is SNMP and how it works.