
Account Management
This is the section of the Domotz Portal that you will use to change/update your Account details. You can reach this section from this link: https://portal.domotz.com/portal/account
Account Info
In this section, you can configure your billing account details (invoice address, type of account, name, country, etc).
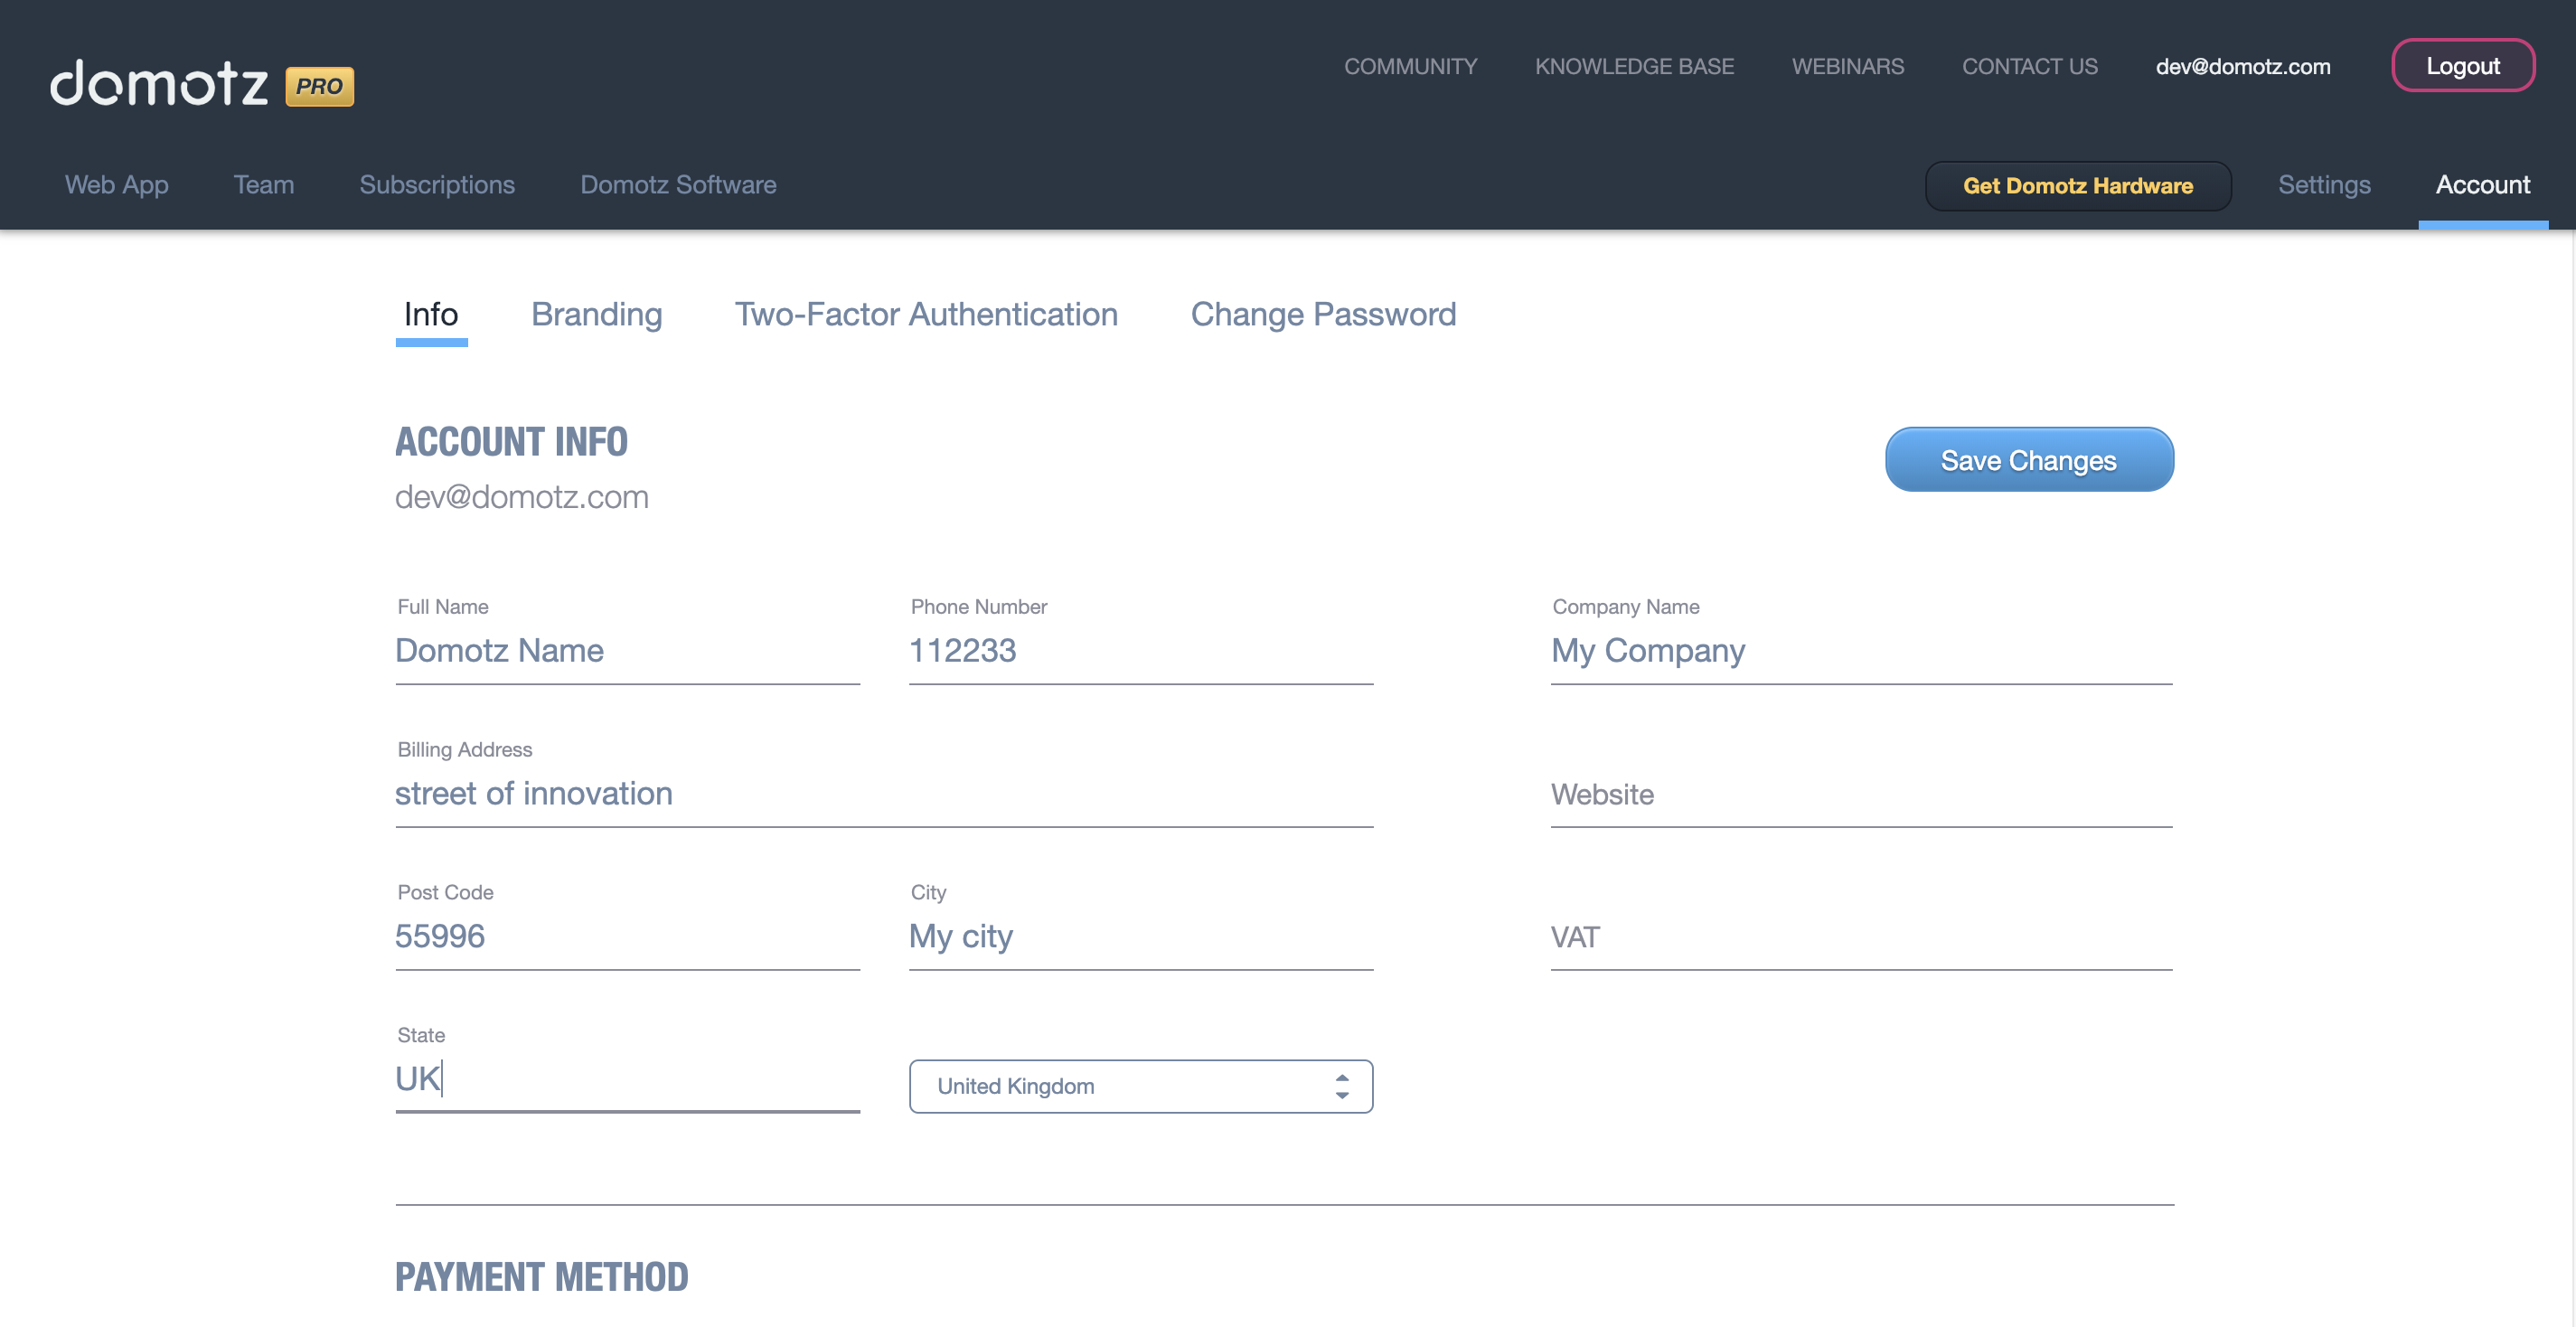
Account Information Update Form in Domotz
1. At the top, the navigation menu includes options for Web App, Team, Subscriptions, and Domotz Software, with links to Community, Knowledge Base, Webinars, and Contact Us on the right. The user is logged in as dev@domotz.com and can log out or access settings and account details.
2. The account information tab is selected, providing fields for personal and company details.
3. Under "ACCOUNT INFO":
- Email: dev@domotz.com (displayed but not editable).
- Full Name: Enter or edit the full name, shown as "Domotz Name."
- Phone Number: Enter or edit the phone number, shown as "112233."
- Company Name: Enter or edit the company name, shown as "My Company."
- Billing Address: Enter or edit the billing address, shown as "street of innovation."
- Post Code: Enter or edit the post code, shown as "55996."
- City: Enter or edit the city, shown as "My city."
- State: Enter or edit the state, shown as "UK."
- Country: Select the country from the dropdown menu, preset to "United Kingdom."
- Website and VAT fields are not filled.
4. To save any changes made to the form, click the "Save Changes" button on the right side.
This is also the section you must use to fill your payment method information.
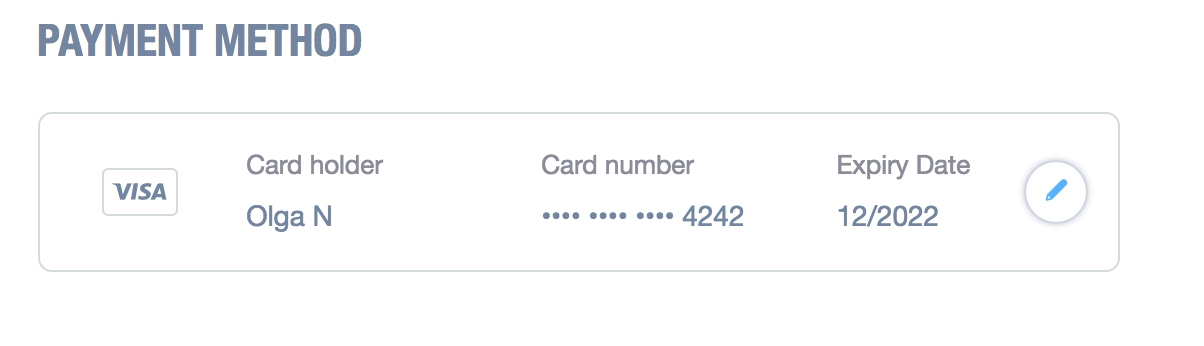
Credit Card Details Display
1. The section is labeled "Payment Method."
2. The card type indicated is Visa.
3. "Card holder" section shows the name "Olga N."
4. "Card number" section displays masked digits with the last four numbers shown as 4242.
5. "Expiry Date" section shows the date as 12/2022.
6. A pencil icon suggests an option to edit these details.
Invoice information
Once you’ve specified payment method, you will be able to control the Invoices information. It includes Invoices History with their dates and payments values. You can easily download any Invoice in PDF.
There you can also find Estimated Upcoming Invoice information about the next payment. If you click on ?, you will see its details with Subtotal, date and the Plan you use.
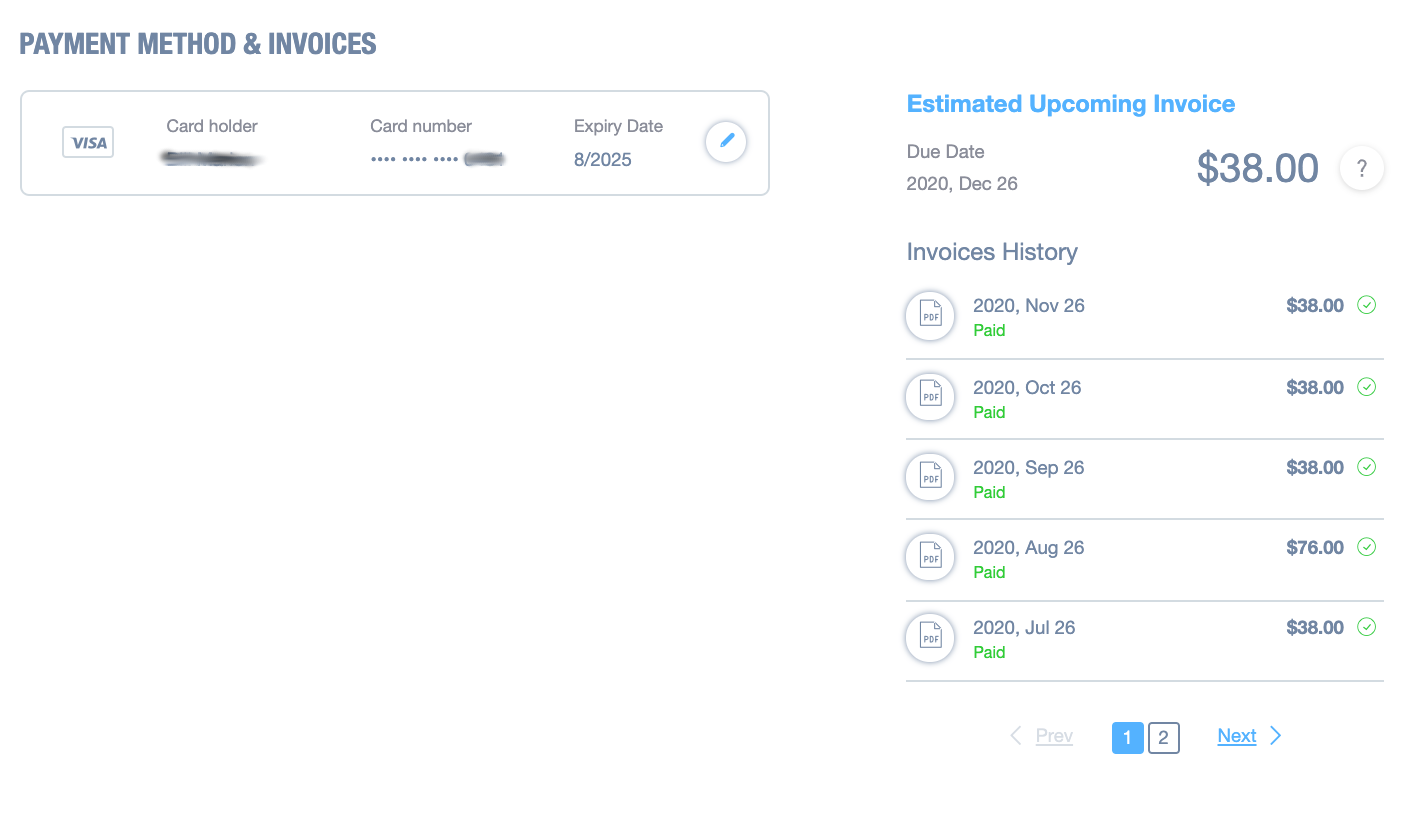
Payment Method and Invoice Summary
1. The payment method is a Visa card with the cardholder's name partially obscured. The last four digits of the card number are masked, and the expiry date is August 2025. An edit icon is available for updating this information.
2. On the right, a section titled "Estimated Upcoming Invoice" displays an amount of $38.00 due on December 26, 2020.
3. Below, "Invoices History" lists past invoices:
- November 26, 2020: $38.00, marked as Paid.
- October 26, 2020: $38.00, marked as Paid.
- September 26, 2020: $38.00, marked as Paid.
- August 26, 2020: $76.00, marked as Paid.
- July 26, 2020: $38.00, marked as Paid.
4. Each invoice entry includes a PDF icon for accessing invoice details. Pagination controls are at the bottom with the first page currently selected.
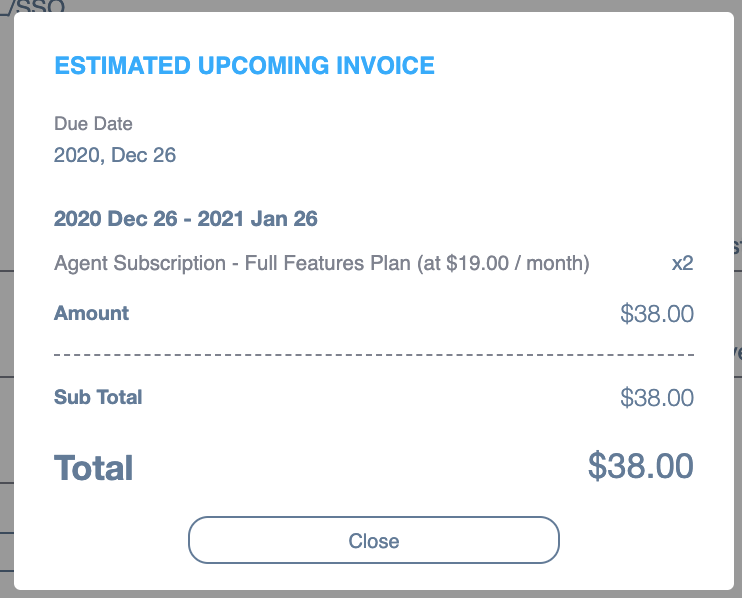
Estimated Upcoming Invoice Summary
1. The invoice is due on December 26, 2020.
2. The billing period is from December 26, 2020, to January 26, 2021.
3. Includes an Agent Subscription for the Full Features Plan priced at $19.00 per month, with a quantity of 2.
4. The total amount and subtotal both equal $38.00.
5. A "Close" button is available to dismiss the invoice summary.
Branding
This tab allows you to configure your contact info and upload a company logo for display in the Violet customer app and in reports generated. Don’t forget to save changes.
Two-Factor Authentication (2FA / MFA)
This tab allows you to configure a Multi-Factor Authentication (MFA) to add more security to your Domotz account.
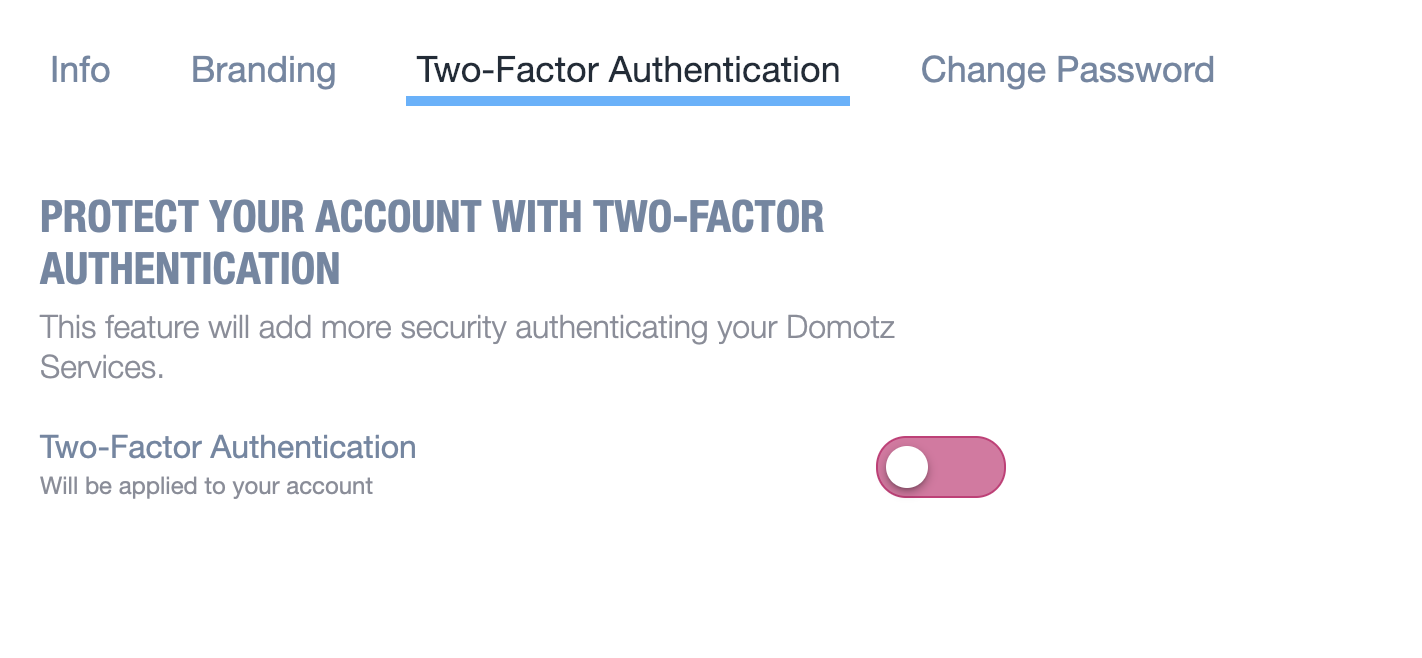
Enable Two-Factor Authentication in Domotz
1. Navigate to the "Two-Factor Authentication" tab in the settings menu.
2. Read the section titled "Protect Your Account with Two-Factor Authentication," which explains the security benefits of enabling this feature.
3. Locate the "Two-Factor Authentication" toggle switch.
4. Slide the toggle to enable this feature, enhancing your account security.
When enabling the 2FA – via toggle button – the user is requested to enter his password and confirm.
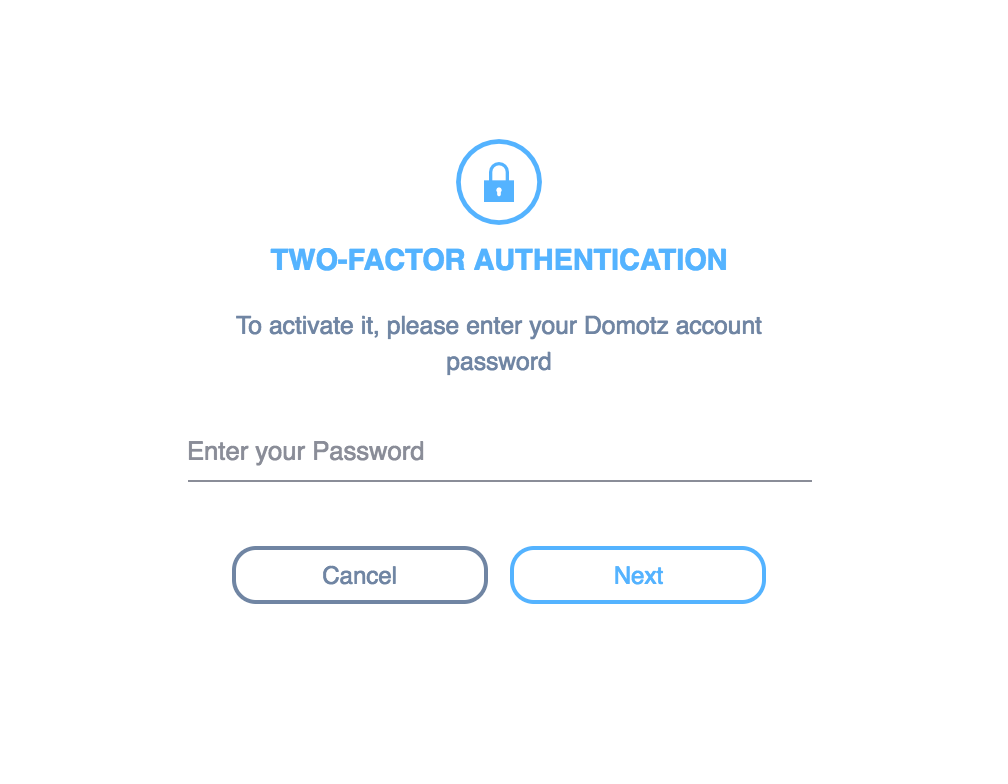
Two-Factor Authentication Activation Screen
1. To activate two-factor authentication, enter your Domotz account password in the provided text field labeled "Enter your Password."
2. After entering your password, click the "Next" button to proceed with the activation process.
3. If you wish to cancel the activation, click the "Cancel" button.
After this step, the 2FA token (QR Code) is generated and needs to be saved and used inside an external application like Google Authenticator or Microsoft Authenticator to generate fresh Domotz login codes.
While acknowledging the token saving, the user can chose to flag the option “Remember me”, which allows to trust the device and skip the authentication.
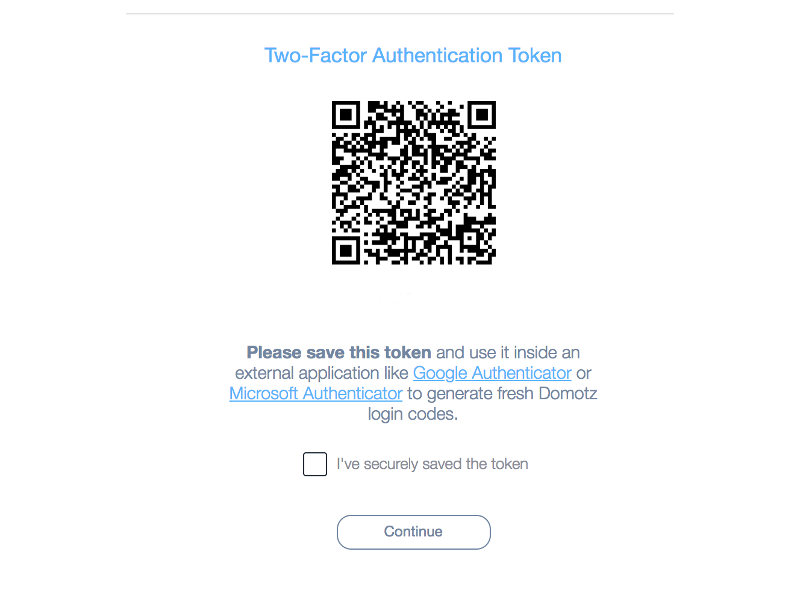
Two-Factor Authentication Token Setup
1. Scan the displayed QR code using an authentication app such as Google Authenticator or Microsoft Authenticator to generate login codes.
2. Read the message advising you to save the token in an authentication app for secure Domotz login code generation.
3. Check the box labeled "I've securely saved the token" once the token is saved.
4. Click the "Continue" button to proceed.
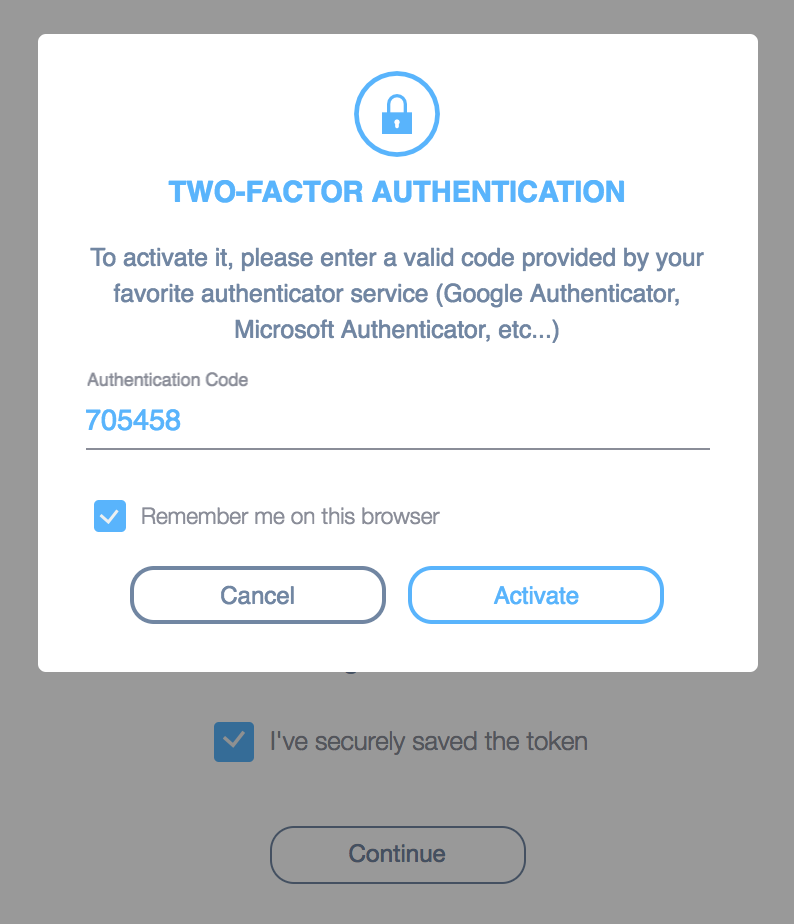
Two-Factor Authentication Activation Interface
1. Enter the provided authentication code into the "Authentication Code" field. Example: 705458.
2. Optionally, check the box labeled "Remember me on this browser" to stay logged in on this device.
3. Click the "Activate" button to enable two-factor authentication.
4. Alternatively, click "Cancel" to exit without activating.
5. After saving your token securely, check the box for "I've securely saved the token."
6. Click "Continue" to proceed.
At the 2FA activation process completion, the page displays:
- The list of Trusted devices (all devices that do not require the two-step authentication at login moment, if the “Remember me“ option has been selected). By clicking the bin icon, the user can remove one device from the list.
- The code being used.
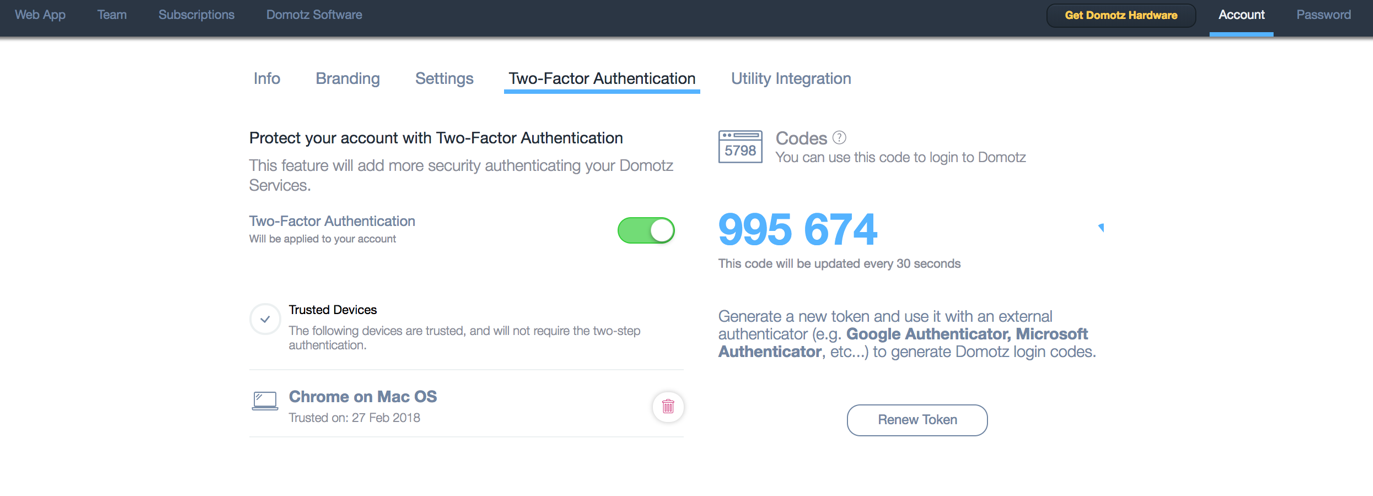
Two-Factor Authentication Setup Screen
1. Select the "Two-Factor Authentication" tab from the menu to enhance account security.
2. Enable Two-Factor Authentication by toggling the switch to the on position.
3. Under "Trusted Devices," view the list of devices exempt from needing two-step authentication.
4. A trusted device example is shown as "Chrome on Mac OS," trusted on 27 Feb 2018.
5. Use the "Codes" area on the right to find your current login code (e.g., 995 674), automatically updating every 30 seconds.
6. To generate a new token, click "Renew Token" and use it with an external authenticator such as Google Authenticator or Microsoft Authenticator to create new login codes.
The user can disable the 2FA at any time (by using the toggle button and inserting his password).
The Team Masters can check wether or not, his team members have configured the 2FA for their accounts, in the Team section available in the user portal.
Moreover the Team Master can also enforce the usage of 2FA to his team members either at the creation of the Team Member itself or in a second moment.
Change Password
Here you can change your account password.
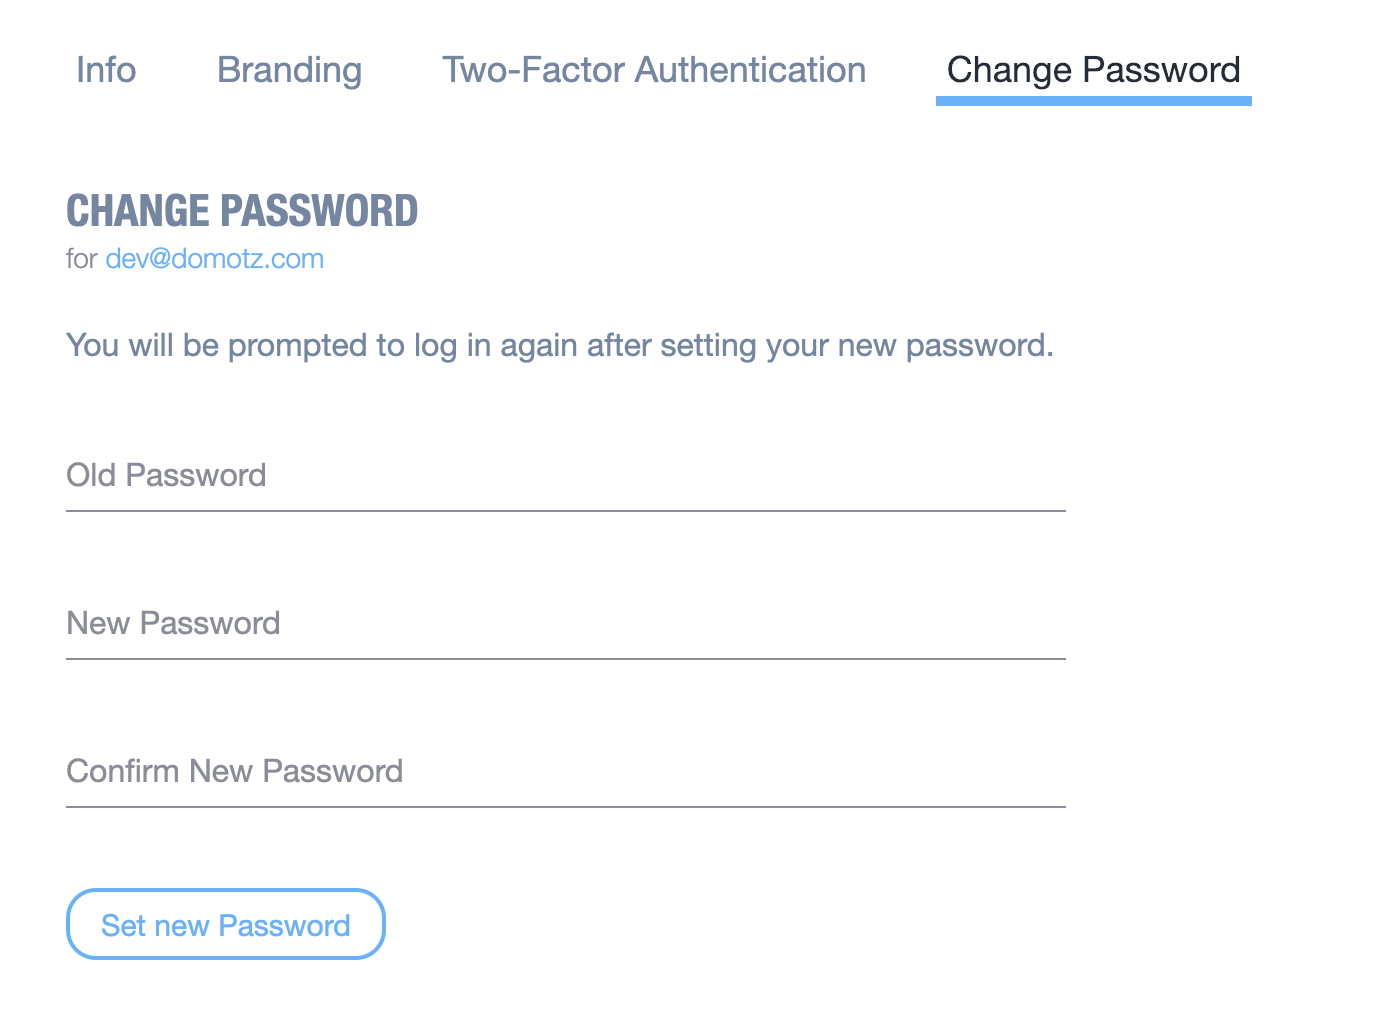
Change Password Form for User Account
1. Navigate to the "Change Password" tab in account settings.
2. Enter your current password in the "Old Password" field.
3. Type your new desired password in the "New Password" field.
4. Re-enter the new password in the "Confirm New Password" field to confirm it.
5. Click the "Set new Password" button to save changes. You will need to log in again after setting your new password.
Change Username
Currently, you cannot change your username independently. To request a username change, please contact Domotz Support at support@domot.com.
Subscriptions
The Subscriptions menu is where you can manage all your account Collectors. You may have a mix of prepaid and Subscription Collectors.
Your Collectors
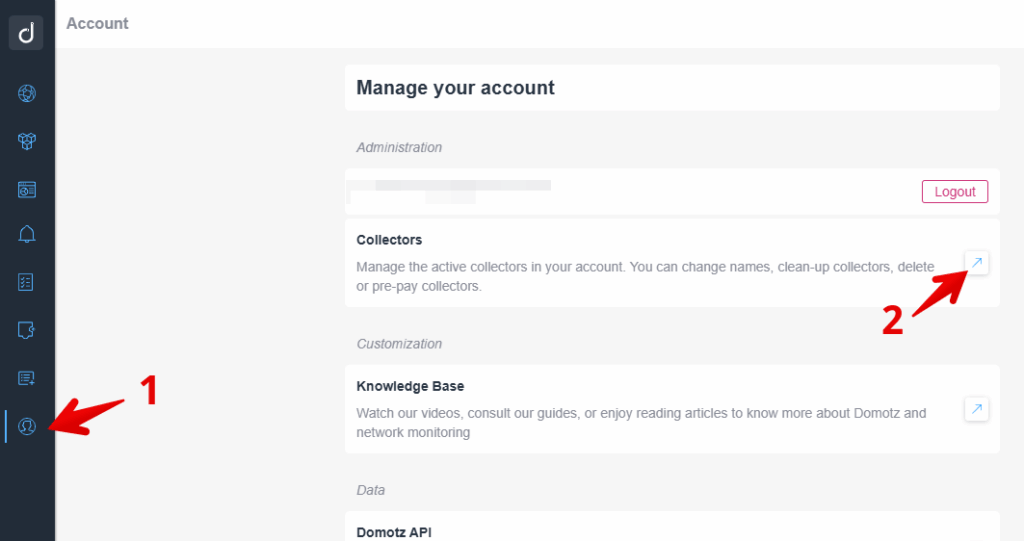
Managing Account Settings in Domotz
1. To access account settings, click the user icon located on the left sidebar.
2. In the "Manage your account" section, under "Collectors," click the external link icon to manage active collectors. This allows you to change names, clean-up, delete, or pre-pay collectors.
Collector Management
In this section, you will be able to manage your Collector:
- Activation status
- Collector Version
- Extend expiration
- Delete the Collector
- Clean-up the Collector data (without removing the subscription)
- Rename Collectors
In this view you see a list of your current Collectors including Version, Status (and, if a prepaid Collector, the Expiration date):
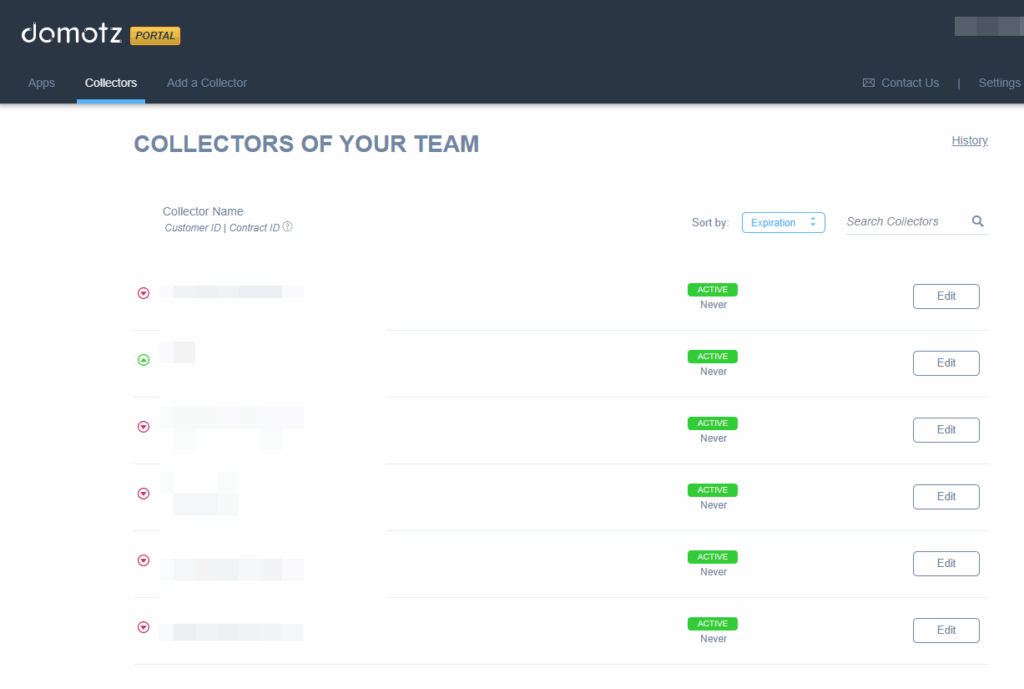
Manage Team Collectors Page in Domotz Portal
1. Navigate to the "Collectors" tab to view the list of team collectors.
2. Each entry displays the collector's name, customer ID, and contract ID.
3. Status indicators show "ACTIVE" with a label stating "Never" beneath it.
4. To edit a collector's details, click the "Edit" button next to the desired entry.
5. Use the "Sort by" dropdown menu to arrange collectors by expiration date.
6. Utilize the search bar labeled "Search Collectors" to find specific entries quickly.
History
History will give you the complete history of key subscription actions, such as Collector activation or removal, done by your account:
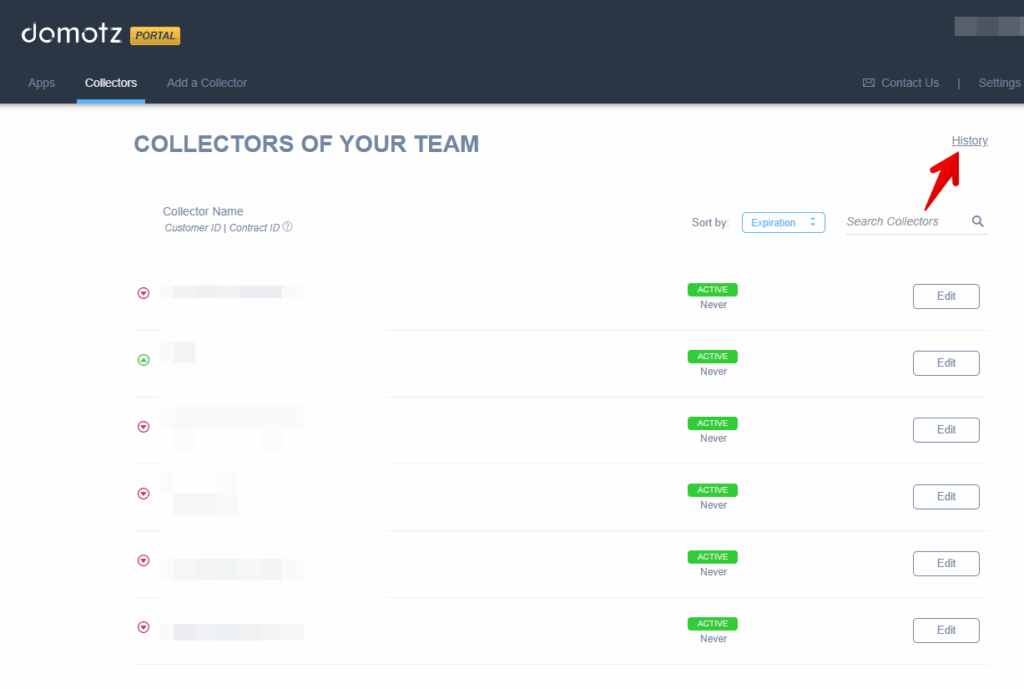
Managing Team Collectors in the Domotz Portal
1. At the top, navigate to the "Collectors" tab to view a list of your team's collectors.
2. Collector details include the Collector Name, Customer ID, and Contract ID.
3. For each collector, their status is displayed as "ACTIVE" along with an expiration date, shown as "Never" in this view.
4. To edit a collector's details, click the "Edit" button next to the relevant collector entry.
5. To access the history of changes or actions, click the "History" link in the upper right corner of the page.
6. You can sort the list by different criteria using the "Sort by" dropdown, currently set to "Expiration."
7. Use the "Search Collectors" field to find specific collectors quickly.
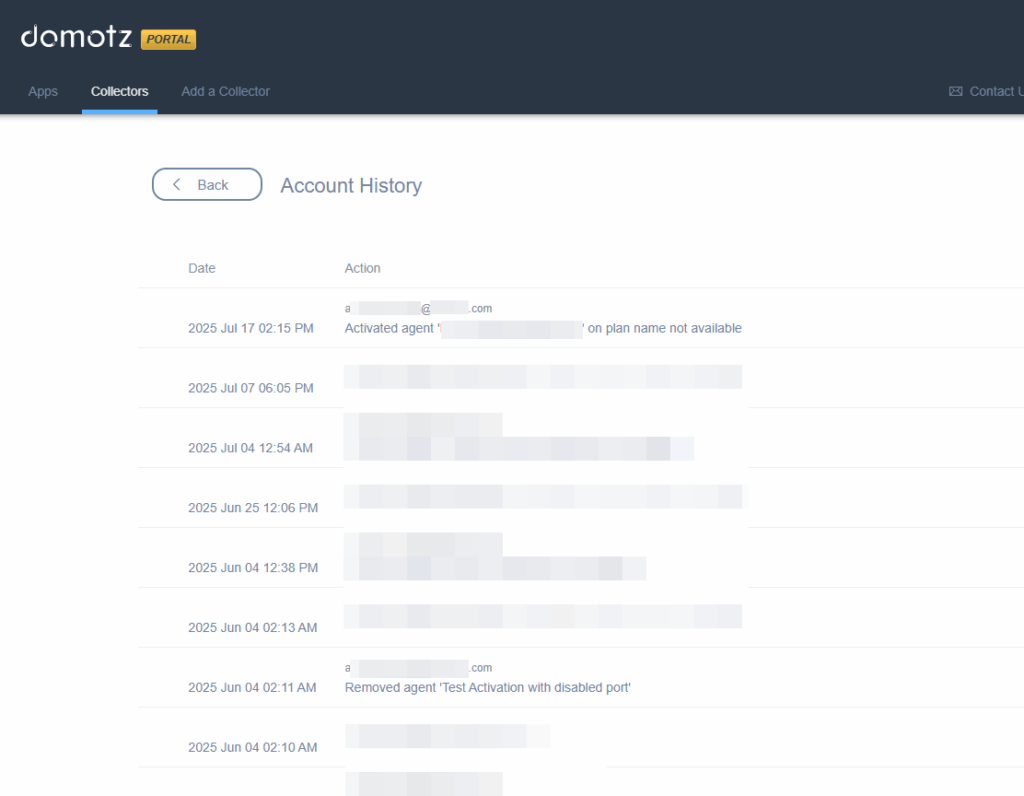
Account History Page Overview
1. Navigate to the "Collectors" tab in the Domotz portal.
2. The page displays the "Account History" section.
3. Each entry is organized with two columns: "Date" and "Action."
4. The "Date" column shows when the action occurred, formatted as 'YYYY MMM DD HH:MM AM/PM'.
5. The "Action" column provides a summary of activities, such as activation or removal of agents, sometimes including an agent's email.
6. Use the "< Back" button to return to the previous page.
Extend Collector
Domotz, by default, will bill automatically every month, using a valid credit card, based on the number of installed Domotz Collectors.
In case you have prepaid collectors you have the possibility of extending their validity using your credit card.
Edit Collector
In this section there are additional information about the selected Collector such as activation date, package version, local IP address, MAC address of the physical device blinded to the Collector.
Collector’s name can be changed from this section.
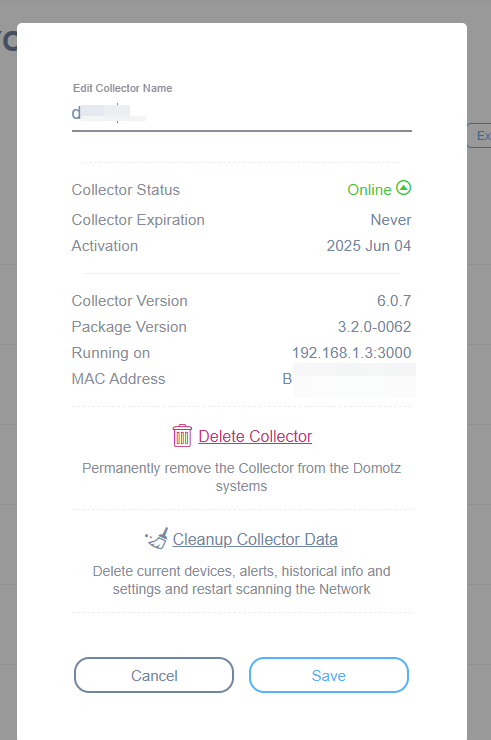
Editing and Managing Collector Settings
1. Edit the collector name in the top field if needed.
2. Check the Collector Status, which is indicated as "Online."
3. Note the Collector Expiration status, which is set to "Never," and the Activation date, which is "2025 Jun 04."
4. Review system details:
- Collector Version: "6.0.7"
- Package Version: "3.2.0-0062"
- Running on IP Address and Port: "192.168.1.3:3000"
- MAC Address is displayed below.
5. To remove the collector from the system, click "Delete Collector" and confirm the permanent removal.
6. To clear data, select "Cleanup Collector Data" to delete devices, alerts, and historical information, and restart network scanning.
7. Save changes by clicking "Save," or discard changes by clicking "Cancel."
From the Edit section you can also Cleanup the Collector data. All the configuration made inside the Collector, together will the scanned info will be deleted. The Collector name and subscription status will remain as it is.
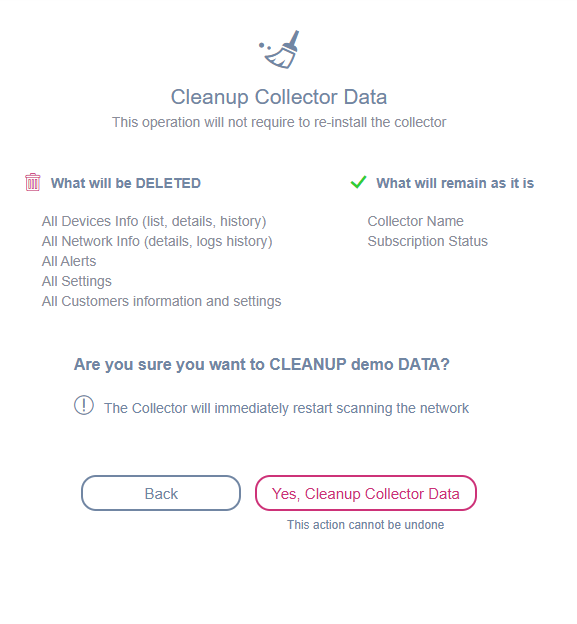
Cleanup Collector Data Confirmation Screen
1. Header: "Cleanup Collector Data" indicates the operation will not require reinstalling the collector.
2. Left Column: Listed under "What will be DELETED" are all devices info, all network info, all alerts, all settings, and all customers' information and settings.
3. Right Column: Listed under "What will remain as it is" are the collector name and subscription status.
4. Confirmation Prompt: Asks "Are you sure you want to CLEANUP demo DATA?" with a warning that the collector will restart scanning the network.
5. Buttons: Two options are available—"Back" to cancel the operation and "Yes, Cleanup Collector Data" to proceed with the cleanup. The action is irreversible.
From the Edit section you can also delete the Collector from your list. Delete Collector will remove all the data related to an Collector. It can be useful if you want to move a box from a location to another, to get rid of previous data. Please be advised that:
- A delete operation is only possible when the Collector is disconnected.
If you wish, you can can prepay any Subscription Collector up to 5 years with your registered credit card.