
Custom Tags allow users to categorize and organize devices and collectors using their own naming system. Unlike predefined system properties, Custom Tags are user-created and fully flexible. They help improve visibility, filtering, and management across device and collector lists.
What Can You Do with Custom Tags
- Organize devices and collectors by purpose, criticality, or category
Examples:
Critical, VoIP, RemoteOffice, ToReplace, HighPriority
Permission Requirement
To create new custom tags, your user role must include the Manage Tags permission if using RBAC Access Management. Users without this permission can assign existing tags but cannot create new ones.
How To Create a Custom Tag
A custom tag can be created from the Inventory (for Collectors and devices), Devices List, and Device Profiles section.
To create a tag from the Devices List:
- Go to the Devices List.
- Open any device.
- Enter a name for your tag.
- Choose a color from the available options.
- Click Create.
Once created, the new tag will appear in the Tags list. From this same list, you can select the new tag and apply it directly to the device you are currently viewing.
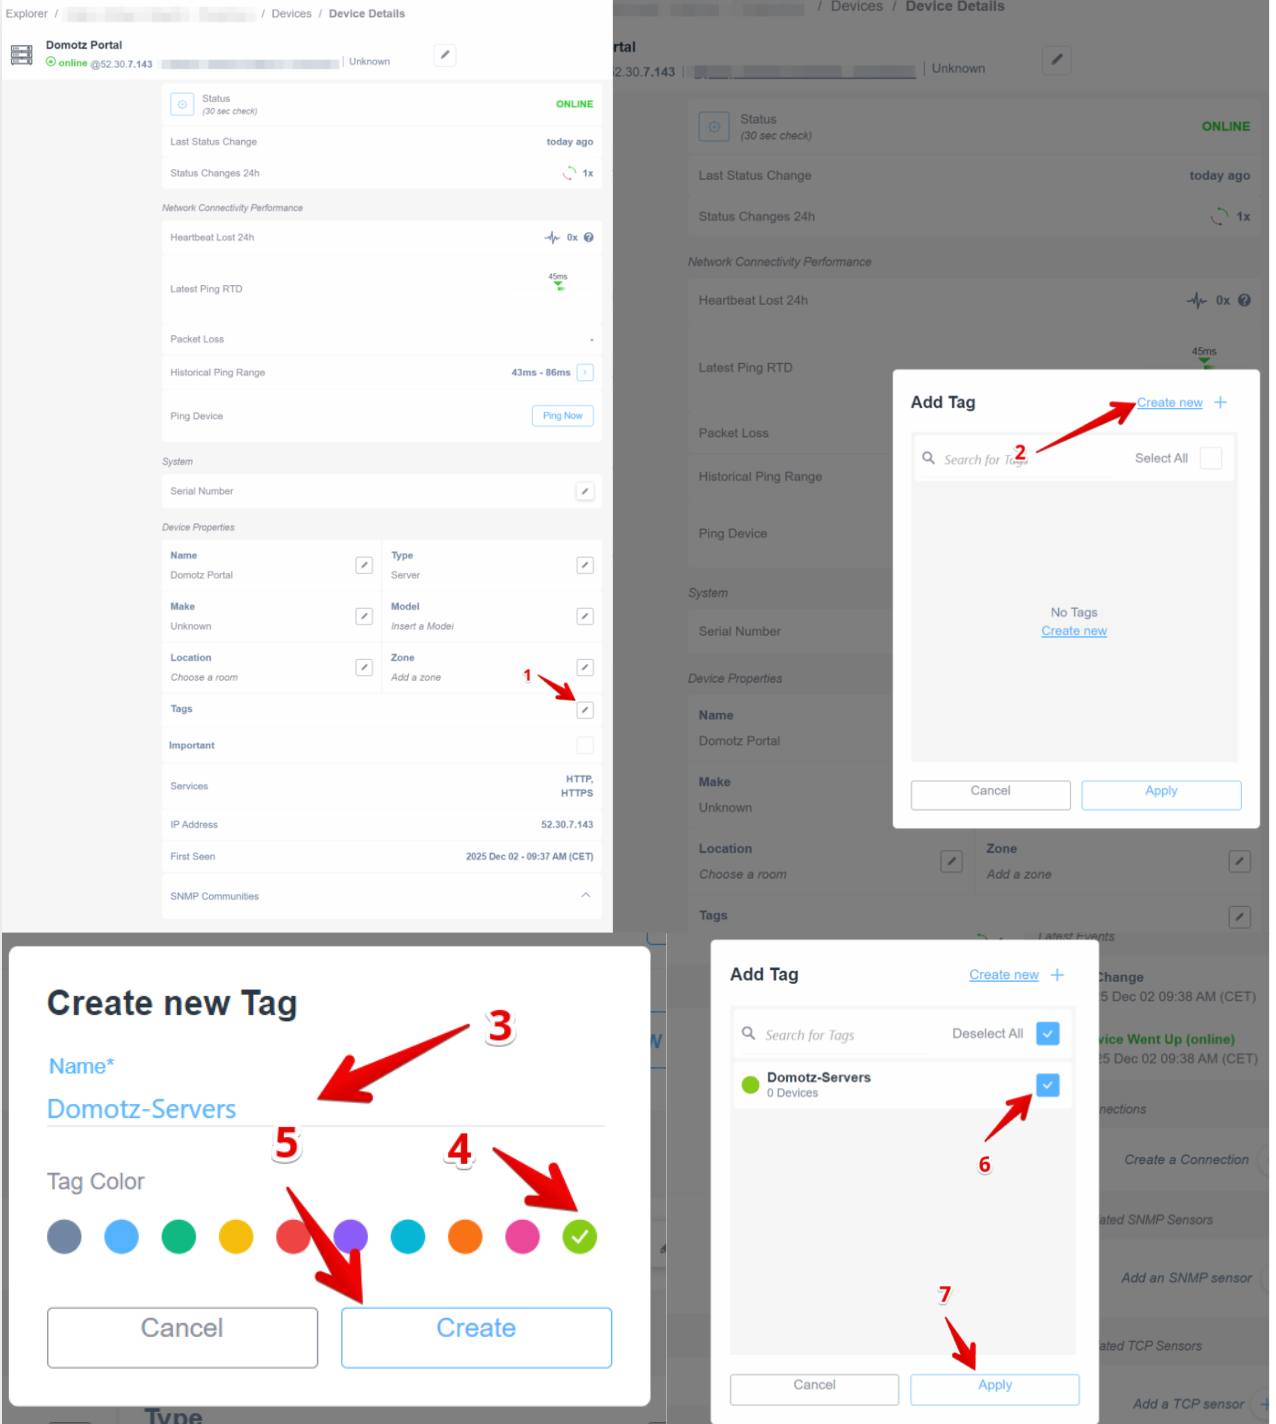
Adding and Creating a New Tag in Device Details
1. Navigate to the "Device Details" page and locate the "Tags" section. Click on the option to add a tag.
2. In the "Add Tag" dialog, click "Create new" to open the tag creation window.
3. Enter the desired tag name in the "Name" field.
4. Choose a tag color from the available options to visually distinguish the tag.
5. Click the "Create" button to finalize the new tag.
6. Once the tag is created, it appears in the "Add Tag" dialog. Select the new tag by checking the box next to it.
7. Press "Apply" to associate the tag with the device.
Tags can also be created from the Inventory page. To do so, click on Add under the Tags column, and you can view all Tags and create new ones as well.
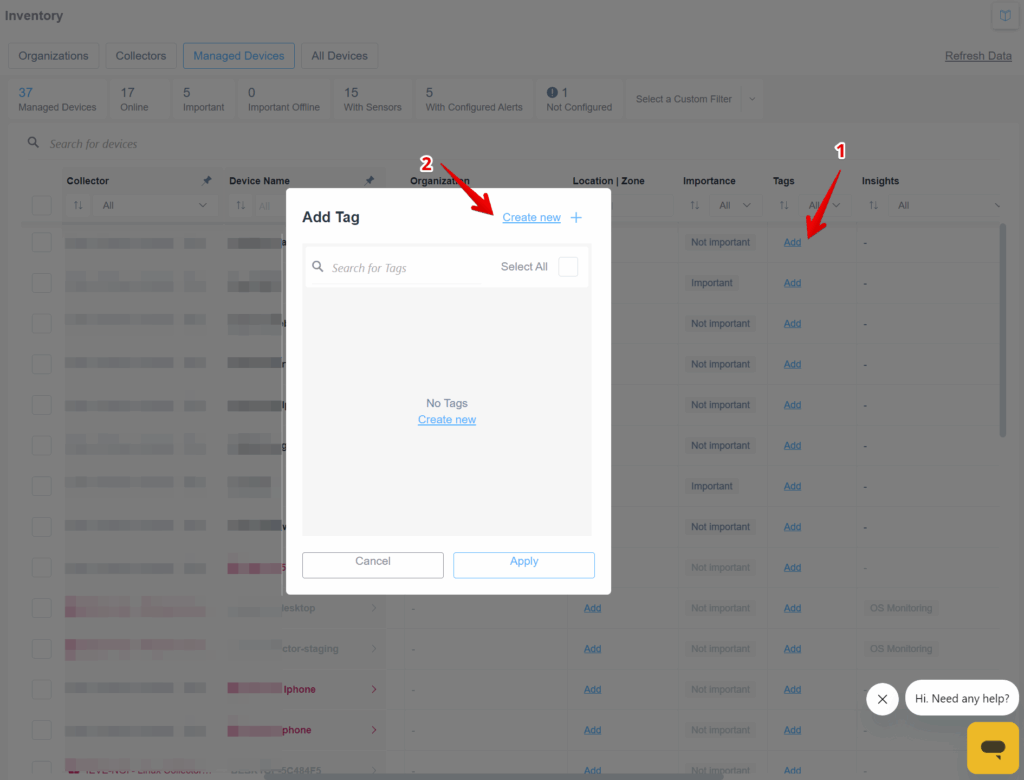
Adding a Tag to a Managed Device in Inventory
1. In the Managed Devices tab of the Inventory section, locate the "Tags" column. Click "Add" next to the device you want to tag.
2. In the "Add Tag" dialog box, you can search for existing tags using the search field. To create a new tag, click "Create new."
3. After selecting or creating a tag, click "Apply" to add the tag to the device.
4. Use the "Cancel" button if you wish to exit the dialog without making changes.
Another efficient way to create tags is through Device Profiles. Under the Profile Details section, you have access to the Tags field. From here, you can create new tags and select existing tags to include in the profile.

Adjusting tags in a device profile.
1. In the "Profiles" section, use the "Profile Name" dropdown to select the desired profile.
2. On the right-side panel under "Profile details," click the edit icon next to "Tags."
3. In the "Add Tag" dialog, click "Create new" if you want to add a new tag.
4. Select the checkboxes for existing tags like "To-Be-Replaced" or "Domotz-Servers."
5. Once the tags are selected, click "Save" to apply changes.
How To Bulk Apply Tags
Tags can be applied in bulk from the Inventory, and Device Profiles sections.
To apply tags in bulk from the Inventory section:
- Select multiple devices.
- A Bulk Edit Device Details panel will appear on the right side of the screen.
- Click Apply.
The selected tag will be added to all devices you selected.

Adding Tags to Managed Devices
1. Navigate to the "Managed Devices" tab in the inventory interface.
2. Select specific devices by checking their corresponding boxes in the device list.
3. In the "Edit Device Details" pane on the right, locate the "Tags" section and click the edit icon.
4. In the "Add Tag" dialog, search for or select tags to apply, such as "Domotz-Servers."
5. Confirm the selection by clicking the "Apply" button.

Managing Devices in the Inventory Dashboard
1. Navigate to the “Managed Devices” tab in the Inventory section to view a list of devices.
2. Use the filter options at the top to refine the device list based on parameters like device name and status.
3. Observe the list columns, including “Collector,” “Device Name,” “Organization,” “Location/Zone,” and “Importance.”
4. The “Tags” column provides specific tags related to each device to categorize or identify them for easy reference.
5. Highlight or interact with specific rows for more detailed device management options.
Tags may be defined within Device Profiles and will be automatically applied in bulk to all devices to which the profile is assigned:
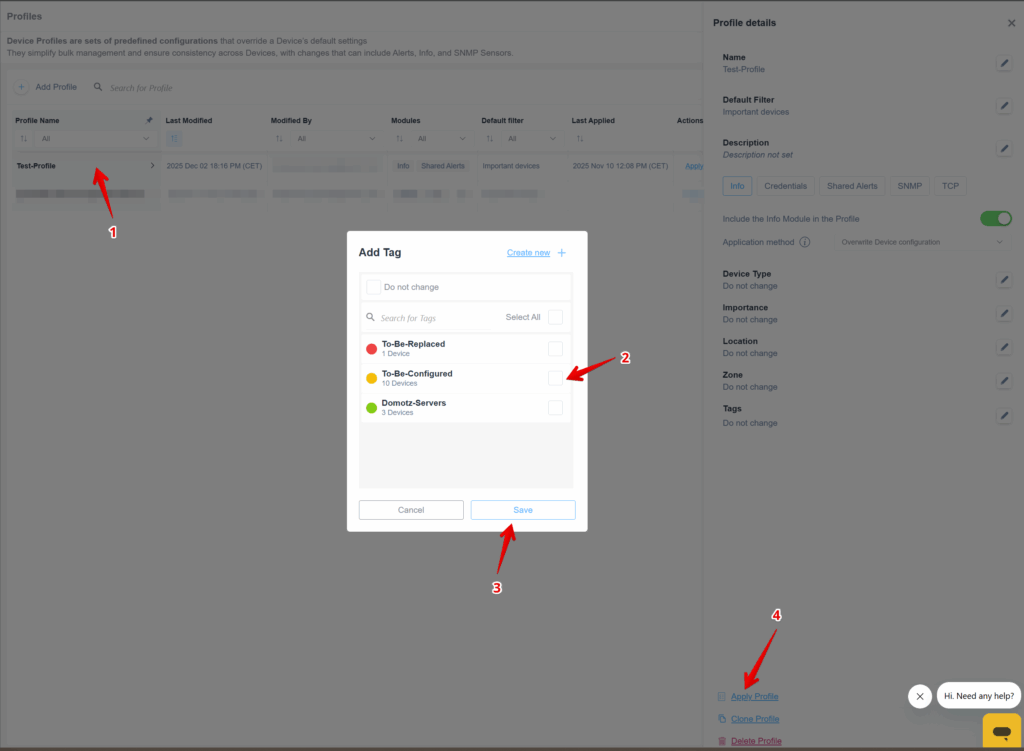
Configuring and Applying a Device Profile
1. In the Profiles section, locate "Profile Name" and click the dropdown to select or filter profiles.
2. In the "Add Tag" dialog, choose tags like "To-Be-Replaced," "To-Be-Configured," or "Domotz-Servers" by checking the appropriate box.
3. Click "Save" to apply the selected tags.
4. To finalize, click "Apply Profile" on the right-hand side under Profile details to implement changes.
Filter Based on Tags
Once devices or collectors have been assigned custom tags, you can filter them in the Inventory section using the Tags column.
To filter by tags:
- Go to the Inventory section.
- Click on the dropdown in the Tags column.
- Select one or more tags from the list.
A filter will then be applied, and only devices or collectors with the selected tags will be displayed.

Managing Device Filters in Inventory
1. Navigate to the "Managed Devices" tab at the top of the Inventory interface to view a list of managed devices.
2. Locate the "Tags" dropdown menu in the header row. Click it to open filter options.
3. In the filter menu, choose "Configuration" to select between "All" or "No Tags". For "Content", check options such as "To-Be-Configured", "To-Be-Replaced", or "Domotz-Servers" to refine the device list based on these categories.
Just like any other column in the Inventory section, tags can also be used to create custom inventory filters.

Managing and Filtering Devices in Inventory
1. Navigate to the "Managed Devices" tab within the "Inventory" section to view device details.
2. Observe metrics at the top: total managed devices, online status, importance, in sync with sensors, and configuration alerts.
3. Use the "Filtered by" options to narrow down results by status, importance, and tags.
4. Click "Save Custom Filter" to store these filter settings for future use.
5. Search for specific devices using the "Search for devices" search bar.
6. Review device information such as collector, device name, model, IP address, serial number, organization, location, importance, tags, insights, and service.
How To Delete Tags
Tags can be deleted from any section where they can be applied to a device.
For example, to delete a tag from the Inventory section:
- Select any device or collector.
- Click the Delete icon.
Once deleted the tag will be removed from the system and automatically removed from all devices and collectors it was previously assigned to.

Managing Device Tags in the Inventory System
1. Navigate to the "Managed Devices" tab at the top of the Inventory page.
2. Select a device from the list by clicking the checkbox next to its name.
3. Go to the "Tags" section in the right-hand panel and click the edit icon next to the existing tags.
4. In the "Add Tag" window, choose the desired tag by checking the box next to it. To modify a tag, click the "Edit" button next to the tag name.
5. In the "Edit Tag" window, change the tag name or select a new color. Click "Save" to apply changes, or "Cancel" to discard them.
For any queries regarding custom tags please contact our support team at support@domotz.com.