
Domotz is purpose-built to collect extensive data on your IT assets efficiently. By effectively managing and aggregating this data, Domotz provides valuable insights such as device status (online/offline), device uptime, network interfaces status, port mapping, and device-specific information. All of these features are already included in the Domotz default plan.
Moreover, Domotz can be configured to enhance its default monitoring capabilities. This can be achieved by using SNMP templates, Custom SNMP OIDs, TCP Sensors, and Integration Drivers.
Some Examples
Switch Monitoring
For network switches, you can activate the Network Interfaces SNMP Template to get detailed traffic statistics for each port:
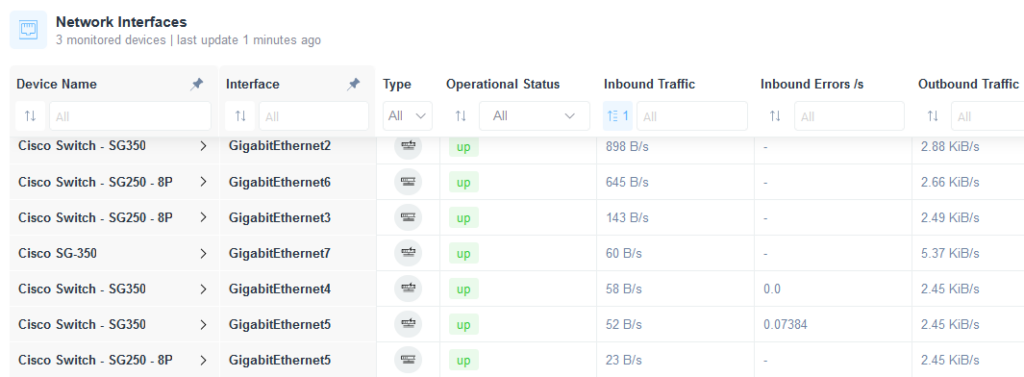
Network Interfaces Overview
1. View the list of network interfaces with details for monitored devices.
2. Columns include Device Name, Interface, Type, Operational Status, Inbound Traffic, Inbound Errors per second, and Outbound Traffic.
3. Device Name column shows names like "Cisco Switch - SG350" and "Cisco Switch - SG250 - 8P."
4. Interface column lists specific interfaces such as "GigabitEthernet2."
5. Type column indicates the type of connection, shown as icons.
6. Operational Status displays whether the interface is "up" or otherwise.
7. Inbound Traffic and Outbound Traffic columns show data rates in bits per second (B/s) or kibibits per second (KiB/s).
8. Inbound Errors per second column provides error rates, if any.
You can also view a graph of each metric to see how it has changed over time:
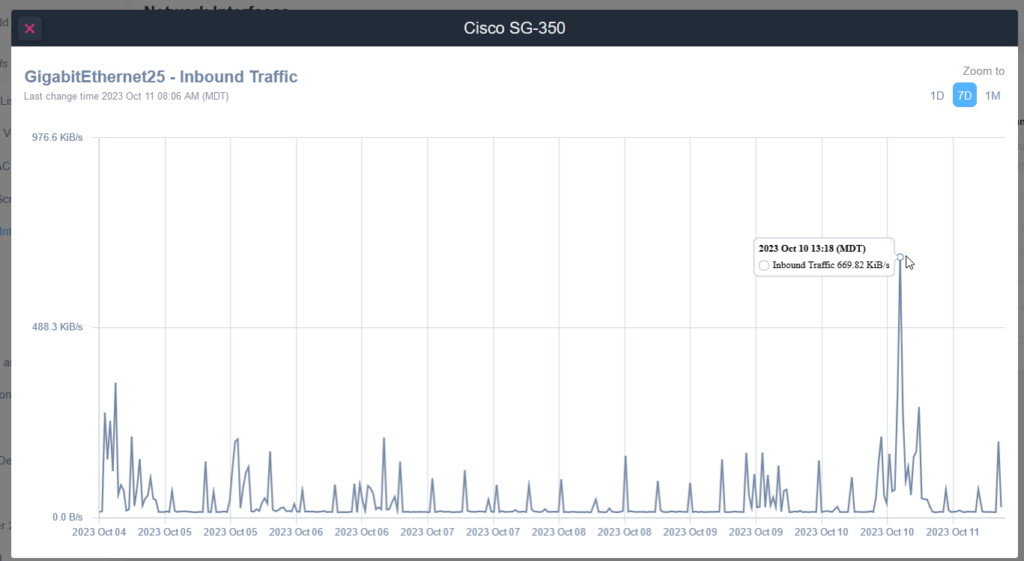
Graph of Inbound Traffic on GigabitEthernet25
1. The graph displays inbound traffic over a period from October 4 to October 11, 2023.
2. The vertical axis shows the traffic rate in KiB/s ranging from 0.0 to 976.6.
3. A peak is annotated on October 10, with inbound traffic reaching 669.82 KiB/s at 13:18 MDT.
4. The last recorded change on this data was at 08:06 AM MDT on October 11.
5. The graph offers a zoom option with three selections: 1 day, 7 days (highlighted), and 1 month for viewing different time frames.
Server Monitoring
For servers, Domotz monitors hardware controllers (such as Dell iDRAC, HP ILO, Supermicro, and XClarity) or operating systems (such as Windows, Linux, and VMware) to keep track of servers health and performance.
In the following example, Domotz is monitoring the Physical Disks status to prevent any service disruptions on an HP ILO server:
Domotz monitors the disk status (along with many other disk properties) on an HP ILO server in order to prevent any service disruptions:
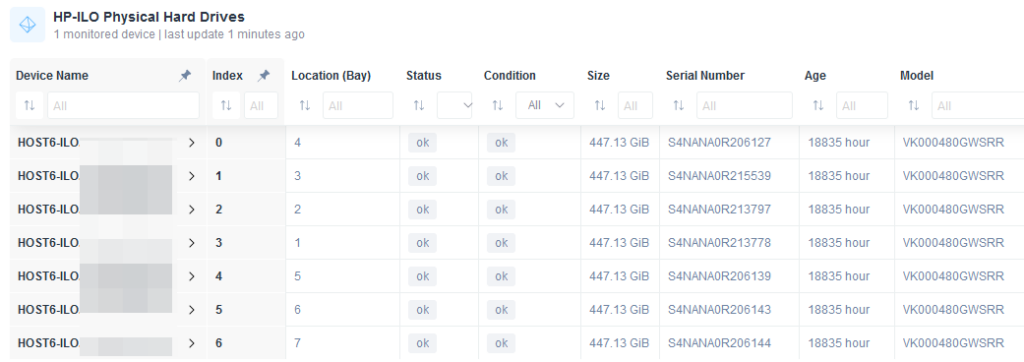
HP-iLO Physical Hard Drives Overview
1. The table lists information about monitored physical hard drives in an HP-iLO system.
2. Columns include:
- Device Name: Identifies the device hosting the drive.
- Index: Numerical identifier of the drive.
- Location (Bay): Indicates the bay number where the drive is situated.
- Status: Displays the current status, such as "ok."
- Condition: Provides a general condition overview.
- Size: Specifies the storage capacity, here shown as "447.13 GiB."
- Serial Number: Unique identifier for each drive.
- Age: Duration in hours, indicating how long the drive has been operational, shown as "18835 hour."
- Model: Model number of the drive, for example, "VK000480GWSRR."
3. Use the dropdowns in the column headers to filter or sort the information based on specific criteria.
Following, Domotz monitors the logical drives on Linux servers (specifically the disk space available on each partition), to prevent the disks from being filled up:
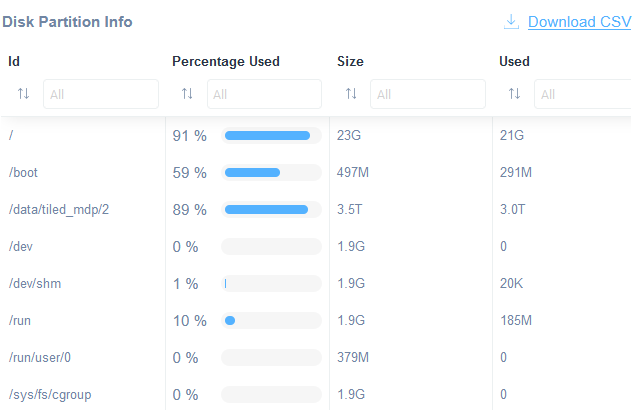
Disk Partition Information Overview
1. The table displays disk partition information with columns for ID, Percentage Used, Size, and Used space.
2. Under the "Id" column, partitions are listed as "/", "/boot", "/data/tiled_mdp/2", "/dev", "/dev/shm", "/run", "/run/user/0", and "/sys/fs/cgroup".
3. The "Percentage Used" column shows the percentage of each partition utilized, with notable usage for "/" at 91%, "/boot" at 59%, and "/data/tiled_mdp/2" at 89%.
4. The "Size" column indicates the total size of each partition.
5. The "Used" column details the actual used space in each partition in relevant units (G for gigabytes, M for megabytes, etc.).
6. Filtering and sorting options are available for each column via small input fields and arrows at the top.
7. A "Download CSV" link is provided for exporting the table data.
In this final example, Domotz lists all the VMs configured on a Proxmox host, along with their status:
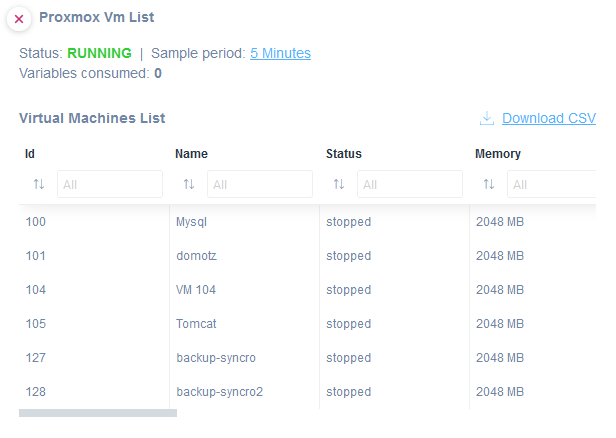
Proxmox VM List Interface
1. Status is "RUNNING" with a sample period of 5 minutes. Variables consumed are 0.
2. The table below shows the list of virtual machines with columns for ID, Name, Status, and Memory.
3. There are sortable columns with filtering options for each field.
4. Virtual machines listed have IDs from 100 to 128. All show a status of "stopped" and memory allocated as 2048 MB.
5. A "Download CSV" link is available to export the data.
Service/Software Monitoring
We also allow you to monitor services such as Apache2, MySQL, Docker, etc.
Here is an example of how Domotz can be used to monitor the expiration of SSL certificates on a list of websites and hosts:
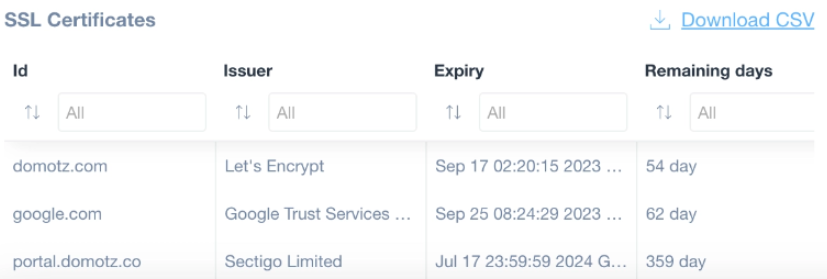
SSL Certificates Management Table
1. The table displays a list of SSL certificates with the following columns: Id, Issuer, Expiry, and Remaining days.
2. Under the "Id" column, domain names such as domotz.com, google.com, and portal.domotz.co are listed.
3. The "Issuer" column shows certificate authorities like Let’s Encrypt, Google Trust Services, and Sectigo Limited.
4. The "Expiry" column indicates the expiration date and time of each certificate.
5. The "Remaining days" column provides the number of days left until each certificate expires.
6. A "Download CSV" link is available at the top right to download the table data.
For more information about monitoring using Domotz Integration Drivers see here
We are also able to continuously check if a port on a specific ip address is open or not, and therefore we are able to monitor the availability of a specific service on a specific host:
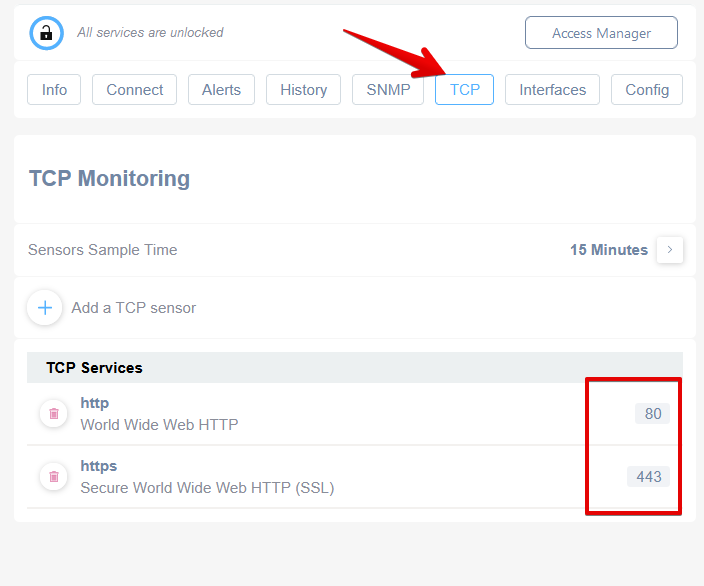
TCP Monitoring Configuration in a Network Management Interface
1. Navigate to the "TCP" tab in the main menu for network monitoring options.
2. Under "TCP Monitoring," view or adjust the "Sensors Sample Time," which is currently set to 15 minutes.
3. To add a new sensor, select the option "Add a TCP sensor."
4. Review the listed TCP Services. "http" represents "World Wide Web HTTP" with port number 80, and "https" represents "Secure World Wide Web HTTP (SSL)" with port number 443.
For more information about TCP Services Monitoring per port, see here
How to Deal with Metrics Consumption
The total metric consumption in use can be found under your Domotz Collector ‘Devices List’ in the ‘Site Metrics Manager’ section:
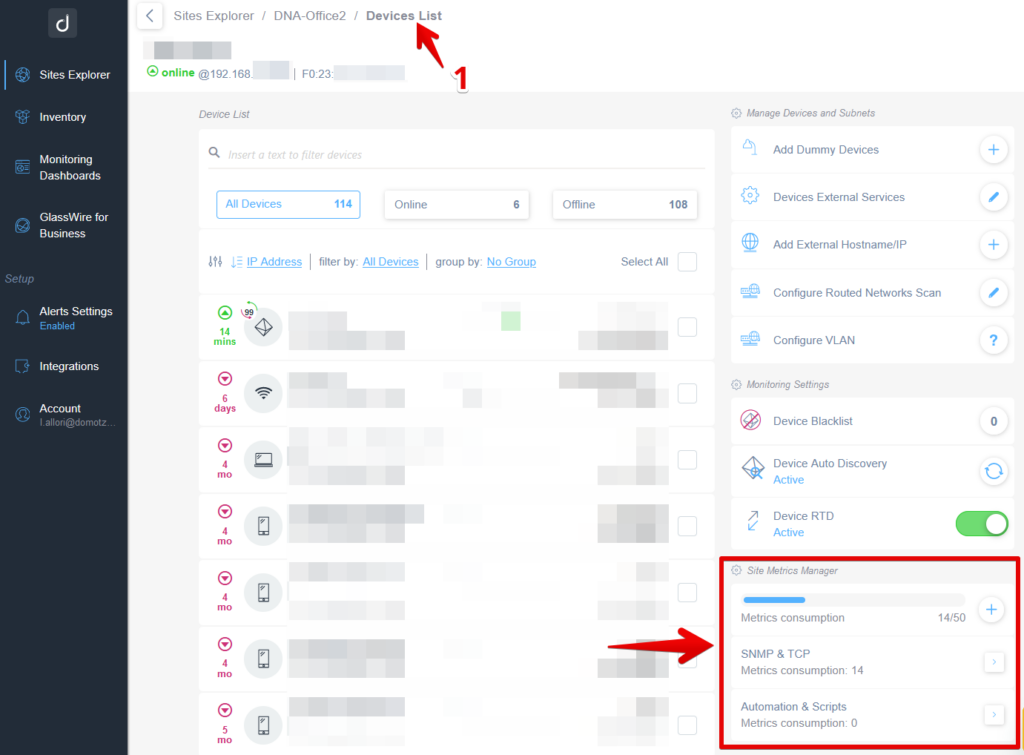
Device Monitoring Dashboard Overview
1. Navigate to "Sites Explorer" and click on "Devices List" to view the list of devices connected to your network.
2. The top right panel displays options to manage devices and subnets, including:
- Add Dummy Devices
- Devices External Services
- Add External Hostname/IP
- Configure Routed Networks Scan
- Configure VLAN
3. The monitoring settings section includes:
- Device Blacklist
- Device Auto Discovery (active)
- Device RTD (active)
4. In the "Site Metrics Manager" section:
- Check "Metrics consumption" for an overview of used metrics out of the total available.
- Review the "SNMP & TCP" and "Automation & Scripts" metrics consumption for detailed insights.
To see “where” (basically on which devices/services) your metrics are used, you might click on the SNMP & TCP arrow or on the Automation & Drivers arrow:
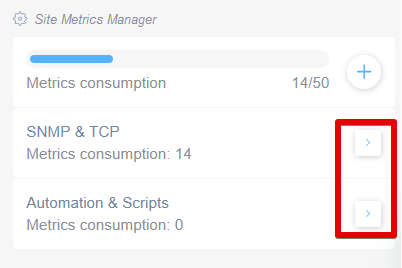
Site Metrics Manager Overview and Navigation Options
1. The top section displays a progress bar for "Metrics consumption" with a current usage of 14 out of 50. There is a plus icon to the right, which may be used to add or manage metrics.
2. Below, two categories are listed: "SNMP & TCP" with 14 metrics consumed, and "Automation & Scripts" with 0 metrics consumed.
3. Each category has a right arrow button, which can be clicked to view more details or manage settings for the respective category.
Metrics Consumption Preview
Before applying an SNMP template or an Integration Driver, you can review the number of metrics you will utilize. This information allows you to assess the potential impact on your metric consumption and make informed decisions:
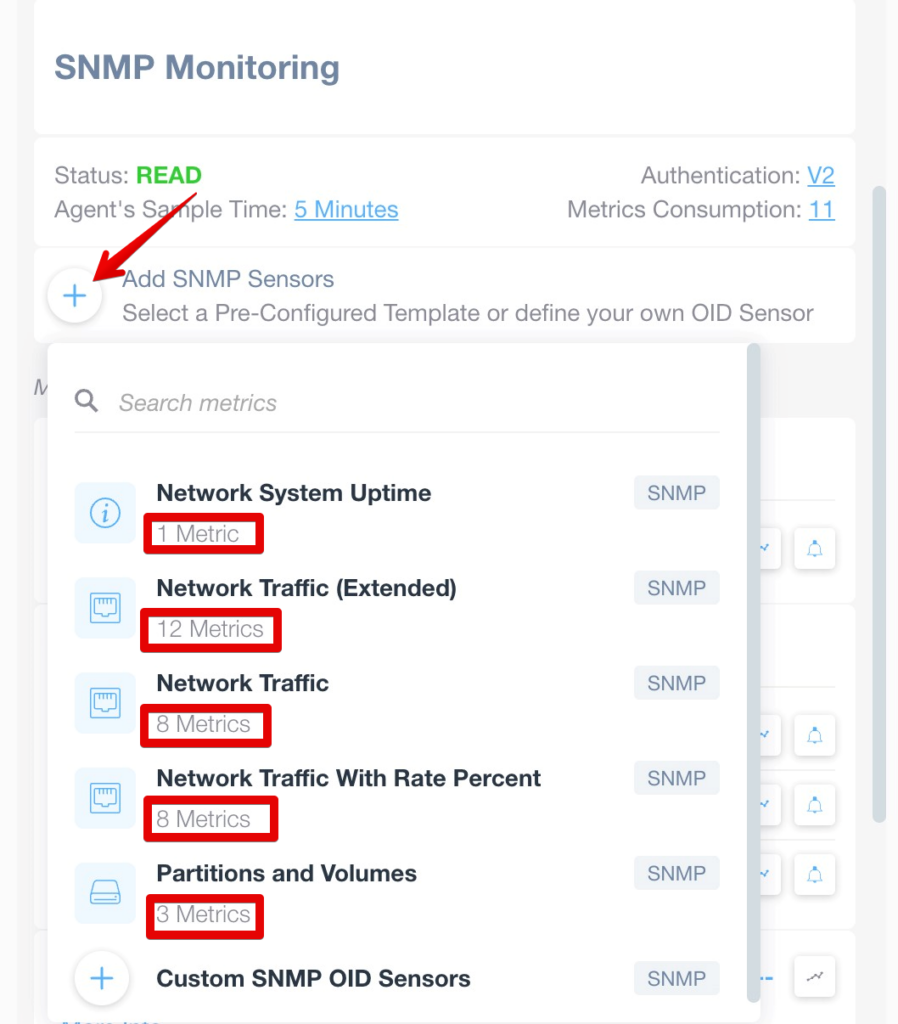
Adding SNMP Sensors and Metrics Selection
1. In the SNMP Monitoring section, check the Status, Agent's Sample Time, Authentication, and Metrics Consumption details.
2. Click on "Add SNMP Sensors" to open metric options.
3. A dropdown displays available metrics:
- "Network System Uptime" with 1 metric.
- "Network Traffic (Extended)" with 12 metrics.
- "Network Traffic" with 8 metrics.
- "Network Traffic With Rate Percent" with 8 metrics.
- "Partitions and Volumes" with 3 metrics.
4. Select the desired metric set to configure and monitor specific SNMP data.
Regarding integration drivers in Domotz, the number of metrics that will be used is typically listed before applying the driver to a device. This helps you understand the impact of the driver on metric consumption.
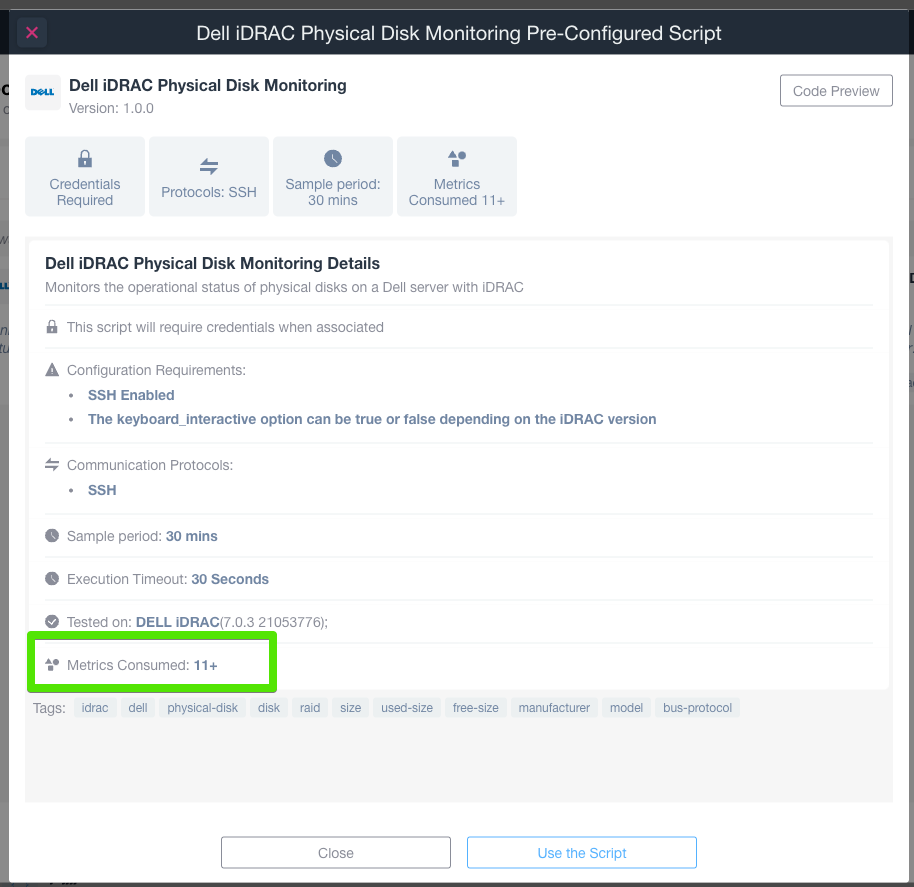
Dell iDRAC Physical Disk Monitoring Script Configuration
1. Overview: The script monitors the operational status of physical disks on a Dell server using iDRAC. Version 1.0.0 is displayed at the top.
2. Credentials: The script will require credentials when associated.
3. Configuration Requirements: SSH must be enabled. The `keyboard_interactive` option can vary according to the iDRAC version.
4. Communication Protocols: Ensure SSH is selected.
5. Sample Period: The sampling period is set to 30 minutes.
6. Execution Timeout: The timeout for execution is set to 30 seconds.
7. Testing: The script was tested on a specific version of DELL iDRAC.
8. Metrics Consumed: The script consumes 11 or more metrics.
9. Options: Use the "Use the Script" button to proceed or "Close" to exit.
Also metric consumption is available when creating monitoring tables or applying SNMP templates:
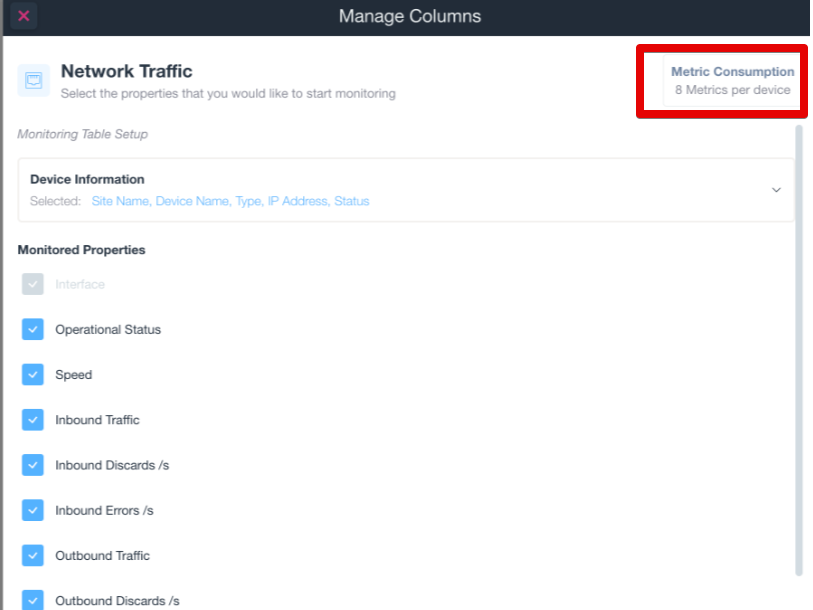
Manage Network Traffic Columns Setup
1. Go to the "Manage Columns" section.
2. Look under "Network Traffic" where you can select properties for monitoring.
3. "Device Information" includes options like Site Name, Device Name, Type, IP Address, and Status.
4. Check the boxes next to "Monitored Properties" you wish to include, such as Operational Status, Speed, Inbound Traffic, and other listed metrics.
5. The "Metric Consumption" box indicates that you can use up to 8 metrics per device.
In this case, by unchecking unwanted properties, the number of metrics used will be reduced:
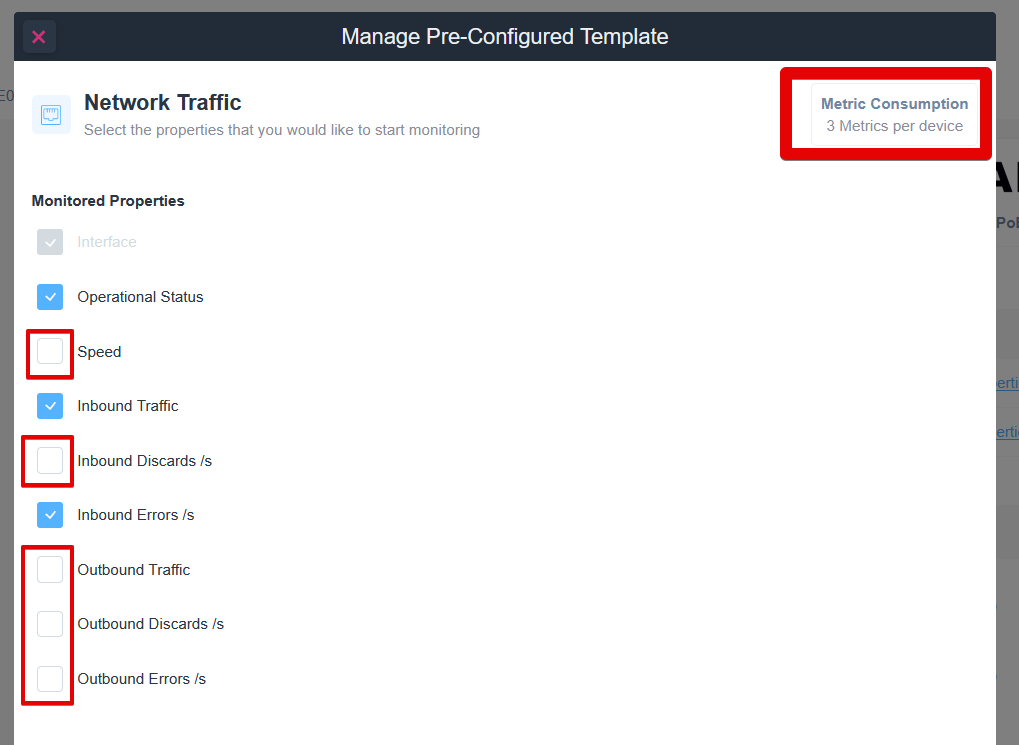
Managing Network Traffic Monitoring Template
1. To monitor network traffic properties, you have options under "Monitored Properties."
2. Check the boxes next to "Speed" and "Inbound Discards /s" to include them in monitoring.
3. Ensure "Operational Status," "Inbound Traffic," and "Inbound Errors /s" are already selected.
4. The "Metric Consumption" section indicates that 3 metrics are being used per device.