The Domotz OS Monitoring Feature
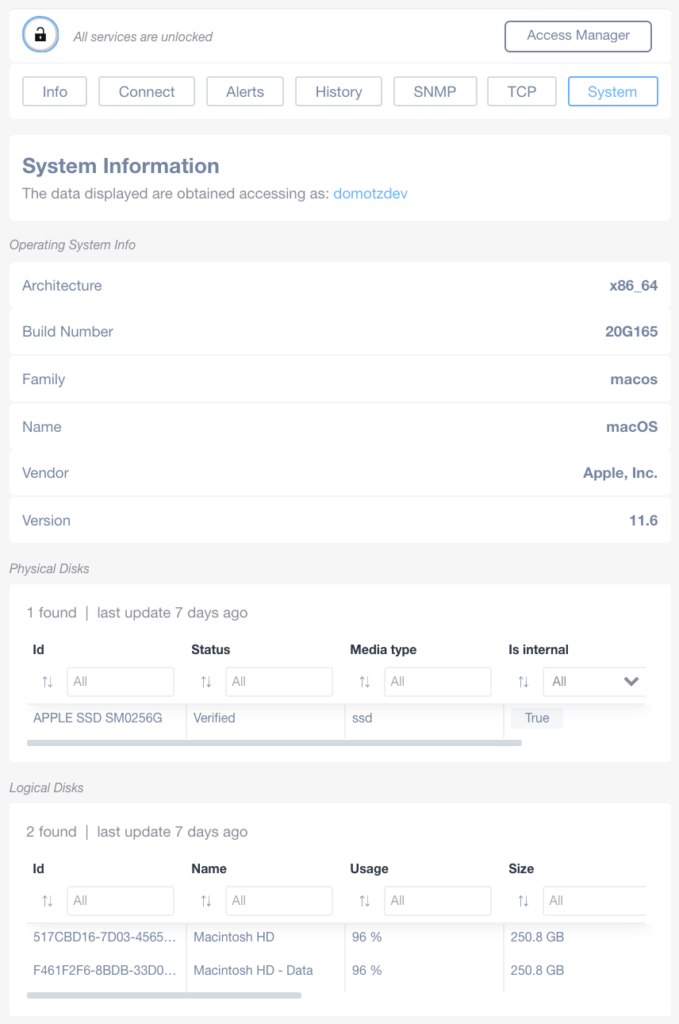
The Domotz Operating System (OS) Monitoring Feature extracts additional information about your devices, including OS name, version, vendor, architecture, serial number, and build number. Compatible devices will be marked as locked in the device list view. Domotz will mark computers, servers, and notebooks having the SSH (22) or WINRM (5986) ports open as locked, so you can unlock the OS Monitoring feature.
For security reasons, SSH has priority over WINRM if a Windows machine has both services enabled:
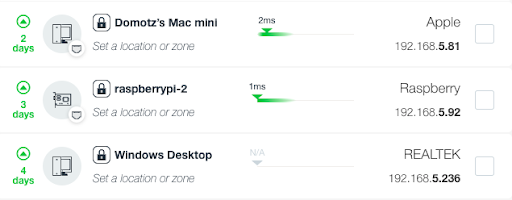
Whenever possible, we recommend using the SSH configuration.
The OS Monitoring feature has been tested on the following systems:
- Windows 10 (or newer)
- macOS Catalina (or newer)
- Debian/Ubuntu Linux
- Centos 8
- VMWare/ESXi
- Dell iDRAC
- HP iLO (HP iLO 4 is not supported)
- Raspberry Pi OS
Unlock the Domotz OS Monitoring feature
You can unlock this feature through your Credentials Manager by inserting a user’s credentials (no administrator privileges are required).
- SSH unlocked example:

- WINRM locked example:

After unlocking the device the OS information will be available from the device info view:
VMWare ESXi
Virtual Machine Data
On a VMWare ESXi server, Domotz will also retrieve information related to Virtual Machines (VM):

The following information for each VM will be presented:
- Name of the VM
- Power Status
- Guest Full Name and OS
- Memory Size
- Virtual CPUs (number)
- Ethernet Cards attached to the VM (number)
- Virtual Disks attached to the VM (number)
- Path Name for the VM disk
- UUID
- Boot-Time
Unlock VMware ESXi
To unlock a VMware ESXi host you need to:
- Enable sshd
- Edit /etc/ssh/sshd_config, search for a line called PasswordAuthentication, uncomment is and set it to yes. For example:
PasswordAuthentication yes
If you made this modification, please save and exit the file, and then restart the sshd service on your ESXI host. - Use the root user to unlock the device
Microsoft Windows – WINRM
Enable an WinRM using Domotz PowerShell script
Creating users
Create a local domotz user or a domain user and place it in a local group or in an domain group.
Please download the latest version of the “WIRNM Enable ps script” from here:
https://github.com/domotz/support_scripts/raw/main/os_monitoring/enable_winrm_os_monitoring.zip
Run the script for Local users
Please open the Powershell terminal with administrative privileges and issue the following command:
Set-ExecutionPolicy Bypass -Scope Processand then enter
Y
After the above command, please run the script using the below parameters:
.\enable_winrm_os_monitoring.ps1 -Username $username -GroupName $usergroup -LogFilePath c:\Windows\tempwhere $username is the local user you would like to use to unlock the windows computer and $usergroup is the group the user belongs to.
In general we do suggest our users to run the script like this:
.\enable_winrm_os_monitoring.ps1 -Username domotz -GroupName domotzGroup -LogFilePath c:\Windows\temp
Basically, what the script does is:
– check if the local domotzuser username exists, if not it creates it
– check if the local DomotzWinRM group, if not creates it and gives the right permissions to this group
– a log file will be generated in c:\Windows\temp
Please note that if the user does not exists, after the user creation a password will be autogenerated and displayed in the output of the script on your screen (this will be not shown in the log file). In such cases we recommend changing the user password by following the below instructions:
A: Open the Powershell terminal with administrative privileges and run the below command to open the Windows settings for users and groups:
lusrmgr.mscB: Click on the Users tab on the left side, right click on domotz user and change its password:
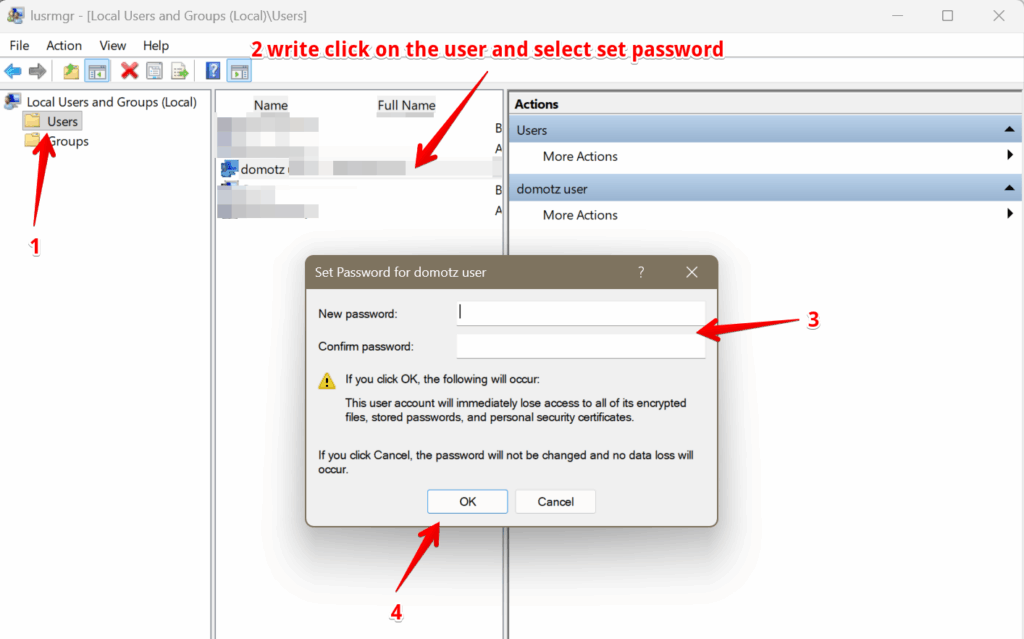
Once the script has been executed successfully, Domotz may take some time before showing the Unlock OS Monitoring option under the Access Manager section of the target device.
Important: while unlocking the device please enter the username in the format of hostname\username otherwise the unlock procedure will fail with authentication error.
Run the script for Domain users
At first, please make sure that the user and the group you would like to use exist already in the AD (this is very important).
Run the script with administrative privileges on a standard Powershell console (NOT ISE) with the following parameters:
.\enable_winrm_os_monitoring.ps1 -Username $DOMAINNAME\$USERNAME -GroupName $DOMAINNAME\$USERGROUPNAME -LogFilePath c:\Windows\tempFor example, if you created the user domotz and the group domotzGroup in the AD the command would be this one where $DOMAINNAME the name of you windows Domain in the old NT format:
.\enable_winrm_os_monitoring.ps1 -Username $DOMAINNAME\domotz-GroupName $DOMAINNAME\domotzGroup -LogFilePath c:\Windows\tempPlease note that the domain name should be used in the old format when specifying username and Groupname.
RIGHT: -Username DOMOTZLAB\domotz -GroupName DOMOTZLAB\domotzGroup
WRONG: -Username domotzlab.com\domotzGroup -GroupName domotzlab.com\domotzGroup
Basically, what the script does is:
– check if the group exists in AD and the user is a member of the group, if not it terminates (no attempt to create objects in AD are made by the script).
– gives the right permissions to the group
– a log file will be generated in c:\Windows\temp
Microsoft Windows – SSH
Enable an SSH Server using Domotz PowerShell script
Please download the script from here: https://github.com/domotz/support_scripts/raw/main/os_monitoring/enable_ssh_os_monitoring.zip
and run it with administrative privileges.
Enable SSH Server (Manual Install)
Open a PowerShell prompt, using the Run as Administrator option and apply the following commands:
- Check the availability of the server:
Get-WindowsCapability -Online | ? Name -like 'OpenSSH*'
- Install the server:
Add-WindowsCapability -Online -Name OpenSSH.Server~~~~0.0.1.0
- Start the sshd service:
Start-Service sshd
- Optional but recommended, configure the service to start automatically:
Set-Service -Name sshd -StartupType 'Automatic'
- Confirm the firewall rule is configured. It should be created automatically by setting up:
Get-NetFirewallRule -Name *ssh*
- There should be a firewall rule named “OpenSSH-Server-In-TCP”, which should be enabled. In case the firewall does not exist, please create one:
New-NetFirewallRule -Name sshd -DisplayName 'OpenSSH Server (sshd)' -Enabled True -Direction Inbound -Protocol TCP -Action Allow -LocalPort 22
MacOs
You need a normal user that can log in to a shell.
If you have verified that you are logging in as a user with shell access, then open the terminal and enter the following command:
sudo systemsetup -setremotelogin on
You will be required to input your user password when you run the command. Provide the password and press enter.
To check if SSH is enabled, run the following command:
sudo systemsetup -getremotelogin
If SSH is on, you will get a message that reads “Remote Login: On”.
How to allow non-admin users to access a device with WinRM or SSH (on Windows)
SSH (Windows)
When using SSH, the following steps need to be executed to allow a non-admin user to extract the OS information:
- Select Start > Run.
- On the Run dialog, type wmimgmt.msc in the Open field.
- Click OK to display the Windows Management Infrastructure (WMI) Control Panel.
- Select the Security tab in the WMI Control (Local) Properties dialog box.
- In the namespace tree within the Security tab, expand the Root folder. This action lists the available WMI namespaces.
- Select the CIMV2 namespace to highlight it.
- Click Security to display the Security for ROOT\CIMV2 dialog box.
- Click Add in the Security for ROOT\CIMV2 dialog box to display the Select Users or Groups dialog box.
- Add the domain user account that will be used as your proxy data collection user account. This should be a domain account (not a local computer account), but it does not need to be an account with administrative access.
- Click OK to close the Select Users or Groups dialog box and return to the Security for ROOT\CIMV2 dialog box. The user account you selected should now be listed in the Name list at the top of the dialog box.
- Select the newly added user (if it is not already selected) and enable the following permissions:
- Enable Account
- Remote Enable
Enable the permissions by clicking the Allow box, if it is not already checked for that specific permission. The Enable Account permission should already be selected, but you’ll need to select the Remote Enable permission.
- Click OK to close the Security for ROOT\CIMV2 dialog box.
Note: The above steps are sufficient to allow an SSH user to extract basic information about an Operating System. However, in addition to this, Domotz is also able to extract status information about “Disks”. In particular, you can use Domotz to identify whether or not a disk has BitLocker enabled. To allow Domotz to extract this information, repeat steps 7-13 above but instead of the ‘CIMV2’ block, navigate the tree until the ‘root/CIMV2/Security/MicrosoftVolumeEncryption’ section is highlighted.
WinRM
To allow non-admin users to access a device with WinRM, add the following additional commands:
(Get-PSSessionConfiguration -Name Microsoft.PowerShell).Permission
Get the name of the group ‘Remote Management Users’ (The exact phrase may differ if your Windows version is not in English).
Net localgroup "Remote Management Users" /add username
The ‘username’ is the account you will use on Domotz.
Then you have to grant permissions to connect to WinRM and execute WMI commands to groups or users:
1 – Open a privileged command prompt or PowerShell window
2 – Assign the permissions for WinRM to the user, to open the security applet run the following:
winrm configsddl defaultAdd your user and grant it Read and Execute permissions:

3 – Assign the user WMI remote permissions from the WMI management console.
To open the console run:
winmgmt.msc- Right ‘WMI Control’ and select ‘Properties’
- Click ‘Advanced’
- Verify that inheritance is enabled
- Click ‘Add’
- Select your user and grant it ‘Remote Enable’ and ‘Execute’


First Login to enable a user
For both the SSH or WinRM methodology, if you are using a non-Admin user, we recommend logging in to the machine with the non-admin user at least once. This should be done following the Windows initialization process. We recommend this because the full profile will be created and it will be possible for Domotz to discover the Applications installed via the Windows Store.
How to allow non-admin users to access the device with SSH (on Linux)
You would only need a normal user that can log in to a shell (/bin/bash).
