
Domotz is designed to allow members of the same organization to access, in a controlled way, the same pool of Collectors.
The owner of the Domotz Pro account – the Team Leader – can create Team Members.
User Roles
Team Leader
A Team Leader is responsible for the administration of multiple networks. He can:
- Use all features of Domotz
- Manage and extend subscriptions
- Create and remove Team Members
- Remove 2FA configuration from a Team Member
Team Members
A Team Member:
- Can access all features of an all Collectors set up by the Team, exactly like his Team Leader.
- Can set up his own set of alerts.
- Onboard new sites (can create new Collectors)
- Can manage and extend subscriptions
A Team Member:
- Cannot create or remove other Team Members.
- Cannot view or change Account or Payment info.
Field Operators
They have the same capabilities as normal Team Members, but only on the Collectors assigned by the Team Leader.
A Field Operator:
- Can configure new Collectors, and by default, they will have access only to these configured Collectors.
A Field Operator:
- Cannot assist in resuming a Collector on a new host (must be a Team Member or Team Leader).
- Cannot edit any monitoring dashboard or monitoring table.
- Cannot manage Integrations.
How to manage User Roles
Configuring Team Members
Only the Team Leader account will have a Team section available in the user portal as shown in the screenshot below.
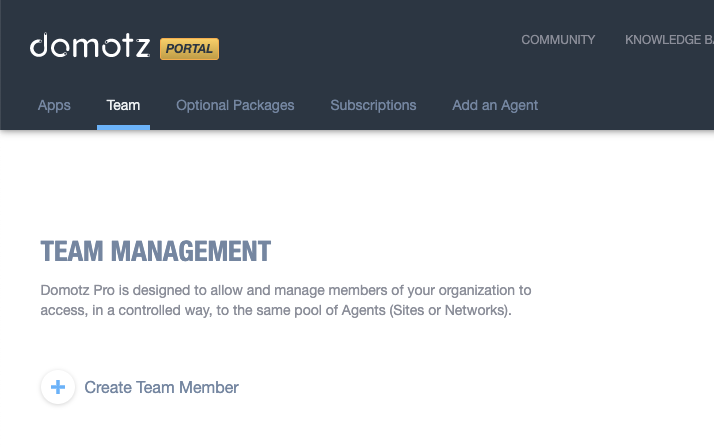
Team Management in Domotz Portal
1. Navigate to the "Team" section in the Domotz Portal menu.
2. In the Team Management area, you can manage organizational access to agents efficiently.
3. To add a new team member, click on "Create Team Member."
4. Follow the prompts to ensure the new member can access the required sites or networks.
You can add a new Team Member or Field Operator by clicking on the Add member button.
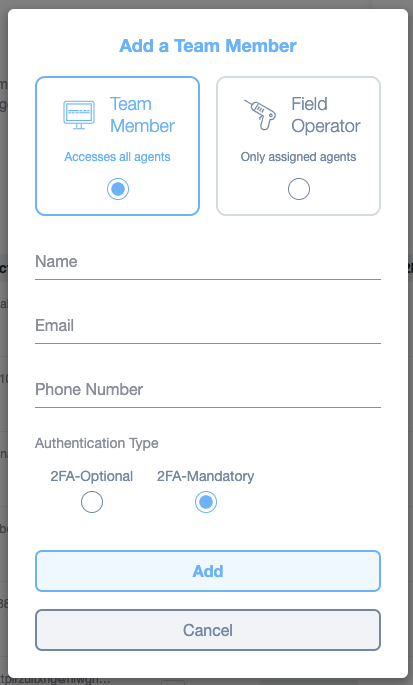
Adding a Team Member Form
1. Choose the type of team member: select "Team Member" to allow access to all agents, or "Field Operator" for access to only assigned agents.
2. Enter the team member’s details in the provided fields: Name, Email, and Phone Number.
3. Select the authentication type: choose either "2FA-Optional" or "2FA-Mandatory" for two-factor authentication preferences.
4. Click the "Add" button to save the new team member.
5. Use the "Cancel" button to discard the changes and exit the form.
The email address specified will receive an email with a link to finalize the Domotz account providing a new password.
If you don’t see the incoming email please check your SPAM folder, or delete the member and create it again.
Reset 2FA for a Team Member
Only the Team Leader account will have a Team section available in the user portal from where they can force each of the Team Members or Field Operator to configure 2FA, or to remove/reset a 2FA from them (for instance in the case a Team Member has lost their second-factor authentication device).
The Team Leader should press Manage on the Team Member or Field Operator for which he is willing to reset the 2FA:
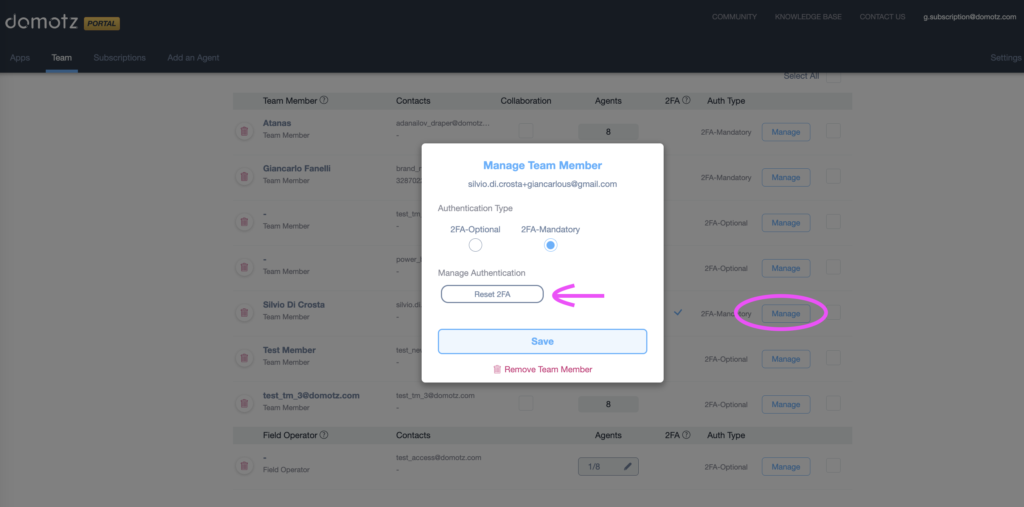
Managing Two-Factor Authentication for a Team Member
1. Navigate to the "Team" tab in the Domotz portal.
2. Locate the list of team members and find the specific member you want to manage.
3. Click the "Manage" button next to the desired team member's name.
4. In the "Manage Team Member" pop-up, view the member's email and current authentication type.
5. Choose between "2FA-Optional" or "2FA-Mandatory" under Authentication Type if you want to change it.
6. Click "Reset 2FA" to reset the two-factor authentication for the selected team member.
7. Press "Save" to apply any changes made.
8. To remove the team member, click the "Remove Team Member" option at the bottom.
How to Allow Multiple Team Leaders/Admin accounts
It is possible to temporarily give the possibility for Team Members to “impersonate” the Team Leader role so that they can perform administrative duties such as adding other Team Members.
Please note that, currently, this feature is only available by contacting our support team.
This is how Team Members can impersonate their Team Leader after being “enabled” by our support team:
Access the Webapp/Desktop App:
- Click on the Webapp or the Portal link to access it as the Team Leader.
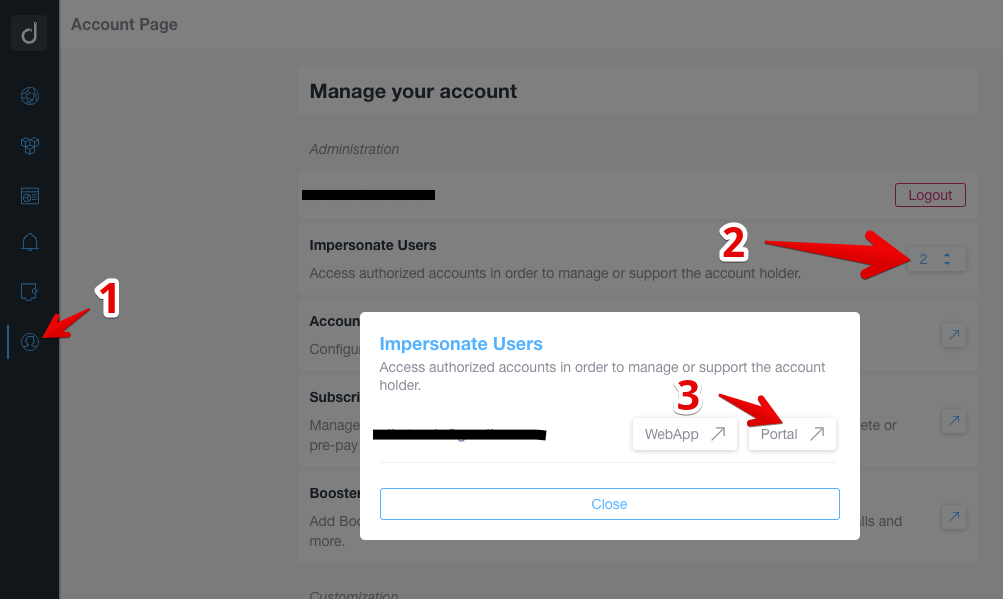
Accessing Impersonate Users Function
1. Navigate to the account page and select the user icon from the left-hand sidebar to access account management options.
2. In the "Manage your account" section, locate and select "Impersonate Users" to open a list of authorized accounts for management or support purposes.
3. In the "Impersonate Users" pop-up, choose between "WebApp" or "Portal" to access the desired interface. Select "Close" to exit the pop-up.