

Introduction to the Domotz HaloPSA integration
The Domotz and HaloPSA software integration helps MSPs with networking or device issues discovered by Domotz in HaloPSA.
By connecting your HaloPSA Account to Domotz, HaloPSA will become one of your “Contact Channels” available when creating Shared Alerts.
This means that Domotz will create and/or update and/or close a HaloPSA ticket when a specific event occurs in Domotz.
On HaloPSA: Get Url, Create Client ID and Secret
To correctly integrate Domotz to HaloPSA, you will need these three values:
- an HaloPSA Url
- an HaloPSA Client ID and Client Secret
1. HaloPSA Url
The HaloPSA Url has this format https://[yourcompanyname].halopsa.com (in this example, we are using https://domotz.halopsa.com – since we have an account with our company name):
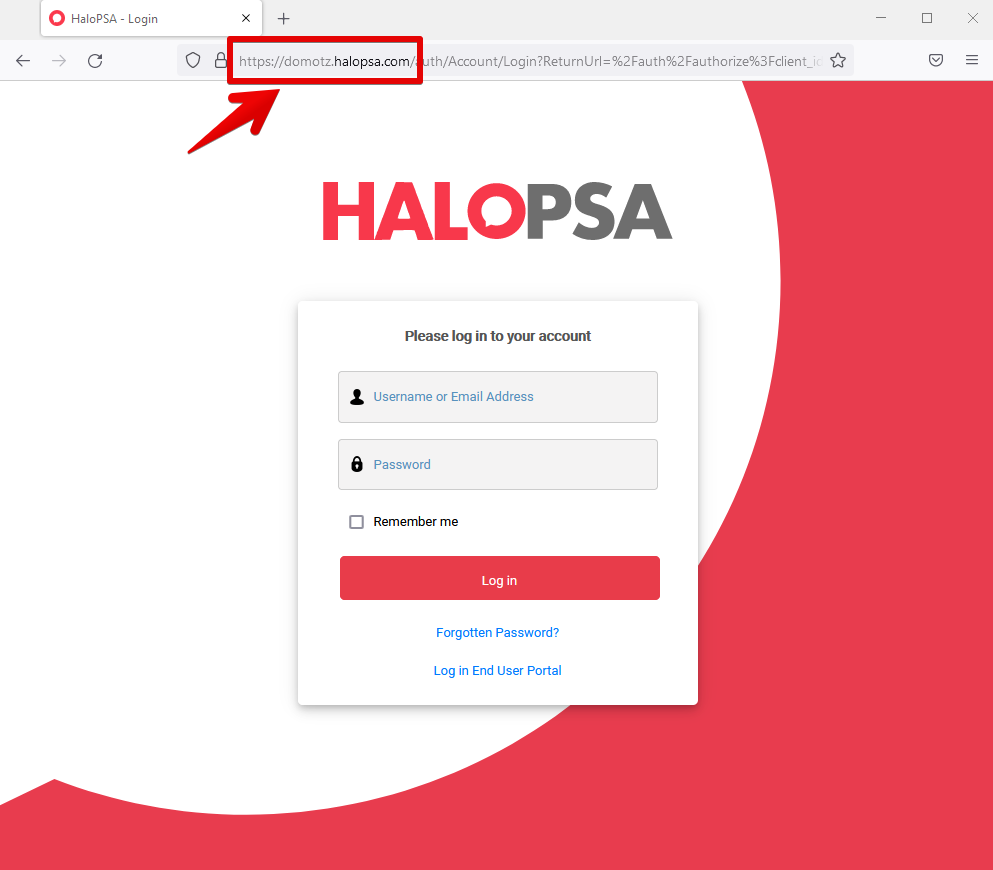
HaloPSA Login Page Instructions
1. Verify the URL in your browser's address bar is "https://domotz.halopsa.com" for secure access.
2. Enter your Username or Email Address in the first text field.
3. Enter your Password in the second text field.
4. Optionally, check the "Remember me" box to stay logged in on the device.
5. Click the red "Log in" button to access your account.
6. If you need to reset your password, click "Forgotten Password?".
7. To enter the End User Portal, select "Log in End User Portal".
2. HaloPSA Client ID and Client Secret
To create and get your Client ID and Client Secret, you need to log in to HaloPSA and click access the following section, Configuration > Integrations > HaloPSA API > View Applications:
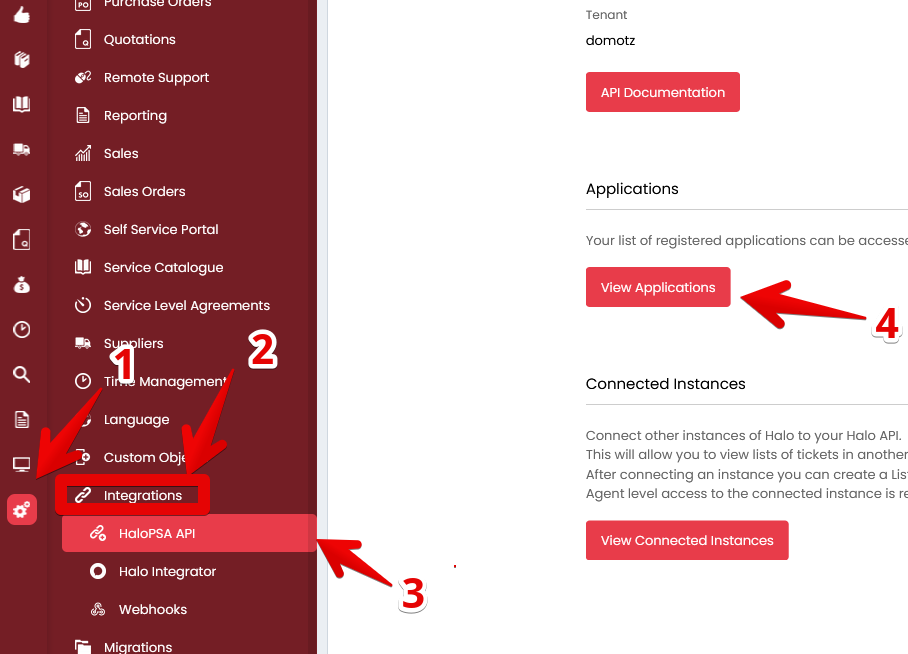
Accessing Applications in HaloPSA API Integration:
1. Navigate to the left sidebar and select "Integrations."
2. In the dropdown menu, click on "HaloPSA API."
3. On the right side, locate the "Applications" section.
4. Click the "View Applications" button to access your list of registered applications.
After that, you need to create a new application by clicking the “New” button:
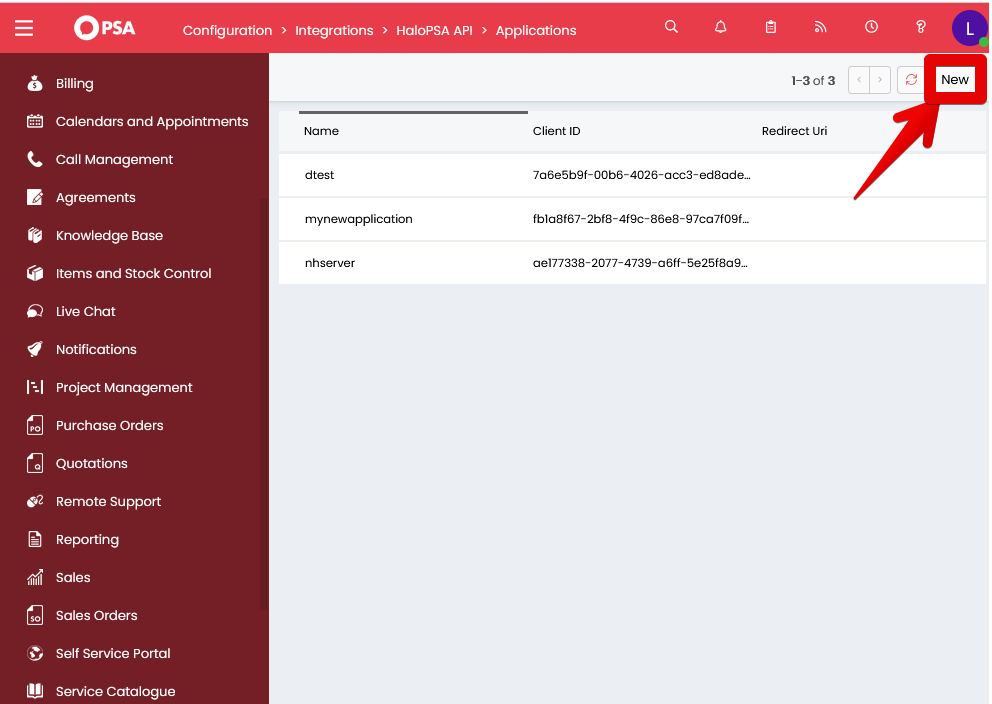
Creating a New Application in HaloPSA
1. Navigate to the "Applications" section under the "HaloPSA API" in the "Integrations" menu.
2. Observe the list of existing applications, which includes columns for Name, Client ID, and Redirect Uri.
3. To add a new application, click the "New" button in the top right corner.
Then, fill in the Details tab, and this will automatically populate the Client ID and Client Customer values:
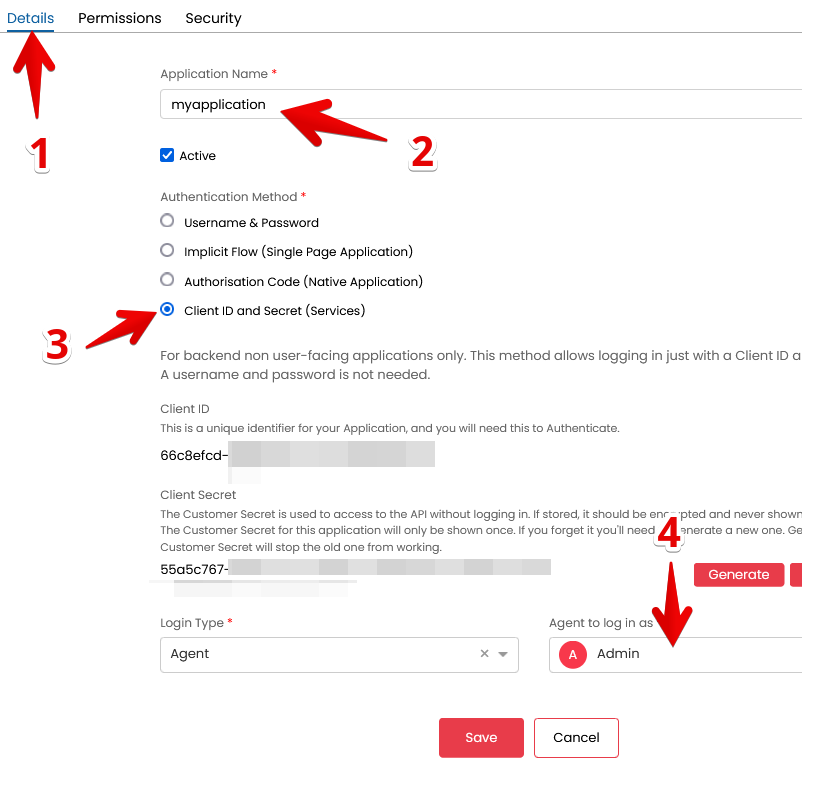
Creating an application with Client ID and Secret authentication.
1. Navigate to the "Details" tab in the application setup.
2. Enter the application name in the "Application Name" field and ensure the "Active" checkbox is selected to activate the application.
3. Under "Authentication Method," select "Client ID and Secret (Services)" for backend non-user-facing applications.
4. To set the login type, select "Agent" from the dropdown menu, then specify the agent to log in as "Admin." Click "Generate" to create a new Client Secret if needed. Finally, click "Save" to save the configuration or "Cancel" to discard changes.
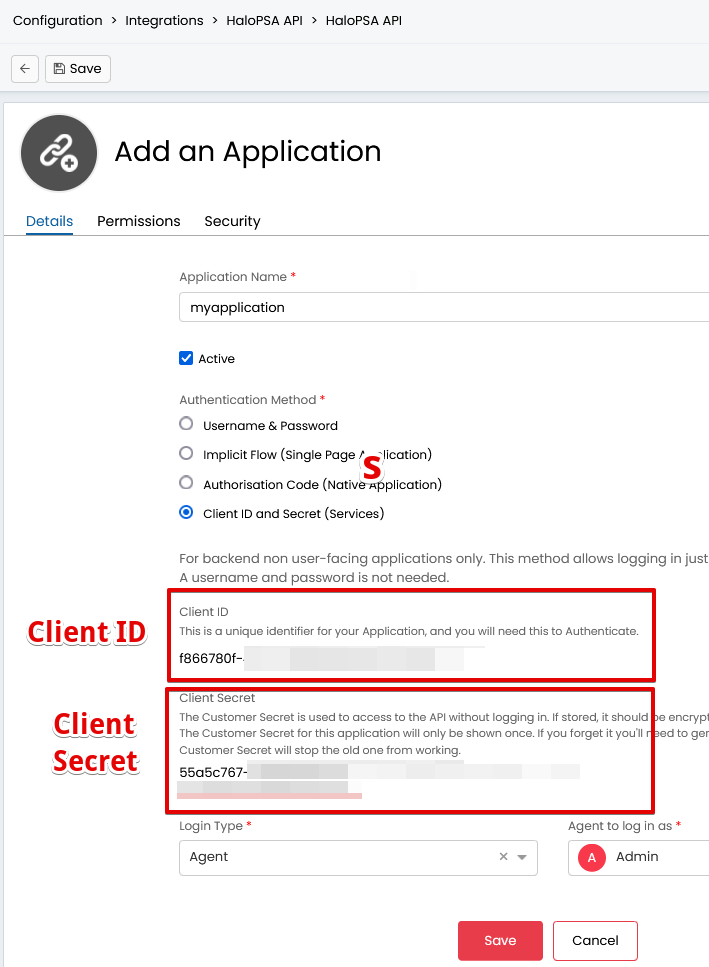
Then, you click “Save,” you will get this error:
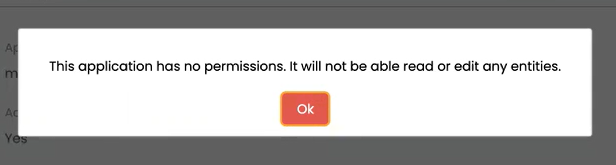
Permission error message dialog.
1. The message states: "This application has no permissions. It will not be able read or edit any entities."
2. Below the message, there is an "Ok" button to acknowledge and close the dialog.
3. Grant permissions to the application in your settings to enable reading or editing entities.
Please open the Permissions tab and add read: tickets, edit: tickets, read: customers (Domotz needs these permissions to be able to create Tickets in HaloPSA)
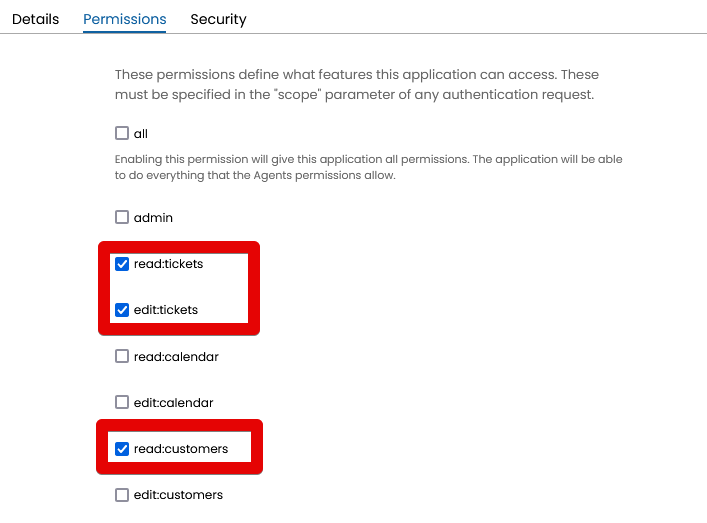
Setting Application Permissions in a Software Interface
1. Navigate to the "Permissions" tab in the application settings.
2. Under the permissions list, locate options to manage access features.
3. Select "read:tickets" and "edit:tickets" to allow reading and editing of tickets.
4. Choose "read:customers" to enable reading customer data.
5. Leave options like "all," "admin," "read:calendar," "edit:calendar," and "edit:customers" unchecked to limit those permissions.
On Domotz: create HaloPSA Contact Channel
Open your Domotz App go to the Alerts and Setting section, and click the “Connect Account” button on the HaloPSA section:
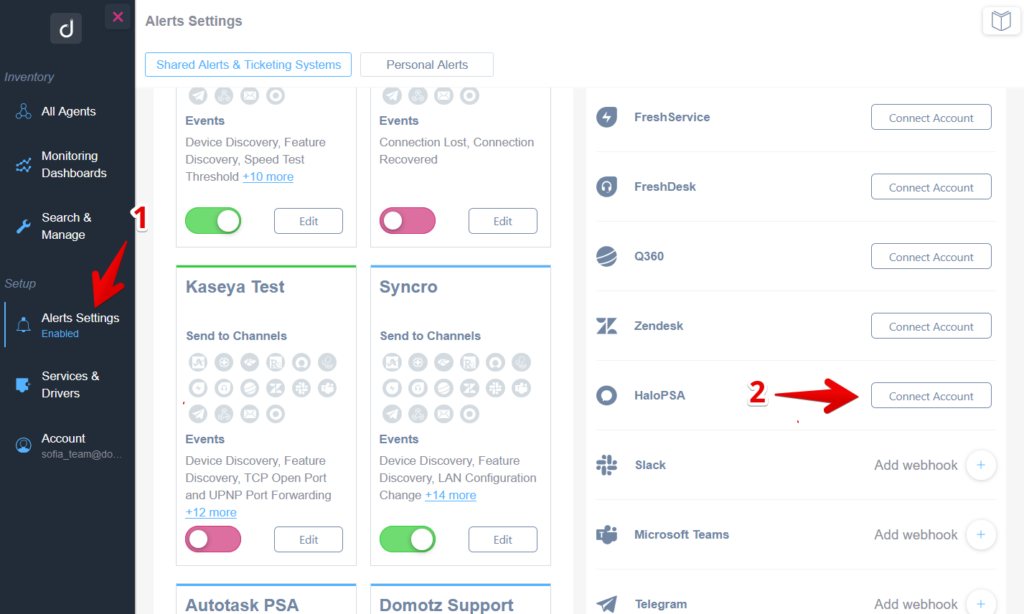
Accessing Alert Settings and Connecting Accounts.
1. In the left-side menu, navigate to "Setup" and select "Alerts Settings" under it.
2. On the right panel, locate the "HaloPSA" service and click "Connect Account" to integrate it.
A window will pop out, and you will be able to fill it with the HaloPSA Url, the Client ID, and Client Secret that you have got previously:
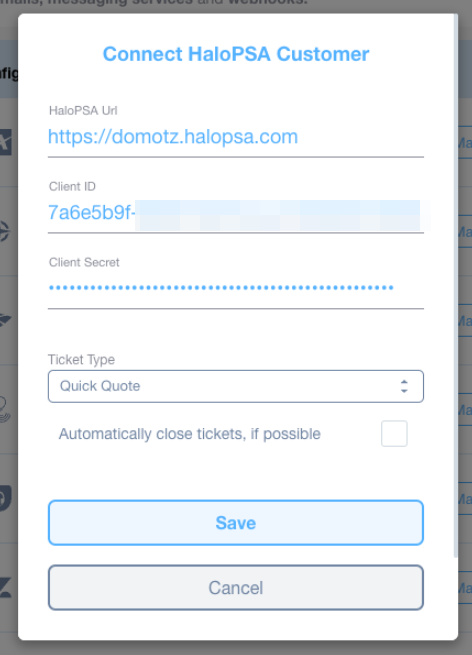
Connect HaloPSA Customer Configuration
1. Enter the HaloPSA URL in the designated field: `https://domotz.halopsa.com`.
2. Fill in the Client ID with the provided alphanumeric code.
3. Input the Client Secret in the corresponding field, ensuring it remains confidential.
4. Use the dropdown menu under Ticket Type to select the appropriate option, such as "Quick Quote."
5. Optionally, check the box to automatically close tickets if applicable.
6. Click the "Save" button to apply the settings.
7. Use the "Cancel" button to exit without saving changes.
Then click the “Save” button, and if the connection to HaloPSA is performed successfully, you will see the following:
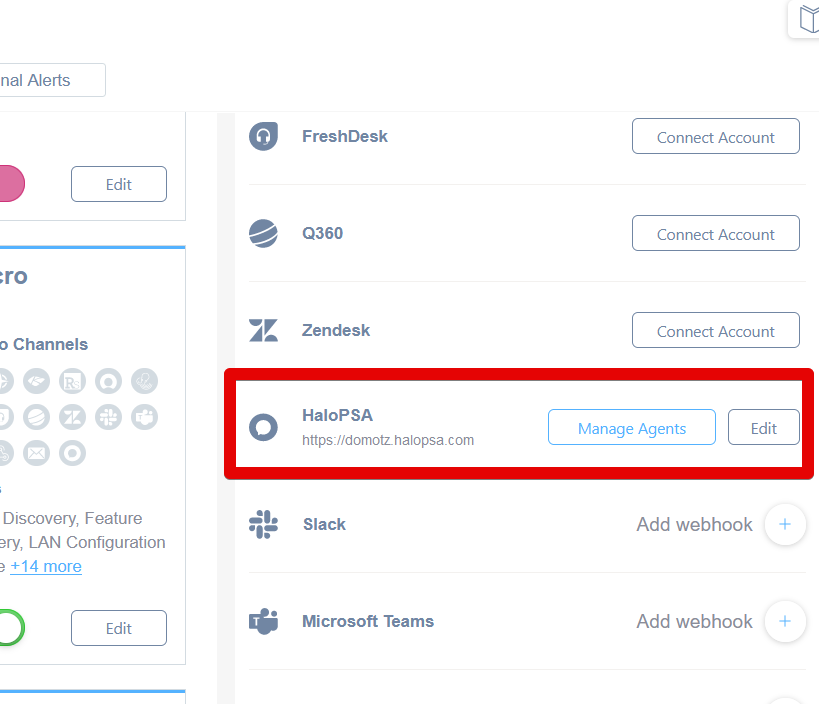
Managing HaloPSA Integration
1. Locate the HaloPSA section in the integration list.
2. Note the URL under the HaloPSA label: https://domotz.halopsa.com.
3. To manage agents, click the "Manage Agents" button next to HaloPSA.
4. To edit the integration settings, click the "Edit" button beside "Manage Agents."
Automatically Close Tickets
Domotz now includes functionality to close HaloPSA tickets automatically when the following events occur: f
- Device Status Events > Device Goes Up
- Network Events > Connection Recovered
- Device TCP Events > Retrieve any TCP Event
If you select this option when creating the HaloPSA contact channel when creating a Shared Alert, a label “Tickets will be closed automatically” will appear under the supported events: (Device Goes Up or Connection Recovered or Retrieve any TCP Event):
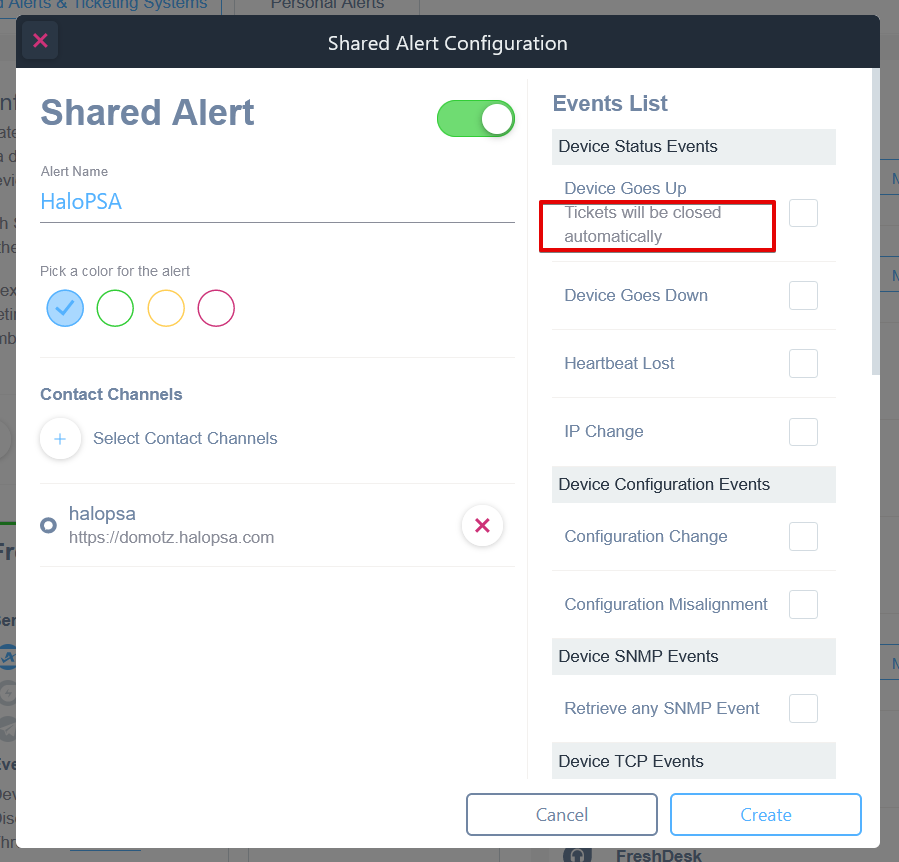
Shared Alert Configuration Setup
1. Configure the alert by entering an Alert Name, such as "HaloPSA".
2. Choose a color for the alert from the three available options.
3. Under "Contact Channels," select the desired contact channels for alert notifications.
4. The selected contact channel is displayed as "halopsa" with the URL provided.
5. In the "Events List" section, check "Tickets will be closed automatically" under "Device Status Events" to enable auto-closure of tickets.
6. After configuration, choose "Create" to finalize the setup or "Cancel" to discard changes.
Auto-closing of tickets is also available for TCP Events:
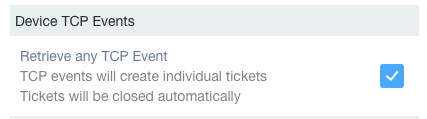
Device TCP Events Configuration
1. To retrieve TCP events, click "Retrieve any TCP Event."
2. Note that each TCP event will generate an individual ticket.
3. Tickets are designed to close automatically, as indicated by the checked box.
Here is how you will see the labels in the Network Events section:
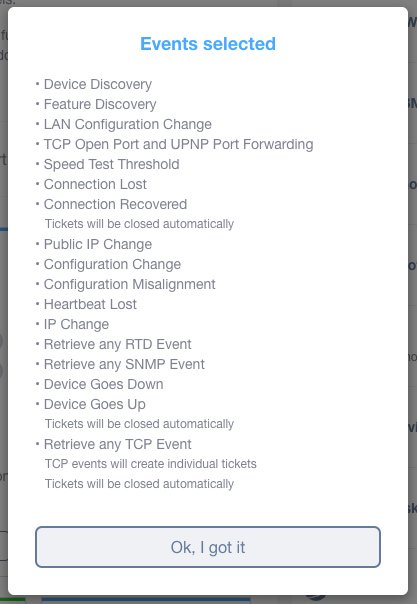
Event Selection Overview
1. The dialog box lists selected events for monitoring, such as Device Discovery, Feature Discovery, and LAN Configuration Change.
2. It includes network-related events like TCP Open Port and UPNP Port Forwarding, and Speed Test Threshold.
3. Connection status events such as Connection Lost and Connection Recovered are displayed, with notes about automatic ticket closure.
4. Public IP Change and various Configuration Changes are included.
5. The list covers critical status updates like Device Goes Down and Device Goes Up, again noting automatic ticket handling.
6. Events like Heartbeat Lost, IP Change, and several retrieval options (RTD, SNMP, TCP) are included.
7. The dialog concludes with a confirmation button labeled "Ok, I got it" to acknowledge the selections.
Associate Domotz Agent and HaloPSA Customers
Click on the “Manage Agents” button and select to which HaloPSA Customer each of your Domotz Agents should create support tickets. Remember that once you have selected a particular contact, you will have to specify the location for that contact also:
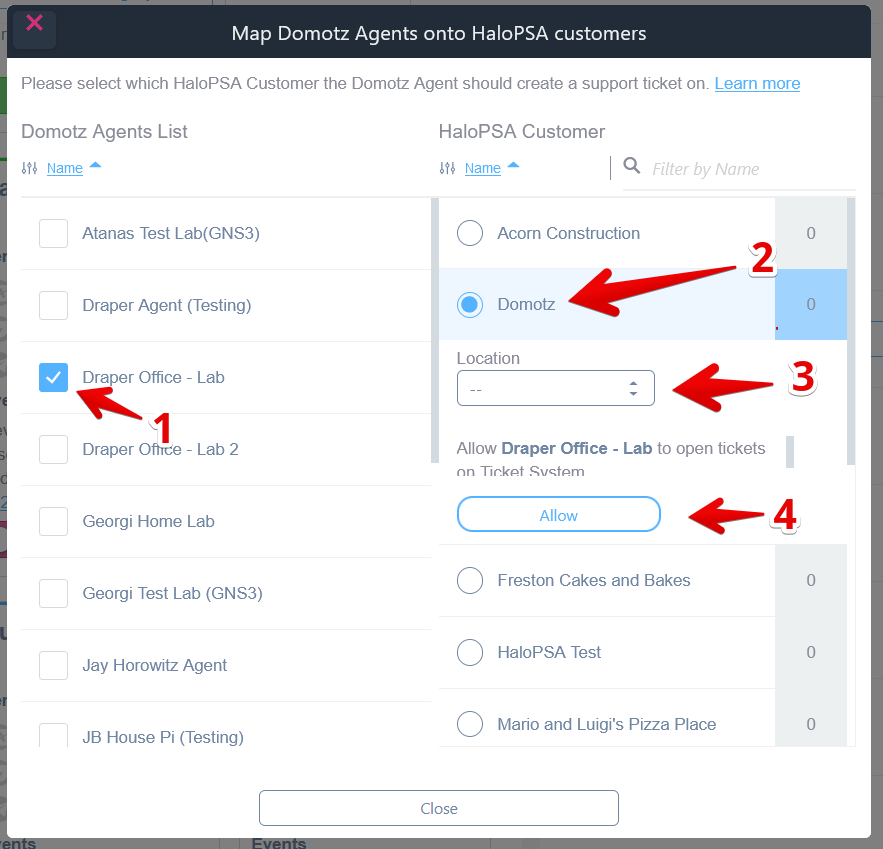
Map Domotz Agents to HaloPSA Customers
1. In the "Domotz Agents List," select the checkbox for "Draper Office - Lab."
2. In the "HaloPSA Customer" section, choose the "Domotz" radio button.
3. Use the "Location" dropdown menu to select the desired location, if applicable.
4. Click the "Allow" button to enable "Draper Office - Lab" to open tickets on the HaloPSA Ticket System.
You are now able to use the Contact Channel for HaloPSA when creating a Shared Alert profile. Once the Shared Alert profile is created, apply it to the Agents and Devices you want to automatically open tickets in HaloPSA.
Try the new HaloPSA Integration on Domotz today.