

Installing a Domotz Box
Make sure you have an account
You can create an account at: https://portal.domotz.com/signup. Or you can log in at: https://portal.domotz.com/login. If you don’t know your username, check with the person that manages your company’s Domotz account. You will need to be listed as a member of your company’s team. New team members can be added in the portal at: https://portal.domotz.com/
Activate your Domotz Box
1) Connect the Domotz Box to the network you want to monitor, by plugging it into the network (router or a network switch) using the network cable provided. Plug the box into a power source and make sure it’s ON.
2) Wait for about 45 minutes while the Domotz Box is automatically provisioned with the latest software. Please do not disconnect the Domotz Box during this phase.
3) Connect your mobile phone to the same network as the Box. Open your app and press “Add Site” in the Sites Explorer section. Once the Domotz Agent is found, you’ll be prompted to tap the “Configure” button.*
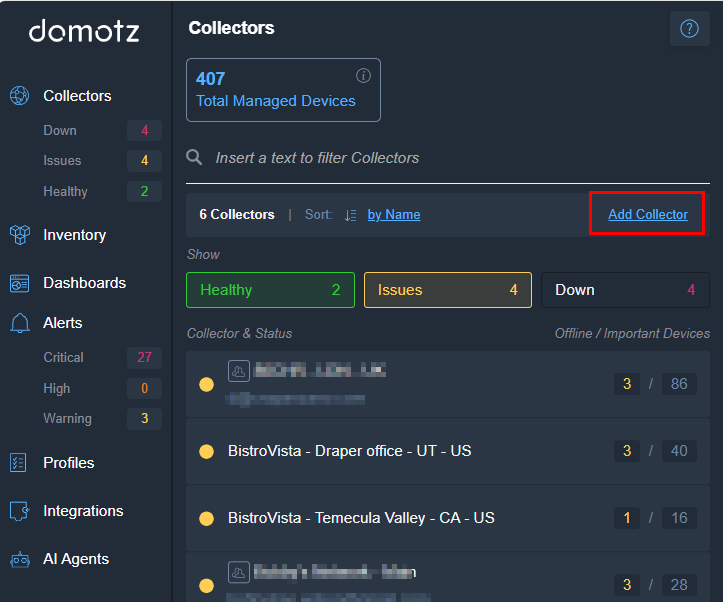
Adding a Collector in the Domotz Dashboard.
1. Navigate to the "Collectors" section in the left-side menu.
2. In the main panel, look for the "Add Collector" option located on the right side, next to the "6 Collectors" label.
3. Click on "Add Collector" to begin the process of adding a new collector.
4. Use the search bar to filter and manage collectors by text input if needed.
5. Indicators show the status of collectors: "Healthy" (2), "Issues" (4), "Down" (4).
6. View detailed collector statuses and the number of offline or important devices listed under columns "Collector & Status" and "Offline / Important Devices".
4) You’ll be prompted to Login. Insert your Domotz Pro account credentials and press “Login” and name your Agent/Site to activate your agent.
The manual part of the configuration is done. The Domotz Agent will proceed with scanning the network and detecting all the devices. This can take anywhere from a few up to 10 minutes, depending on how many devices there are on the network.