
Domotz network monitoring software includes ConnectWise PSA Integration so MSPs can monitor and manage devices in Domotz, discover issues and immediately send them to ConnectWise PSA so you can track them.
MSPs can monitor and manage network infrastructure, connected devices and IoT systems directly through ConnectWise PSA.
Learn more about the Domotz integration with ConnectWise PSA.
How to set up the Domotz ConnectWise PSA Integration
You can connect your ConnectWise PSA Account into Domotz. ConnectWise PSA will become one of the Contact Channels available when creating a Shared Alert. This means that you can create or update a ConnectWise ticket when a specific event occurs in Domotz.
Configuring ConnectWise PSA security roles and API members
Security roles and API members are used for connecting Domotz to your ConnectWise PSA account. This must be performed by a ConnectWise PSA administrator with permissions to manage security roles and members. If you can’t please ask your manager.
Add security roles
Log into the ConnectWise PSA dashboard and from the navigation menu, click System, then Security Roles.
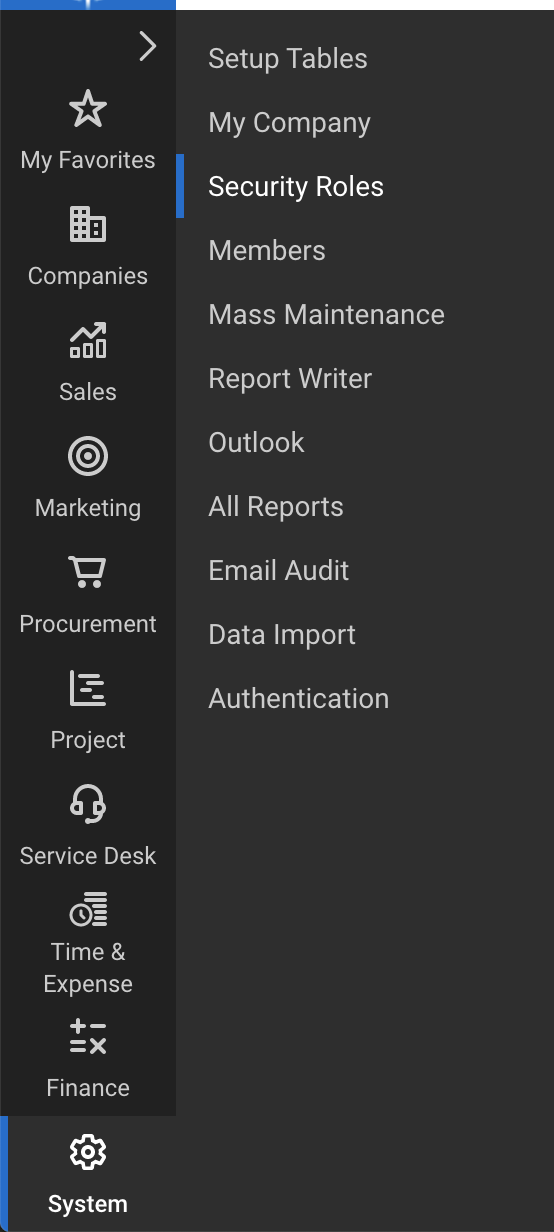
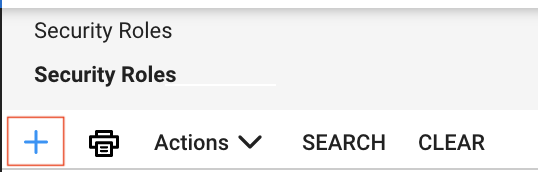
Click on “Add button” and insert “Domotz API” for role ID, then click “Save”.
Expand the below roles groups and enable the following roles:
- Companies -> Company Maintenance (Inquire Level = All)
- Service Desk -> Close Service Tickets (Edit Level = All, Inquire Level = All)
- Service Desk -> Service Tickets (Add Level = All, Edit Level = All, Inquire Level = All)
- Finance -> Agreements (Inquire Level = All)
- System -> Table Setup (Inquire Level = All)
- Companies -> Configurations (Inquire Level = All) – This is only required if you are planning to leverage the functionality that allows Domotz to link ConnectWise Configurations to Tickets when created.
Then click on “Save“.
The levels needed are shown in the following picture.
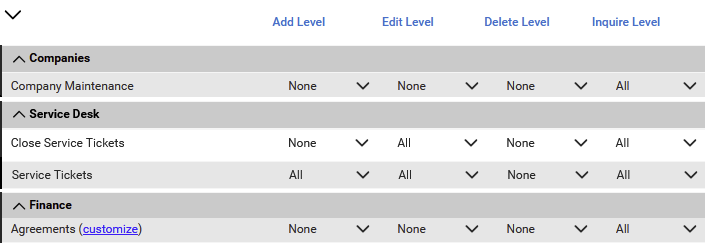
User Access Levels Configuration Interface
1. At the top, there are options to "Add Level," "Edit Level," "Delete Level," and "Inquire Level." Use these to manage access levels.
2. The interface is divided into three sections: Companies, Service Desk, and Finance.
3. Under "Companies," there is "Company Maintenance" with drop-down menus for setting permissions to "None," "All," or other specified levels.
4. "Service Desk" includes "Close Service Tickets" and "Service Tickets" options, each with permissions set to different levels such as "None" or "All."
5. "Finance" has "Agreements," which can be customized. Permissions are adjustable similarly.
6. Use the drop-down arrows beside each permission to change access levels as needed.

Customizing Table Setup in the System
1. Navigate to the "System" section.
2. Locate the "Table Setup" option.
3. Click on the "customize" link next to "Table Setup" to adjust settings.
4. Use the dropdown menus labeled "None" and "All" to specify preferences for each column. Adjust these settings as needed to customize table behavior or appearance.
Moreover, if you are planning to allow Domotz to link ConnectWise Configurations to Tickets, please also use the following level:

Configuring Company Settings in a Software Interface
1. At the top, a collapsible section titled "Companies" is shown.
2. Below, there is a row for configuring settings with various dropdown menus.
3. The "Configurations" label is shown with a linked option to "customize," allowing further adjustments.
4. Four dropdown fields are labeled "None," enabling selective changes per category.
5. The last dropdown is labeled "All," indicating a global setting choice for the corresponding category.
After adding security roles you need to add a member and API member.
Add member and member API
Open Members menu under System.
Please check you have at least one location with at least one business unit defined before creating a new member in ConnectWise PSA.

Open the API Members menu and click on the add button to create a new member API.

- Enter Domotz API as the Member ID.
- Select Domotz API as the Role ID.
- Select Corporate (Level 1) as the level.
- Select Corporate as the name.
- Select a location.
- Select a business unit.
- All other options should be set to best reflect that this account has a view of your entire organization, not just a single location or business unit.
- Click Save
Set an API Key on a member
After creating a member you need to create an API key. Select the member from the member’s list and then open the API Key menu.
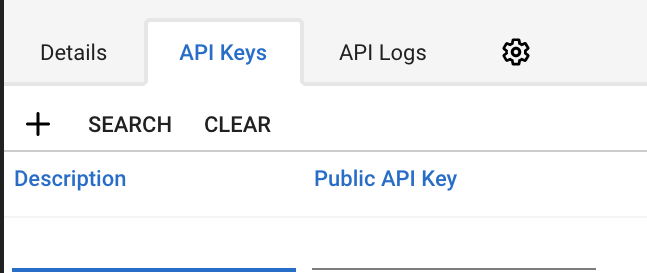
Click on the add button and insert CW Domotz as a description. Then click on “Save”.
Copy and save the Public and Private API keys, that will be used inside Domotz.
Connect ConnectWise PSA to your Domotz account
After having created an API key inside your ConnectWise PSA account (see above) you can proceed with connecting your ConnectWise PSA account to your Domotz account.
Open the Integrations menu from the left sidebar inside the Domotz App and click on ConnectWise PSA under the Ticketing Systems section.
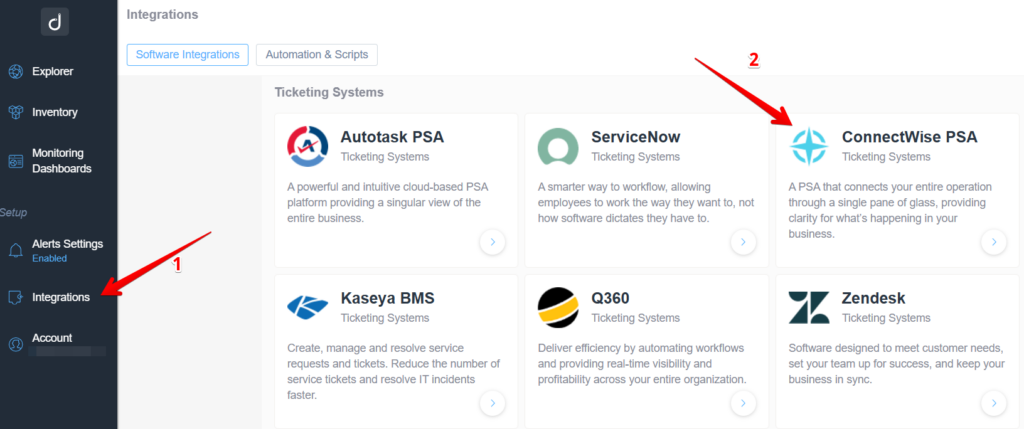
Accessing ConnectWise PSA Integration Settings
1. In the left-hand sidebar, select "Integrations" under the "Setup" section.
2. In the main window, locate and select "ConnectWise PSA" under the "Ticketing Systems" category. This option allows you to connect and manage your operations through ConnectWise within your software interface.
Fill the form with:
- Company ID: your ConnectWise PSA company ID.
- API Endpoint: please check your ConnectWise PSA URL endpoint (i.e. if you have “https://eu.myconnectwise.com” you’ll have to insert “https://eu.myconnectwise.com” inside this field).
- Public Key: generated inside your ConnectWise account (see @4.16.1.3.1.3. Set an API Key on a member).
- Private Key: generated inside your ConnectWise account (see @4.16.1.3.1.3. Set an API Key on a member).
Click Next.
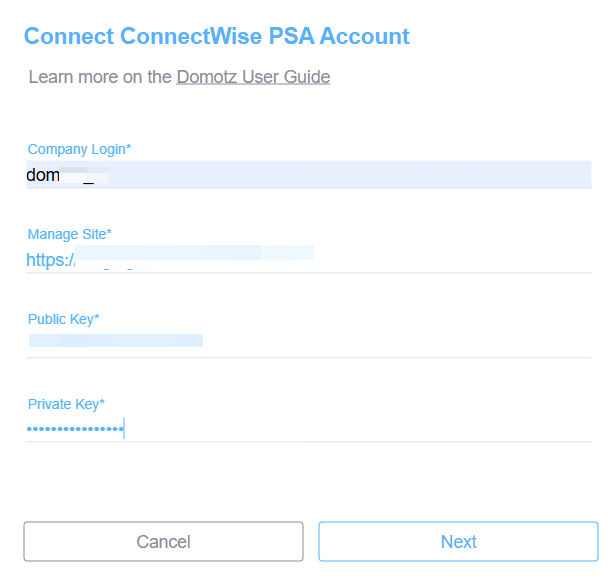
Connect ConnectWise PSA Account Form
1. Enter your company login in the "Company Login" field.
2. Provide the URL for "Manage Site."
3. Input the "Public Key" associated with your account.
4. Enter the "Private Key" securely.
Use the "Cancel" button to exit without saving or the "Next" button to proceed after completing the form.
Please note that the ‘Company Login’ is the same that you use when logging in CW:
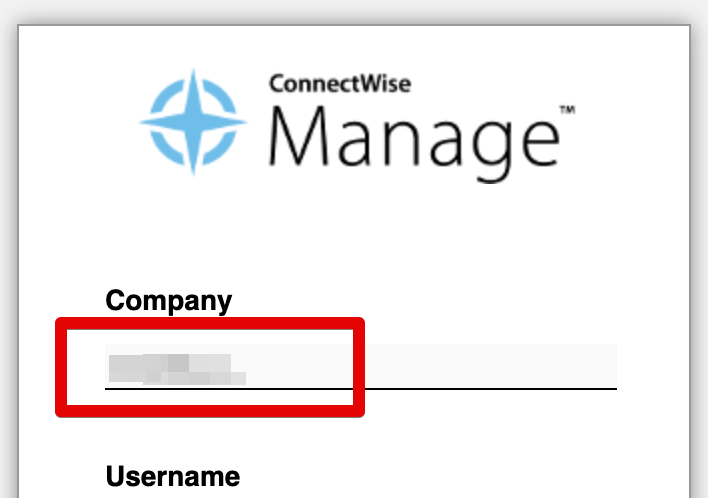
ConnectWise Manage login screen.
1. Locate the "Company" field at the top of the login form and enter your company ID or name.
2. Below the "Company" field, find the "Username" field to enter your username or email.
3. Proceed with the login process after entering the required information in both fields.
You can then select the board on which you’d like to open tickets in. Then click on “Next”.
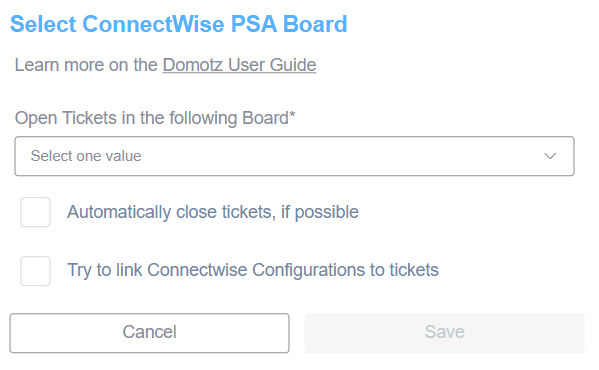
Configure ConnectWise PSA Board Settings
1. Choose a board for ticket management by selecting an option from the dropdown menu labeled "Open Tickets in the following Board."
2. Optionally, check "Automatically close tickets, if possible" to enable automatic ticket closure.
3. Optionally, check "Try to link Connectwise Configurations to tickets" to associate configurations with tickets.
4. Click "Cancel" to discard changes, or "Save" to apply the configuration.
If you select “Automatically close tickets, if possible”, you will be given the option to select which ticket types Domotz can close, and set their default Closed Ticket status:
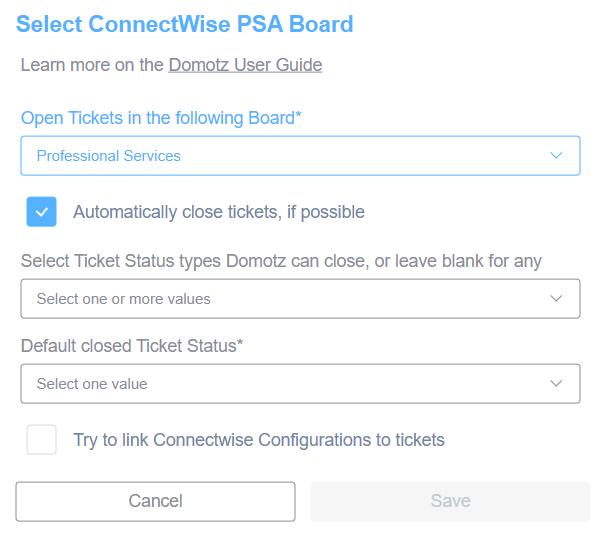
ConnectWise PSA Board Settings Interface
1. Choose the board for open tickets by selecting "Professional Services" from the dropdown under "Open Tickets in the following Board."
2. Enable the option to close tickets automatically by checking "Automatically close tickets, if possible."
3. Specify the ticket status types that Domotz can close using the dropdown labeled "Select Ticket Status types Domotz can close," or leave it blank to select any status.
4. Set the default status for closed tickets by selecting a status from the "Default closed Ticket Status" dropdown.
5. Optionally, check "Try to link Connectwise Configurations to tickets" to enable configuration linking.
6. Click "Save" to apply the settings or "Cancel" to discard changes.
Here you select the ticket statuses that you wish to be closed:
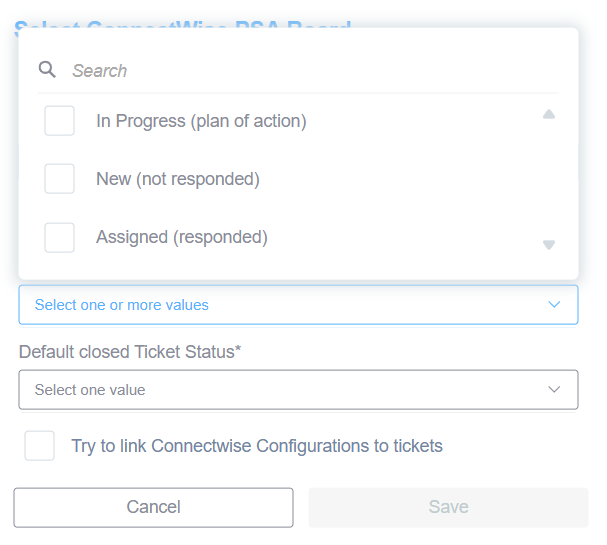
Selecting Ticket Status and Options in ConnectWise PSA
1. Use the dropdown menu to select ticket statuses: "In Progress (plan of action)," "New (not responded)," or "Assigned (responded)."
2. Confirm your selections by clicking on "Select one or more values."
3. Choose a default closed ticket status from the "Default closed Ticket Status" dropdown.
4. Optionally, check "Try to link Connectwise Configurations to tickets" if applicable.
5. Finalize or discard changes with the "Cancel" or "Save" buttons.
And here you select the Status type that Domotz will use for closure:
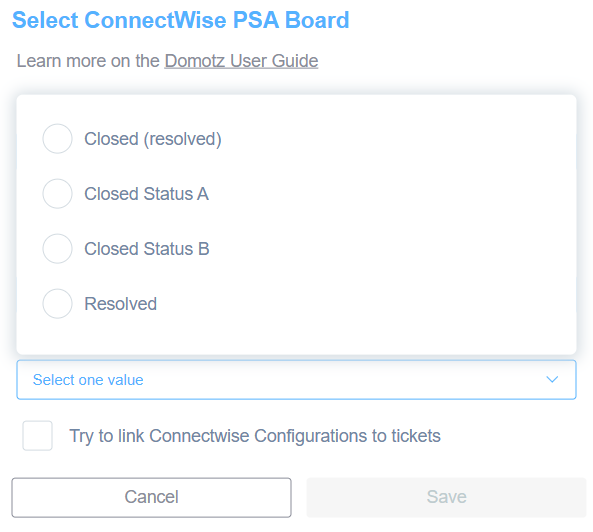
Selecting a ConnectWise PSA Board Status
1. Choose a status from the available options: "Closed (resolved)," "Closed Status A," "Closed Status B," or "Resolved."
2. Use the dropdown menu labeled "Select one value" to make your selection.
3. Check the box labeled "Try to link Connectwise Configurations to tickets" if you want to attempt linking configurations.
4. Click "Save" to confirm your choices, or "Cancel" to discard changes.
And after that you will be able to modify your current configuration by clicking on the ‘Edit’ button:
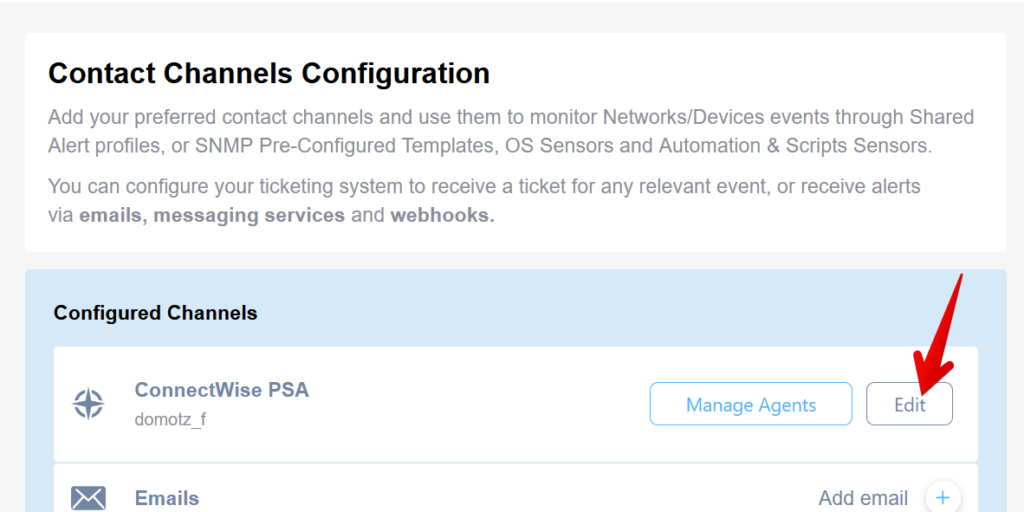
Contact Channels Configuration Setup
1. In the Contact Channels Configuration section, add contact channels to monitor network or device events via different methods such as emails, messaging services, and webhooks.
2. Within the Configured Channels area, locate the channel labeled "ConnectWise PSA."
3. To modify this channel, click the “Edit” button located on the right side of the ConnectWise PSA entry.
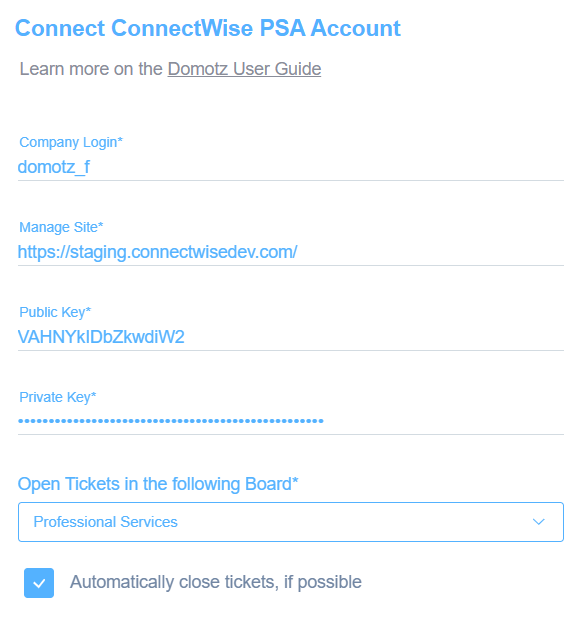
Connecting a ConnectWise PSA Account
1. Enter your Company Login in the provided field, such as "domotz_f".
2. Specify the Manage Site URL, for example, "https://staging.connectwisedev.com/".
3. Input the Public Key in the designated area.
4. Provide the Private Key securely in its field.
5. Select the board for opening tickets from the drop-down menu, like "Professional Services".
6. Optionally, check the box to "Automatically close tickets, if possible" to enable this feature.
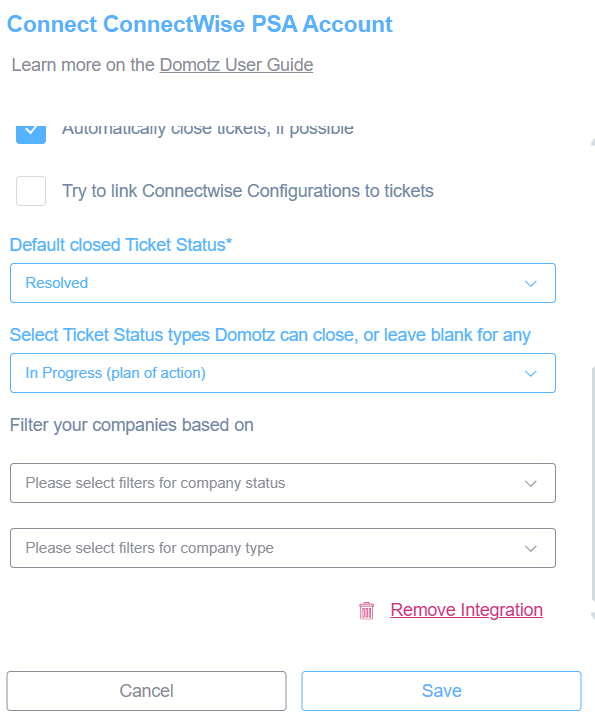
Connect ConnectWise PSA Account Settings
1. Read the Domotz User Guide for detailed instructions.
2. Check "Automatically close tickets, if possible" to enable automatic ticket closure.
3. Optionally, check "Try to link Connectwise Configurations to tickets" if you want to attempt linking.
4. Set "Default closed Ticket Status" by choosing an option, such as "Resolved," from the dropdown menu.
5. Select the "Ticket Status types Domotz can close," like "In Progress (plan of action)," or leave it blank for any status type.
6. Filter companies based on status and type by selecting the appropriate options from the respective dropdown menus.
7. Use the "Remove Integration" option if needed.
8. Click "Save" to apply changes or "Cancel" to discard them.
Or, you can click on ‘Manage Agents’:
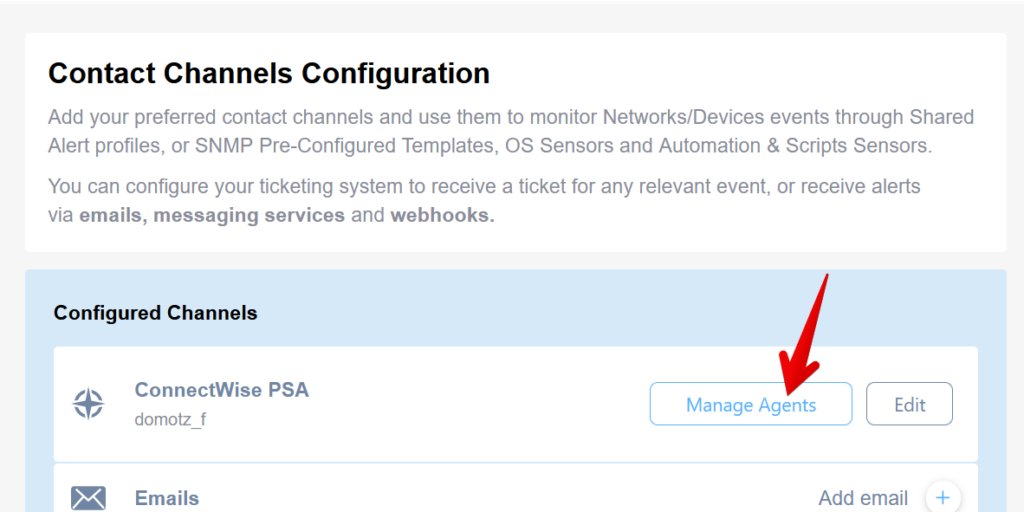
Configuring Contact Channels
1. Access the "Contact Channels Configuration" section to add or manage your preferred contact channels for monitoring network and device events.
2. Review the "Configured Channels" list to see existing channels such as "ConnectWise PSA."
3. To manage agents for "ConnectWise PSA," click the "Manage Agents" button associated with this channel.
4. Use the options provided to configure your ticketing system, allowing ticket reception or alerts via emails, messaging services, and webhooks.
and select to which ConnectWise PSA Accounts each Domotz Agent should create a support ticket on:
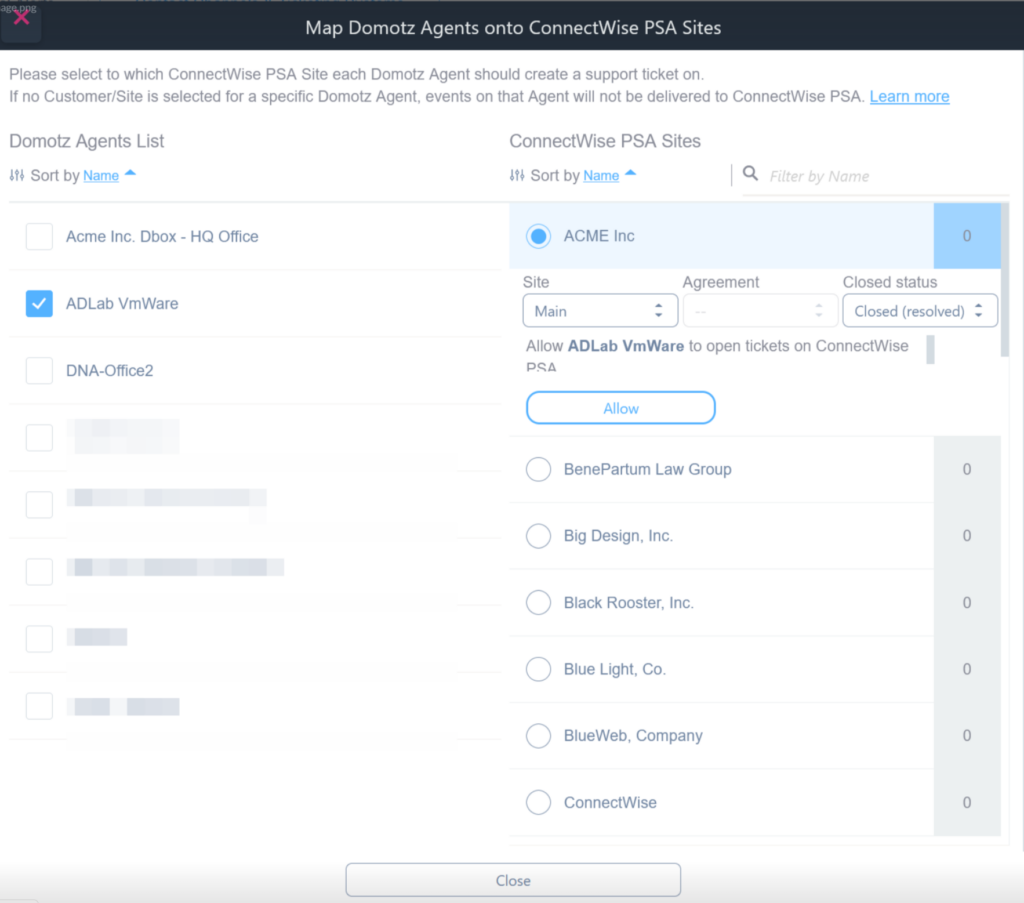
Mapping Domotz Agents to ConnectWise PSA Sites
1. Select a Domotz agent from the left list. In this example, "ADLab VmWare" is selected.
2. On the right, choose a ConnectWise PSA site. "ACME Inc" is selected.
3. Choose the "Site" and "Agreement" from their respective drop-down menus if available.
4. Set the "Closed status" option; here it’s set to "Closed (resolved)."
5. Confirm the mapping by ensuring that "Allow ADLab VmWare to open tickets on ConnectWise PSA" is indicated.
6. Click the "Allow" button to finalize the mapping.
7. Use the bottom "Close" button to exit the process when done.
You are now able to use the Contact Channel for ConnectWise Manage, within the Shared Alert profile. Once the Shared Alert profile is created, apply the Shared Alert to the Agents and Device for which you are willing to automatically open tickets in your ConnectWise PSA.