
To kick off July, here are all the latest features and improvements we’ve added to Domotz:
- Monitor more SNMP & TCP sensors with our big increase for all plans
- OS Monitoring data is available in the Monitoring Tables
- Generate historical graphs for variables in the Monitoring Tables
- Create Tables of Variables with Custom Integration drivers
- We’ve improved the navigation within Manage for your Sites and Devices
- Alerts delivered through WebHooks now include richer information
- We’ve improved identifying devices on Routed Networks
What’s new
OS Monitoring data within Monitoring Tables
We can now report all the OS Monitoring data (Logical Disks, Physical Disks, Memory, and more) within your Custom Monitoring Tables:
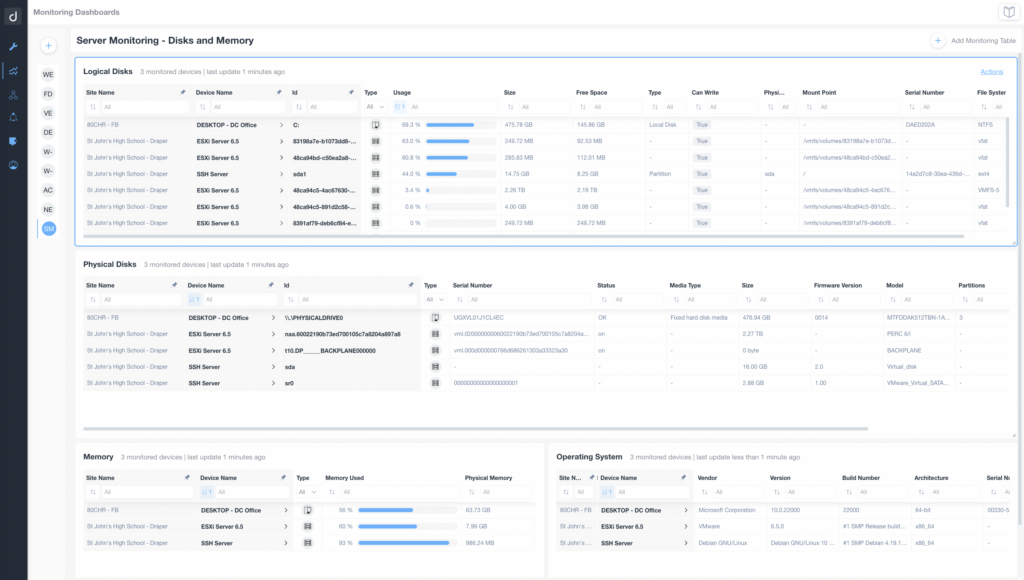
Server Monitoring Dashboard Overview
1. **Logical Disks**: Displays a table with columns for Site Name, Device Name, ID, Type, Usage, Free Space, along with other disk details like Can Write, Physical, Mount Point, Serial Number, and File System. Use this section to monitor logical disk usage and characteristics.
2. **Physical Disks**: Below, view a table showing information about physical disks. This includes Site Name, Device Name, Status, Media Type, Size, Firmware Version, and additional related data. This section helps track the status and capacity of physical storage devices.
3. **Memory**: Provides data on memory usage across monitored devices. Key columns are Site Name, Device Name, Type, Memory Used, and Physical Memory. This helps assess memory performance.
4. **Operating System**: Lists operating system details, featuring Site Name, Device Name, Vendor, Version, Build Number, Architecture, and other OS-specific attributes. Useful for confirming software configurations and versions on each device.
When creating a new Monitoring Table, you can now select data using the OS Monitoring capability:
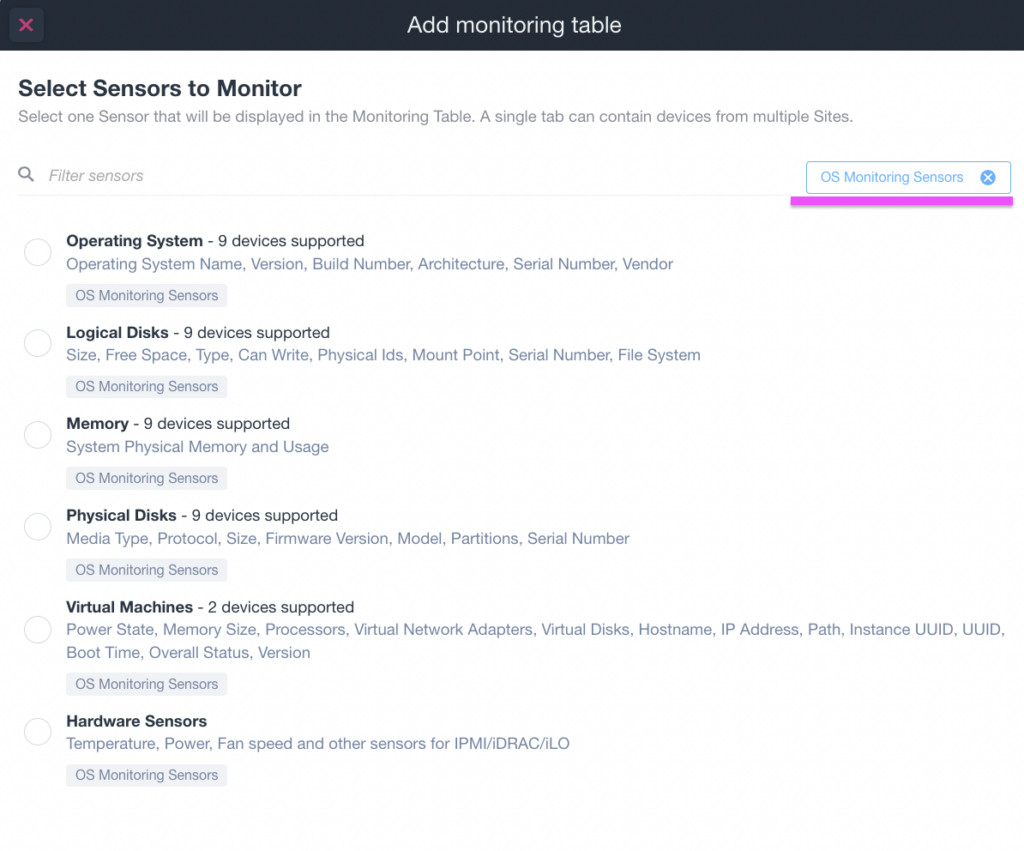
Select Sensors to Monitor
1. Choose a sensor from the list to display in the Monitoring Table. Each tab can handle devices from multiple sites.
2. Available sensors include:
- Operating System: Provides details such as Name, Version, Build Number, Architecture, Serial Number, and Vendor.
- Logical Disks: Displays Size, Free Space, Type, and other disk attributes.
- Memory: Monitors System Physical Memory and Usage.
- Physical Disks: Shows Media Type, Protocol, Size, and related information.
- Virtual Machines: Details Power State, Memory Size, Processors, and more.
- Hardware Sensors: Checks Temperature, Power, Fan speed, among others.
3. Select the "OS Monitoring Sensors" tag to add or remove it from your selection.
Use the filter option to search for specific sensors.
In the Monitoring Tables, you can now choose to extract and report information about Operating systems, Logical and Physical Disks, Memory, Hardware Sensors, or Virtual Machines details.

View and Manage Virtual Machines
1. The table displays information about virtual machines, with columns labeled: Site Name, Device Name, Name, Type, Power, OS, Memory, Processors, Virtual Network Adapters, Hostname, IP Address, Path, Instance UUID, UUID, Boot Time, Overall Status, and Version.
2. Each row represents a virtual machine and contains data like site and device names, type (e.g., ESXi Server), power status (e.g., poweredOn), operating system (e.g., Ubuntu Linux), memory allocation (e.g., 1.00 GB), and other attributes such as IP address and boot time.
3. Filters are available at the top of each column for narrowing down the list, with input fields allowing specific values or conditions to be set for filtering results. For example, type specific site names or OS types to narrow down the list.
4. The "Overall Status" column indicates the health of virtual machines, such as "green" for normal operation.
5. An "Actions" link at the top right suggests additional interactions or management options for the virtual machines listed.
Historical Graphs generated from Monitoring Tables
You can now click on the values of variables we’re reporting to generate graphs including historical values.
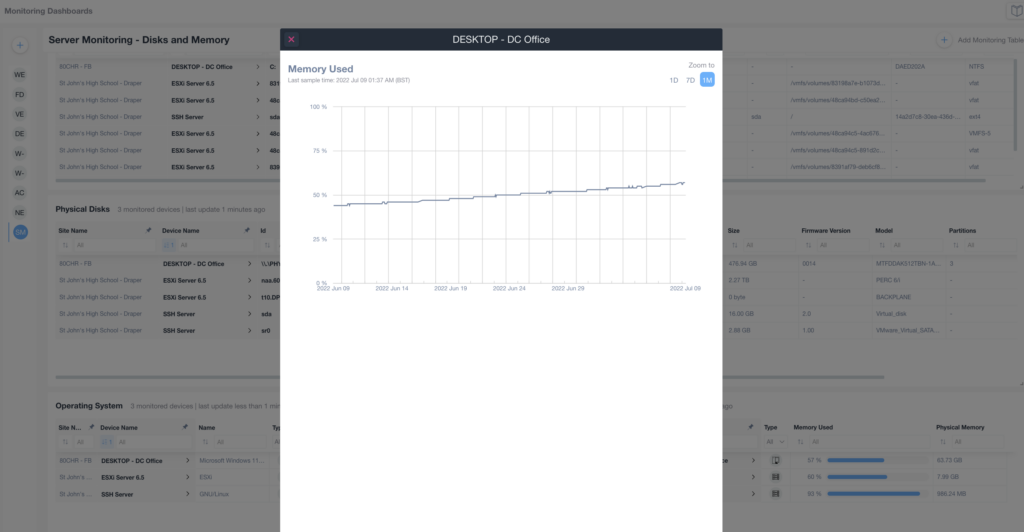
Memory Usage Graph for DESKTOP - DC Office
1. Displays a memory usage graph over time, with data spanning from June 9, 2022, to July 6, 2022.
2. The vertical axis represents memory usage percentage from 0% to 100%.
3. The horizontal axis covers the date range mentioned.
4. Shows a gradual increase in memory usage, indicating a trend.
5. Top right options allow zooming into different time frames: 1 Day (1D), 7 Days (7D), and 1 Month (1M).
6. Last update timestamp: July 6, 2022, at 05:37 AM IST.
When a variable is “text-like” this means you’ll get a historical list of the values instead of a graph:
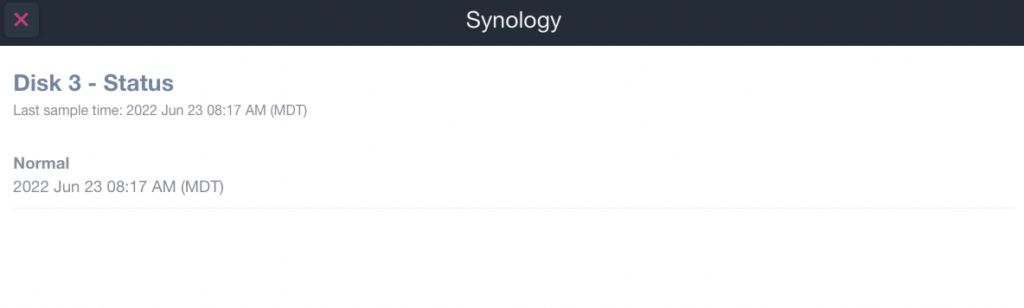
Synology Disk Status Overview
1. Verify the disk status by locating "Disk 3 - Status" at the top of the window.
2. Note the last sample time displayed, "2022 Jun 23 08:17 AM (MDT)," ensuring the data is current.
3. Check the status below the timestamp, which indicates "Normal," confirming the disk is functioning correctly.
Table of Variables with Custom Integration Drivers
You can now create a structured Table of Variables using the Custom Integration Drivers:
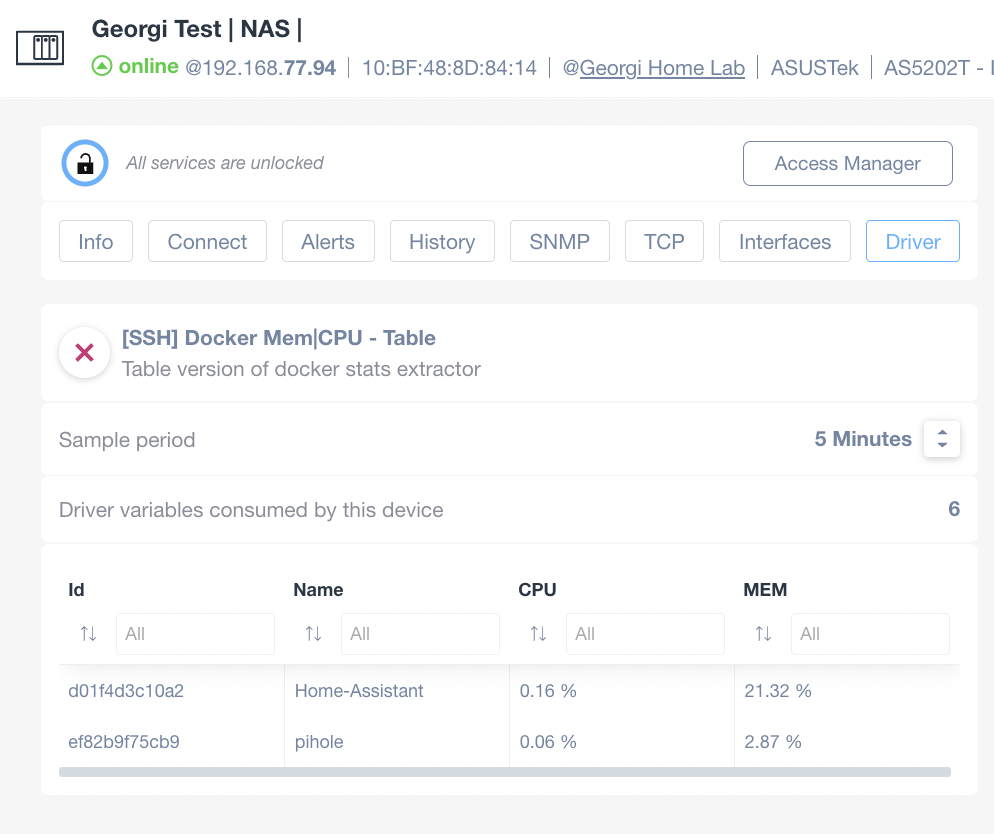
Monitoring Docker CPU and Memory Usage in NAS
1. At the top, the NAS device named "Georgi Test" is online with IP address 192.168.77.94.
2. A menu with tabs for Info, Connect, Alerts, History, SNMP, TCP, Interfaces, and Driver is available.
3. Under the Driver tab, a section titled "[SSH] Docker Mem|CPU - Table" displays Docker statistics.
4. The sample period for data collection is set to 5 minutes.
5. Driver variables consumed by the device are indicated as 6.
6. Below is a table with columns: Id, Name, CPU, and MEM.
7. Entries show Docker container statistics:
- First entry: Id "d01f4d3c10a2", Name "Home-Assistant", CPU usage 0.16%, MEM usage 21.32%.
- Second entry: Id "ef82b9f75cb9", Name "pihole", CPU usage 0.06%, MEM usage 2.87%.
When using our Custom Integration Drivers, this new feature allows you to structure the data set output you extract output from any device (or in general any IP address/hostname).
For more information please refer to the following pages:
- Custom driver table variables within the Domotz user-guide
- DriverTable definition in the documentation
- Custom Driver example (extracting Docker stats) with the usage of DriverTable
Improvements
Monitor more SNMP & TCP Sensors
We’ve added a significant increase to the number of SNMP & TCP sensors you can monitor on both Standard Plans and Booster packs.
As a matter of fact, the number of Domotz Sensors (SNMP + TCP) is now:
- Domotz Agent with Standard Plan: 900 sensors
- (Previously) 300 sensors per Agent
- Domotz Agent with Booster Pack: 6600 sensors + 900 sensors = 7500 sensors
- (Previously) 1500 sensors per Agent
Improved Navigation within the new Manage for Sites and Devices
We continue to improve the experience in the new section Manage.
Firstly, with the latest release you can simply filter all your Sites or Devices with a simple click on the main counters (at the top of the page):
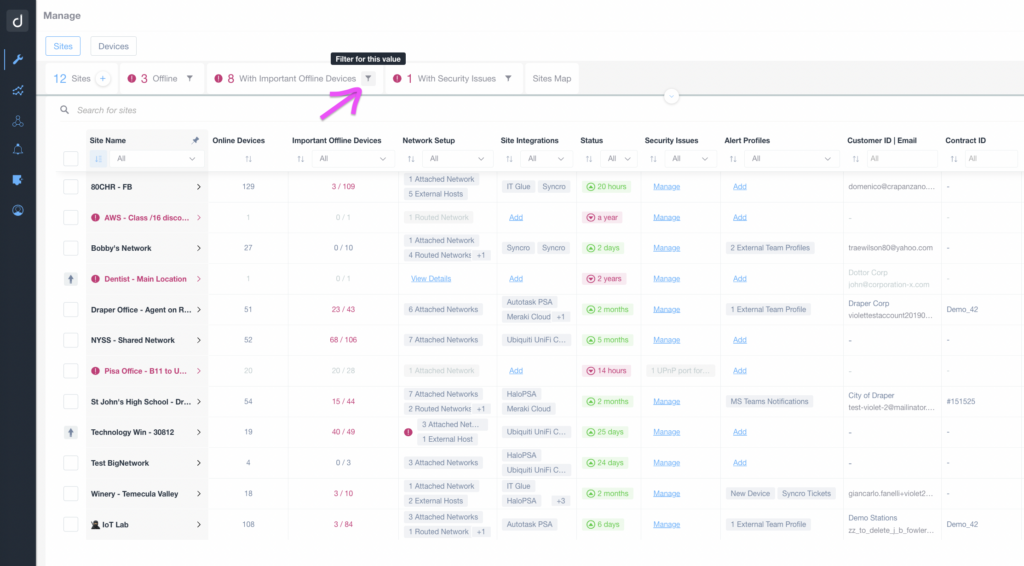
Managing Device Filters in a Network Dashboard
1. Locate the management menu at the top of the dashboard. It includes options for viewing different sections: "Sites," "Devices," and a filter bar with site status indicators.
2. The filter bar displays several filter criteria:
- Total number of sites (12).
- Sites that are offline (3).
- Sites with important offline devices (8).
- Sites with security issues (1).
3. To filter sites with important offline devices, click on the "With Important Offline Devices" option. This narrows down the displayed sites in the table to those that have critical offline devices.
4. The table below shows detailed information for each site, including columns for:
- Site Name
- Number of Online Devices
- Number of Important Offline Devices
- Network Setup
- Site Integrations
- Status (e.g., how long it's been online/offline)
- Security Issues, with a link to "Manage" them
- Alert Profiles, with a link to "Add" alerts
- Customer ID | Email
- Contract ID
5. Use this filtered view to manage and address issues with important offline devices effectively.
Secondly, when navigating o Sites/Devices, the side menu highlights the appropriate item. Navigation within entities now includes “breadcrumbs” which lets you easily click back to the original page.
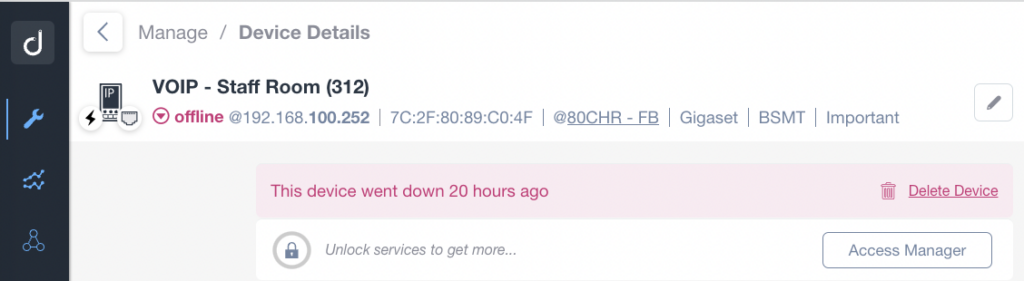
Device Details Interface for VOIP - Staff Room
1. The page displays the device details for "VOIP - Staff Room (312)".
2. The status shows the device is "offline" with the IP address 192.168.100.252 and the MAC address 7C:2F:80:89:C0:4F.
3. Additional details include location tags such as @80CHR - FB, Gigaset, BSMT, and marked as Important.
4. A notification states, "This device went down 20 hours ago."
5. Options include deleting the device by selecting "Delete Device."
6. Access to further options is available through the "Access Manager" button.
7. Navigation options are provided in the sidebar, including icons for dashboard, tools, statistics, and user management.
Thirdly, when navigating to device details, you’ll see the name of the device’s Agent/Site in the header area of the device itself.
Fourth, we have added a quick filter in the Devices tab to select all the Online devices with one single click:
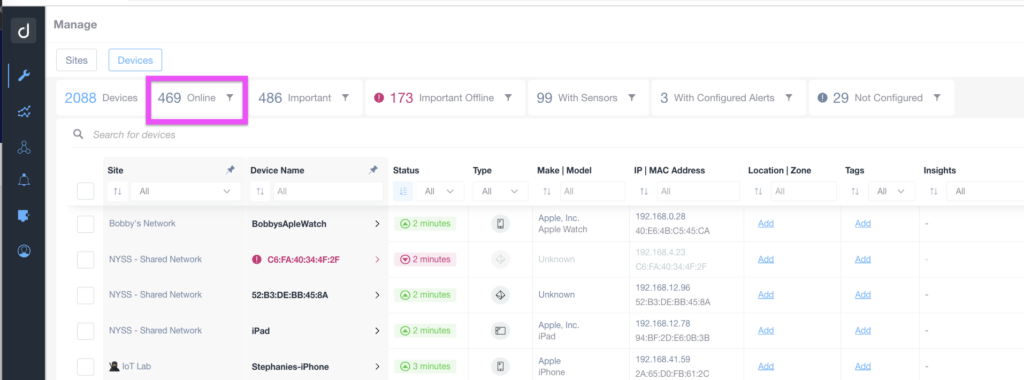
Device Management Dashboard Overview
1. Navigate to the "Devices" tab under the "Manage" section to view device information.
2. The dashboard displays a total of 2088 devices, highlighting 469 devices currently online.
3. Additional filters include 486 important devices, 173 important offline devices, 99 with sensors, 3 with configured alerts, and 29 not configured.
4. Use the search bar to find specific devices by name or attributes.
5. Device details are organized in a table with columns for Site, Device Name, Status, Type, Make/Model, IP/MAC Address, Location/Zone, Tags, and Insights.
6. Select filters or sort options at the top of each column to customize the view according to your needs.
Moreover, all the filters and sorting options are now saved at a browser level. In this way, users are now able to visit the Devices and Sites tab for the Manage and keep using a previously filtering and sorting options (without loosing any previously done work).
Lastly, in the Sites tab, for the Agents that are mapped with a customer/organization in the connected PSA/Ticketing System or Documentation System, the information about the specific customer/organization is reported directly in the Domotz App / WebApp:
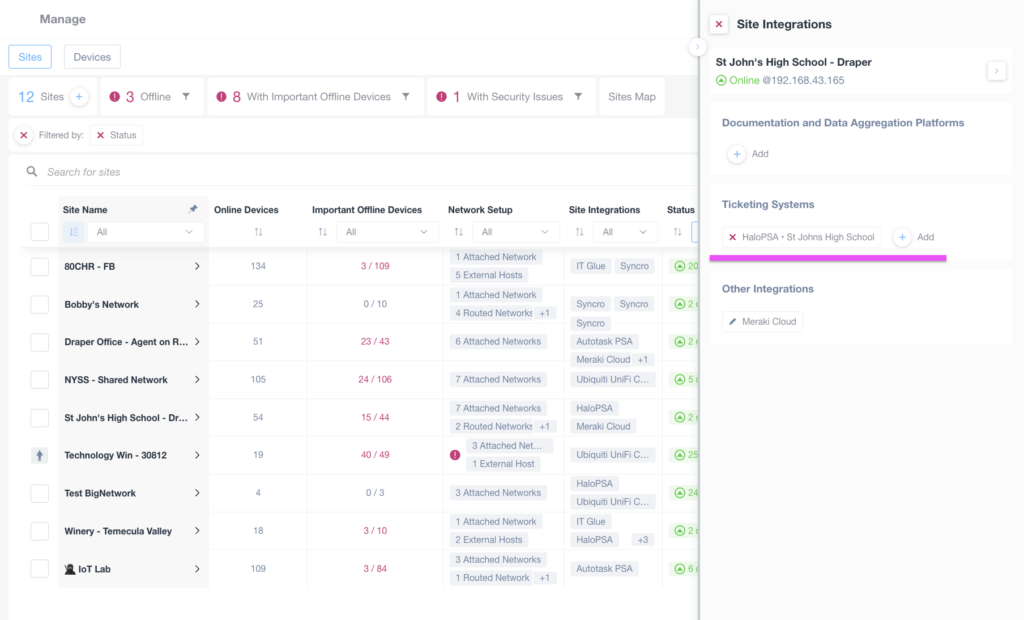
Site Management and Integration Interface
1. At the top, tabs allow switching between managing "Sites" and "Devices." The "Sites" tab is currently selected.
2. Filters for the site list show counts of sites, offline sites, those with important offline devices, and sites with security issues.
3. The site table includes columns for "Site Name," "Online Devices," "Important Offline Devices," "Network Setup," "Site Integrations," and "Status."
4. The row for "St John's High School - Draper" shows 54 online devices and 15 out of 44 important offline devices. Network setup includes routed networks and external networks.
5. The right panel, labeled "Site Integrations," details integrations for "St John's High School - Draper," indicating its online status.
6. The section "Ticketing Systems" lists "HaloPSA + St Johns High School" with an option to add integrations.
7. "Other Integrations" lists "Meraki Cloud" as an option.
Notification delivered through WebHooks now include additional details
We have enriched the information delivered through our WebHooks when events occur on networks you monitor with Domotz.
For each event at the Network level (Agent/Site), the webhook details now include the following information:
- Name of the Agent
- Status of the Agent
- Timezone
- Location
Moreover, for each event Device level, the webhook details now include the following information:
- Name of the device
- Status
- Vendor
- Type object (id, label, detected_id)
- IP Addresses
- MAC Address
- Importance
- Location
- Zone
- Model
Furthermore, the data is backward compatible meaning that previous information will now have the same format as detailed above.
This is an example, of the data our WebHook reports for a device HeartBeat lost notification:
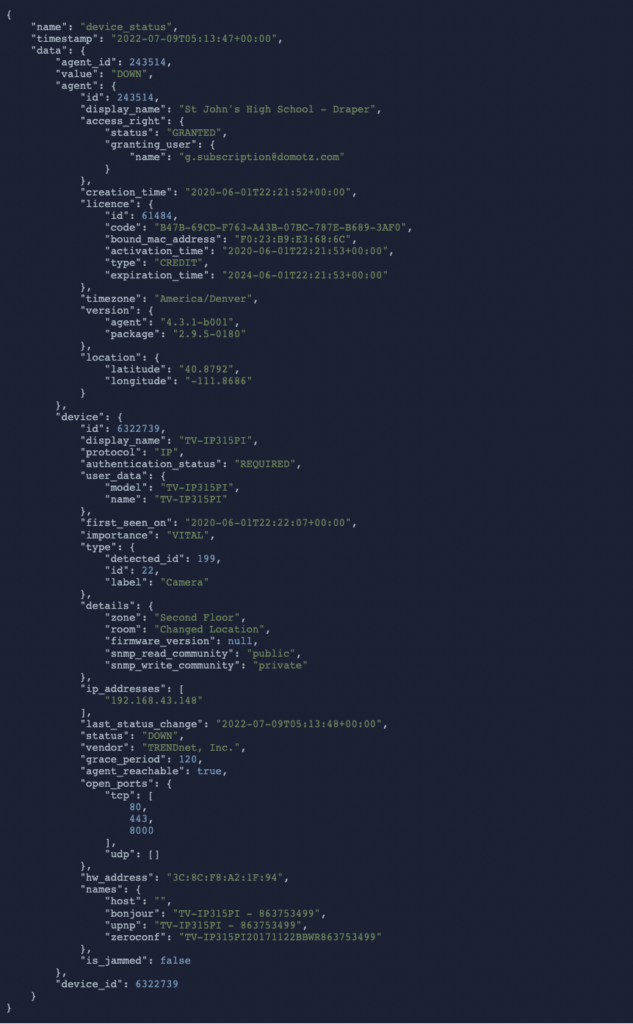
Device Status JSON Data Structure
1. The main object is titled "device_status" and has a timestamp of "2022-07-09T05:13:47+00:00".
2. Under "data", the "agent_id" is 243514 and its "value" is "DOWN". The agent's display name is "St John's High School - Draper" with access rights labeled as "GRANTED".
3. License details include an ID of 641844, a specific code, and a "bound_mac_address" of "F0:23:B9:E3:68:C5". The license type is "CREDIT" with an expiration time of "2024-06-01T22:21:53+00:00".
4. Timezone is America/Denver, and the software version is "4.3.1-boot" with a package version "2.9.5-0180".
5. Location has specified latitude "40.8792" and longitude "-111.8686".
6. The "device" section starts with ID 6322739, a name "TV-IP315PI", and a status "DOWN". The device vendor is "TRENDnet, Inc."
7. Importance is labeled "VITAL", and the first seen date is "2020-06-01T22:22:07+00:00".
8. Details indicate the device is in the "Second Floor" in a "Changed Location" room.
9. IP addresses listed as "192.168.43.148".
10. The last status change was noted with the same timestamp as the main object with open TCP ports "80, 443, 8000".
11. The MAC address is specified as "3C:8C:F8:A2:1F:94" with additional names under "bonjour" and "zeroconf".
12. The field "is_jammed" is set to false, and the overall "device_id" is 6322739.
For more information, refer to the Shared Alert and WebHooks user guide.
Acknowledge and dismiss the “Big Network” warning
When you configure a Domotz Agent on a network with an attached interface (NIC) that has a subnet larger than /22, you’ll get a warning message. Now you can acknowledge and dismiss the notification on the Domotz App and WebApp:
As a matter of fact, when the Domotz Agent is running with a standard plan, a single Domotz Agent is capable of scanning multiple network interfaces, but each one with a subnet as big as a /22 (up to 1,024 different IP addresses for each network interface).
Moreover, Domotz also now offers an Enterprise level Domotz Agent with the capability of “Big Network” scans, which allows the software to scan and monitor multiple network interfaces, each one with a /16 subnet mask (up to 65,536 different IP addresses for each network interface).
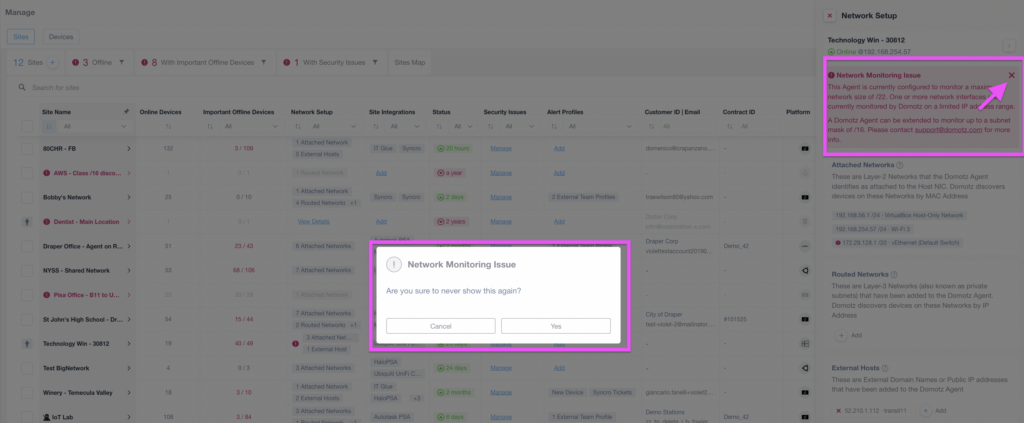
Network Monitoring Issue Resolution
1. A pop-up message labeled "Network Monitoring Issue" asks for confirmation: "Are you sure to never show this again?" with "Cancel" and "Yes" buttons.
2. On the right panel, a section explains the issue. It states the Agent is configured to monitor a maximum range and highlights if a monitored interface is out of this range. To extend monitoring, contact support at support@domotz.com.
3. Use this feature if you want to disable the warning or need to address the monitoring range through support.
Improved identification of devices on Routed Network
When you use Domotz to discover devices through the Routed Subnet capability (Routed Networks – see https://help.domotz.com/user-guide/automated-discovery-inventory/#3), the information Layer 2 delivers (e.g. MAC Address of the device) is not available.
However, as an alternative Domotz now uses and retrieves additional higher-level information (e.g. SNMP, UPnP, bonjour, etc) to further identify the device (to provide a Vendor, Name, Model, and Type).
Added support for Mikrotik PoE control
You can now control the PoE status of the ports on Mikrotik PoE devices (CRS models).
Additional MIBs available in the Domotz Database
Additional MIB files are available for the following devices. Additionally, you can search for their OiDs from Domotz:
- Cambium Networks
- Room Alert 3S Environment Monitor
Fix
We’ve fixed the following issues:
- An issue was preventing the loading of WebApp on the Safari browser.
- Desktop App was not allowing a change of resolution.
- Aruba OS – Configuration Management partially working on some configurations.
- Zendesk mapped customers were not reported in the Agent & Customer Configuration info tab.
- Ruckus integration was broken due to a change introduced in the latest Ruckus controller firmware.
- Agent migration across teams was breaking the Collaboration functionality (requiring Domotz Support to re-enable existing collaborations).
- Agent software was crashing if the default gateway was not identified.
- Synaccess PDU cycles wrong outlet/port ordering
- DHCP data were not collected on the networks from a previous version of the Domotz Agent.
Known limitations
- Firstly, monitoring Dashboards are currently limited to Monitoring Tables as Widgets. Furthermore, they do not report some variables (e.g. the ones created by the Custom Drivers) within the Monitoring Tables.
- Firstly, Luxul Router-based Agents do not support VPN on demand. To elaborate, we’ll add this capability as soon as Luxul’s team provides us with the required API resources.
- Devices with multiple network interfaces (multiple MAC addresses) can’t be merged into a single device. This affects some types of switches that appear as multiple instances on Domotz when VLANs are configured.
- The static IP address on the Domotz Box cannot be configured before configuring the Agent.
- HDCP cannot be leveraged on additional VLANs on the Domotz Box.
To conclude, these release notes cover the changes in the Domotz Pro service since the previous one. Furthermore, these changes include Domotz Pro cloud, Domotz Agent, and Domotz Pro App.
All in all, to learn more, check out our network monitoring software or check out our Know Your Networks Blog.